Indoor Tent Grow - FoxFarm Nutrients - Green House Seed's Trainwreck

WebbIndoor

Member
Short Personal History: As a veteran with PTSD I have become a patient of the Oregon Medical Marijuana Program and decided to grow my own medicine. Two years ago I harvested my first crop and have been passionate about growing cannabis ever since. Although I have been successful in harvesting quality plants every session, I enjoy making small changes each time and realize I have a long way to go before I can consider myself proficient.

Your Role: While most people enjoy positive reinforcement, I seek out harsh criticism combined with solid reasoning. Whether you are a new grower trying to understand how you might begin growing yourself or an experienced grower with some helpful tips and tricks, my goal is to be a resource for our collective community to learn and grow successfully. Please subscribe and follow along with me!

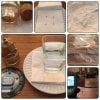
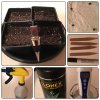
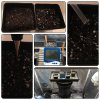
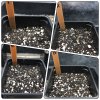
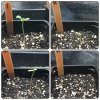
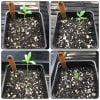
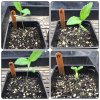
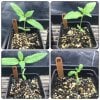
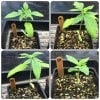
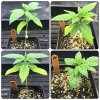
Introduction: On March 1st I planted four Trainwreck seeds purchased from Green House Seed Co. I have not previously grown Trainwreck and am looking forward to learning a bit more about growing sativa-dominant plants in an indoor tent. Throughout this grow journal I will post pictures of every process while describing it to the best of my ability.

As we go along you can expect to see my processes for germination, transplanting, vegetative and flowering growth periods before laying out my entire drying/curing process. If I am missing important information I hope experts will chime in while I will be around to answer questions as often as possible. Thank you so much for growing along with me!
 

WebbIndoor

Member
Yesterday I germinated all four Trainwreck seeds. Here are the items I used in the process:
  • 4 Trainwreck seeds
  • 4 Paper towels
  • 1 Plate or dish
  • 1 Plastic bag
  • 1 Glass of distilled or reverse osmosis (RO) water
  • 1 Small container lined with rough sandpaper
Preparation: First, simply collect all of the above items before moving forward. Remove seeds from their packaging and be careful not to damage them. Fold all four paper towels at the perforated edges and then fold it "hamburger" style one time. Cut a strip of sandpaper and insert it into a small container (matchboxes and dube tubes will work fine).

1) Take all four cannabis seeds and place them into a small container lined with sandpaper. Lightly swirl the seeds so that it they make constant contact with the sandpaper for roughly ten seconds (Click HERE to check out a YouTube video regarding seed scuffing).

2) After lightly scuffing the seed's outer layer, place each one onto the inside half of the folded paper towel.

3) Fold the paper towel on top of itself, completely covering all four seeds and slowly pour the entire glass of distilled water onto the napkin until drenched.

4) Take the wet paper towel between your hands and gently press out any water loosely trapped inside. You simply want the paper towel to be wet without dripping.

5) Place the wet paper towel into a clean plastic bag (I prefer freezer bags). Do not lock or completely close the bag as you want it to breathe, making it more difficult for mold and bacteria to take hold.

6) Find a spot to store the seeds while they germinate! I like to place them on my water heater as it is always dark and around 75 degrees Fahrenheit (dark, wet, and in the mid 70s is generally the key).

Yet to Come: Either today or tomorrow I will remove all four seeds from the paper towel and transplant them into a small nursery pot. At that time I will describe and show you my vegetative tent and grow space.IMG_1219.JPG
 

WebbIndoor

Member
24 hours after using the above germination process I have four viable seeds with tap roots ready to be planted! The medium I am using is a mixture of two parts FoxFarm Ocean Forest, one part FoxFarm Light Warrior, and some dolomite lime (brings the PH up just a bit). this soil drains well and has plenty of nutrients that keep the plants growing strong.

Preparation: Now that my wet paper towel full of viable seeds that have opened up and shown their tap root, I've collected the following items:
  • 4 Nursery pots filled with potting soil
  • 1 Spray Bottle
  • CloneX or another seed/clone specific nutrient
1) Added the minimum dosage of seedling nutrient to a spray bottle filled with distilled or RO water. (I use 1ml of CloneX solution and have had good results. Once out of CloneX I will likely be moving to seaweed extract or other natural supplements).

2) Sprayed the dry soil until it is moist. Water does not need to be dripping/flowing out the bottom of the nursery pot at this time. I will be spraying again, once the seeds have been planted, so I don't need to drench it...

3) Poked a small divot into the soil as a little "bed" for the seed. This divot is roughly just the height and width of the seed.

4) Using a straw, I pick up one seed with the root facing down and being careful not to damage anything (it's very vulnerable right now). When the root is lined up with the divot I lightly tap the straw to force the seed out and into her new bed.

5) I push just a pinch of dry dirt over the top of the seed and spray once again. This time I ensure that the seed is snug, surrounded by wet soil, and no part of the root is visible.
IMG_1230.JPG
Moving to Tent: Knowing that these seeds will soon turn into plants, I place them directly into a vegetative tent after transplanting. I keep them about 6 inches from the light, one fan blowing on the light, one fan blowing on the floor, and have a humidifier constantly running at half capacity. This allows me to keep the veg tent cool and at a high humidity while the flower tent (same room of the house) is unaffected. Here are the items I'm now using, but didn't mention:
Yet to Come: Over the next few days I expect all four seeds to sprout and shed their shell. As the seedlings grow I will make sure they stay about 6" from the light and will prop them up if needed. I'll post pictures as they grow.

In the top left of the following picture you will notice the left pot has dry soil while I have sprayed the one on the right to make it moist. I then poke a divot into the wet soil and gently place the seed into the divot, making sure the tap root faces down.
IMG_1231.JPG
 

WebbIndoor

Member
Looking good. Number four decided to curl on me and the tap root was trying to reach toward the sky. I got it turned around and believe it will come around. Number one should shed its shell soon and I imagine all of them will be sporting green in no time.image.jpeg
 

WebbIndoor

Member
Number 4 is still lagging. I don't expect her to ever show the growth the other three will, but I'm open to being proven wrong.image.jpeg
 

WebbIndoor

Member
As time goes on it's always fun to watch the process speed up! the strong three are really stretching out while poor number four is finally showing regular growth.
image.jpeg
 

WebbIndoor

Member
I did a test to see if my T5 lights were losing some of their spectrum by spinning them 1/4 circle each day. They always reached toward the back light, the one that even looked brightest to me. Although the lights are rated for 10-15k hours, I replaced them at around 8k hours of use. After 24 hours of using the new GE T5 bulbs, all of them are reaching directly up regardless of them being turned twice.image.jpeg
 

Attachments

WebbIndoor

Member
I'm starting to have issues with these seedlings that I've not experienced before. From the start I've seen slow growth and now I'm noticing more serious issues such as decoloration and leaf deformities.
  • Each canopy is about 10" from T5 lighting
  • Humidity is constant around 50% with a humidifier running
  • Temperature is about 75/70 day and night respectively
  • Water around 6.5ph is given with some runoff every two or three days depending on dryness.
I got these seeds roughly two years ago from a reputable dealer and believed they would be still viable. Does anyone have suggestions to help these plants or do you think my old seeds are going to develop weak plants no matter what?

Although I've never flushed a seedling, I will be doing that tonight. I have to ensure nutrients and PH are not the issue before I attempt anything else. image.jpeg
 

WebbIndoor

Member
New growth looks much better. Temp and humidity are consistent. I'm watering every three days right now at a PH of 6.5, allowing plenty of runoff.image.jpeg
 

WebbIndoor

Member
I attempted to delete this threat but it appears Rollitup does not allow that action. If this upsets you, please take it up with them as I will no longer be accessing this site. Sorry to bail on the two people following this thread, but I realized I'm not helping anyone and I should just focus on trying to become a better gardener myself before trying to help people that are learning themselves... Peace.
 

kindnug

Well-Known Member
move them to bigger pots with str8 ocean forest
they would've done better if you didn't mix the potting soils.
I've sprouted many beans in str8 FFOF, but I prefer their CocoLoco if you can get it.
 
Top