JigFresh's Grow #2 : Vertical Scrog - closet diy dwc - 650w - Headband + Casey Jones
- Thread starter jigfresh
- Start date

Hulk Nugs
Well-Known Member
Dam your so right man forgot about the PM, no reason to clone them.I'm not messing with clones... I would have to spend more money on equipment... and then I would have clones with nothing to do with. Plus all these plants are infected with Powdery Mildew (it's a disease) so any clone I cut would be infected also.
Thanks for the idea hulk.
BUT
What happend to your little veg setup ?? I thought you already had the lights and some pc fans.
Always trying to help man,
greenfirekilla420
Well-Known Member
I'd lollipop those soil plants like HN said. I wouldn't even want to waste time on popcorn nugs on those plants. Cola growing and thats it haha.


wonderblunder
Well-Known Member
Looks sick, subscribed. Never thought those screens would fill up like that.....
jigfresh
Well-Known Member
I got it at Michaels for like $7 each.So i have been looking back trying to find where you got, or what the glass is, your using for your lights and no luck.? also courious how your making the hash? (any links?)
The grow is lookin great man!
I can't seem to find a link to the whole breakdown.
Hash: Search "Gumby Hash" on youtube... that's what I do.
Ice, bucket, strainer, drill w/ agitator, hoses, wax paper, a bowl, a muffin/ computer fan helps, and time.
jigfresh
Well-Known Member
Full constuction description (with tons of pics)
Alright, tronica, everyone, I'm finally 100% complete. This light is bad ass. 680w of dual spectrum greatness. I am using two separate ballast kits I bought from plantlightinghydroponics.com. I have a 430w hps ( $64.90 ) and a 250w mh ( $49.90 ). I needed to buy extension cords to plug them in, and also some extension #14 stranded wire to reach the sockets. And even with all the shady wiring I've done, I've only shocked myself once. Here's how I made mine.
Materials:
24"x36" Sheet Metal - Lowe's - $8
(2) 18" Strong Ties (thin) - Lowe's - $2
(2) 6" Strong Ties (thick) - Lowe's - $4
(2) Hurricane glass' - Michael's - $12
High heat white spray paint - Home Depot - $5
(8 ft) Chain - Home Depot - $4
(6) S-Hooks - Lowe's - $3
Nuts, bolts, threaded eyelets, washers all were from my junk drawer.
4" semi rigid ducting - My leftover drawer.
4" flexible ducting - Lowe's - (25') $18
(2) 4" rigid 90 deg ducting - Lowe's - $6.30
Duct Tape - Ace - $3
Galvanized steel wire - Home Depot - around $3
The total I figure I spent on it was ~$60. (i know if you add up the costs it's more than that, but I used some of the left over materials for other stuff)
All told with ballasts, bulbs, materials, tax, shipping I think it cost me around $260. Personally I think that is pretty good for basically 2 complete light setups with a custom enclosure.
Tools: (just a suggestion, you can use whatever you want)
1 big piece of wood with sharp clean 90 edges.
Gas Mask/ Ventilator (wear to spray paint, save your lungs for the pot)
48" ruler (at least 36")
2" pvc pipe (to bend the middle bend)
vice or clamp
big ass hammer (sledge if you are man, haha)
drill (some bits help too)
big roll of something like fencing or small tree trunk - anything cylindrical (to roll the curves out on)
sheet metal shears
Procedure:
The biggest problem I had with the whole thing was getting my sheet metal to come out right. There were two major parts to the sheet metal, the creases and the bends.
The creases I started by laying a big board on top of the flat sheet and trying to crease it by bending the edges up. This worked to get my creases started, but they were maybe 45 degree angles, not a very 'clean' crease.
To make the creases nice and strong I picked the board up and bent the creases with my hands over the edge of the board. This worked well.
To make the bends I tried many things, you guys really should have seen me. Just by pulling at it, I bent it a little, then what did the trick was wrapping it around my hardware cloth roll. And I just bent and rolled it as much as I possibly could, and it came out as you see it. At the most curled under pressure (while I was bending it) it more than overlapped itself.
For my design I had to cut holes in the reflector for venting to pass through. The reflector is pretty much exactly the size of my closet, and the venting had to get to the bulbs somehow. I just used sheet metal shears and cut the oblong hole you see, for the 90 degree rigid ducting to fit in.
I used the 18 thin straps on the underside of the reflector. This strap is what the bolts that connect to the chain go through and also what the heavy strap bolts to. They are also for structural support.
I bent the heavy straps to 90 degrees using a clamp (2 actually) and a sledge hammer.
I then painted the straps and reflector with high temp spray paint, flat white. I could have probably gotten normal spray paint, but why risk anything, especially for $1 difference.
I bolted everything together using pretty small machine bolts with locking washers. I used 2 to connect each heavy strap to the thin strap/ reflector. I used 2 machine threaded eyelets with locking washers for each thin strap to hold the thing up. And I used one extra screw to bolt the thin strap to the reflector. So for each side there are 5 bolts holding the straps to the reflector (3 bolts, 2 eyelet bolts).
The glass is connected using the Galvanized Steel wire. I just wrapped it around each end of the glass and stuck it through a hole I drilled, then made a loop to hold it in place. Simple. Also most of the rigidity of the glass comes from taping it to the ducting.
The 90 degree rigid ducting is just taped in place, the 180 degree semi rigid ducting as well just taped in place. I have the flexible ducting leading from the fan to the light and from the light out the roof.
The sockets are bolted twice each to the thick straps. I drilled two little holes for the socket wires to pass through the reflector. The wires leave the socket and goes in between the glass and the ducting (i just tape around them).
The bulbs I situated so that the first thing the fresh wind hits is the tip of the first bulb, blowing over the bulb, then the socket, making the 180 turn hitting the next bulb tip, then blowing over the bulb and out the other end.
My original plan was that the wind would always hit the 430w first, but I decided I would rotate bulbs to make the plants happy.
One tip a newbie will need when ordering bulbs. For best results use ED18 or T15 shaped bulbs, they are the skinny ones. Most others won't fit at all.
Results:
I have a 430w HPS and a 250w MH going. I have a 435 cfm inline fan (6" fan being forced to run through 4" ducts). With the fan collecting cool air (around 65 F) from the bedroom, the lights stay very cool (considering).
It is not that the 430w gets hotter than the 250w, but rather whichever is second in line for cooling is much hotter (duh). Even so, I can hold my hand on the first tube, and I can momentarily touch the second tube (it's kinda hot).
That heat dissipate quickly though as my plant tips have been at most 6" from the lowest glass for a week with both lights, no heat stress whatsoever. I'm more worried about light bleaching, but nothing yet.
Temps in the room stay around 80, but I do have a thermostat. However the room exhaust doesn't go off all the time, so the temps stay low.
If you have any questions I don't think Tronica would mind you asking. Not only did he give us this great idea, but he is gracious with his thread too.
If you haven't already give Tronica a +rep (you click on the scales on the top right of one of his posts)
DST
Well-Known Member
Hi Jig, I would have quoted you but that was quite a large post up there....anyway, this new web server is not liking my browser, everything goes to plain text and the screens look "pants on head"!!!I managed to get a cool tube after much searching for cheap alternatives (we don't have a michaels  ( However my local grow shop is selling cool tube for like 25 euros so I was stoked!! Your hedge is coming along beautifully!Peace DST
( However my local grow shop is selling cool tube for like 25 euros so I was stoked!! Your hedge is coming along beautifully!Peace DSTjigfresh
Well-Known Member
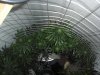
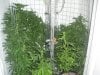
I'm not exactly happy with the use of the light thats going on. I want to raise the plants to get the bright light on all plant... (instead of a lot of wall). But if I raise the plant, then the tops of all the branches would be above the light, and those seem to be like they will be the biggest producers of the plant... so I want them in the good light. That means lighting a lot of wall becuase of the shape of the plants. This is a major reason why this exact way of growing isn't the best. Next time I will have more plants that will fill in the gaps... and there will be less veg time.You should just set the plants up a little higher so the lower buds get more light. It should give you some nice equally thick buds throughout the whole plant...
Thanks for the kind words.
Thanks a lot tahoe... my plants love all the good vibes.This is WAY over the Coolest of Kewl Bar ... hahaha! Excellent work man ...
You too Dr. G. The plants love you man. They are always asking when Tahoe and Dr. G are going to come by. They also ask about your horses and dogs (respectively).
That was in my living room... and that wasn't making the household happy, so all growing is done in the closet. I could try to set up a veg area above everything, but I'm not too worried about flipping plants that fast yet. I think when I am, I'll set things up propper in it's own space.What happend to your little veg setup ?? I thought you already had the lights and some pc fans.
*idea* In fact that may be one of my next projects.
Fucking Awesome hulk. Seriously, you are like my subconsious or something. You know what I'm thinking, when I don't, haha.... I don't even know what I mean, but you give me the best ideas.

Alright GFK... when exactly do I lollipop them. I was not really wanting to do this... However, with the new configuration and becuase the big girls are spreading out... I don't really have room for the soil plants to spread out.I'd lollipop those soil plants like HN said. I wouldn't even want to waste time on popcorn nugs on those plants. Cola growing and thats it haha.
So a strait up stick cola plant is sounding appealing right now. It's sad because the side lighting would get those side branches nice.... but they would shade the big girls and they are going to pump out so much more bud than the soils, I don't want to shade them at all.
So when do I do this. It's been 2 weeks and a couple days since 12/12. It's been about a week since they started spitting up pistils.
Thanks bro. You are on vertical green too right? If it isn't you there is another wonderblunder.Looks sick, subscribed. Never thought those screens would fill up like that.....
Thanks a lot my friend. I fucking love the avatar. That chick behind him is so about to get slapped.looks amazing man +rep
can't wait for harvest and smoke report
I always ask myself this question... was it Billy Dee, or the Colt 45 that were the heart of his problems?
Right on DST... glad you could get the setup going even better. One day I'll get an actual cool tube deal... they have long ones for grows like mine... they are just expensive. 25euros doesn't sound too bad for one like you got.I managed to get a cool tube after much searching for cheap alternatives (we don't have a michaels
jigfresh
Well-Known Member
Alright, I know I'm not like everyone, but I start counting flowering when the budsites start looking like little flowers. So, I started counting on 11/05. That makes today day 12. If you like counting from 12/12... just add 7 days. There was a week between when I turned out the light for 36 hours and when I start counting.
I'm expecting these girls to take 9.5 and 10.5 weeks respectively. That makes harvest around Jan 10. Looks like I'll be having a busy January.
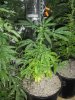
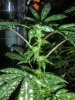
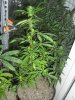
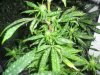
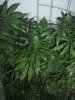
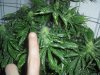
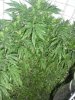
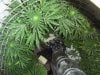
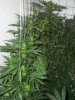
Ok, I used my wifes camera, so the pics look different. You can really see the sulphur powder... don't worry, it's a good thing, sorta.
I think it was too dark, so the close up's aren't the best. I'm really happy with how fat the nugs are getting already. And there are so many of them.
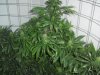
It definitely looks like I didn't do that well with the 'middle' of the plant... the vast inside part looks like it will produce some smaller buds, but no complaining... just something to do better next time.
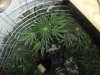
Hope you guys enjoy. I took the overhead shots for whomever it was that said they liked those.
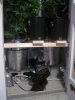
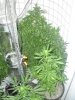
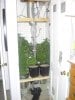
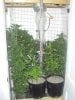
I forgot to mention the constuction I did. I made little platforms for the soil plants, so I could open up the floor space, get better air circulation, get the soil plants in better light, and also make me able to put more fans in the closet... I'm anticipating fat dense nugs all packed together... and mold is not an option.
I'm expecting these girls to take 9.5 and 10.5 weeks respectively. That makes harvest around Jan 10. Looks like I'll be having a busy January.
Ok, I used my wifes camera, so the pics look different. You can really see the sulphur powder... don't worry, it's a good thing, sorta.
I think it was too dark, so the close up's aren't the best. I'm really happy with how fat the nugs are getting already. And there are so many of them.
It definitely looks like I didn't do that well with the 'middle' of the plant... the vast inside part looks like it will produce some smaller buds, but no complaining... just something to do better next time.
Hope you guys enjoy. I took the overhead shots for whomever it was that said they liked those.
I forgot to mention the constuction I did. I made little platforms for the soil plants, so I could open up the floor space, get better air circulation, get the soil plants in better light, and also make me able to put more fans in the closet... I'm anticipating fat dense nugs all packed together... and mold is not an option.
Attachments
-
 44.1 KB Views: 132
 -
 86.4 KB Views: 107
 -
 81.4 KB Views: 113
 -
 80.6 KB Views: 103
 -
 104 KB Views: 98
 -
 95 KB Views: 82
 -
 81.9 KB Views: 109
 -
 71.9 KB Views: 122
 -
 67.1 KB Views: 95
 -
 66.6 KB Views: 92
 -
 93.2 KB Views: 85
 -
 82.4 KB Views: 87
 -
 74.1 KB Views: 86
 -
 89 KB Views: 102
 -
 74.3 KB Views: 807
 -
 59.5 KB Views: 97
 -
 80.5 KB Views: 193
 -
 107.2 KB Views: 137
Hulk Nugs
Well-Known Member
 very nice!!!!!!!
Plants are all looking really healthy, it looks like your put chirstmass twinkler lights on them.
This harvest is going to be remebered for a very long time would be hard to forget the first wall of green nugs, glad i got to join you on the grow , looking forward to see what you pull of Vert setup.
Projects can be alot of fun. Keep us update as i know you will. OH yea dont forget about the green house you said your going to build before spring going to need some clones/plants for that


Fred Flintstoner
Active Member
Here's to your 100% success on preventing bud rot Jig, I know its going to happen ")
I plan on following your fight to the finish and to learn from your experience. It has read 20% or LO (as in wont read any lower) on my digital hygrometer for the past 3 months so I have no idea what this sort of thing is like, but it will be interesting to watch!
Thanks for stopping by my grow btw bro!
Your plants are looking sick
Iamtreehigh
Well-Known Member
What if you put that floro light bank that you had the purple kush clones under at the bottom of the plants somehow? I've read that floro's will make it nice and frosty and it will still be hit by the hps... unless mounting that extra bulb is an option. Or even a few CFL's might help just to get the light down there.
#1Raiderfan420
Well-Known Member
Lookin good Man! So what's up with the sulfur?
jigfresh
Well-Known Member
Raiderfan, Kevin... the sulphur powder is to treat the Powdery Mildew the plants have. I did it to them with my laziness. Anyways, the sulphur powder changes the pH of the surface of the leaf, making it impossible for mildew to live.hey jig, what was the sulfer for? looks like some mighty fine work you've done.
The real test will be at the end. I have to stop using it 2-4 weeks before harvest depending on who you beleive. In that time, the Mildew could show back up and ruin the crop...
IT"S GONNA BE TENSE.
By the way kevin... it's great to see you on here. This video is for you:
[youtube]5hKi_Rp8Fn8[/youtube]
Fred Flintstoner
Active Member
Yay dual lights!!!!!!!!!!!!!!!!!!!!!!!!!!!!!!!!!!!!!!!!!