thanks drifter i'm hoping for the best
>>
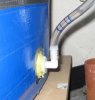
i've moved the can into its final resting place. if all goes well i won't even have to move it at all once i get this bench thing constructed.
View attachment 592838
my reservoir (i thought that word looked funny yesterday and realized that i had been spelling it wrong) has given me grief the last week. first it cracked when i tried drilling a hole it. i got this patched up using epoxy. then i kept on having to mess with the res after i had put it under the can, which is no easy task alone. the two drains under the can have tubing that has to be directed into holes cut into the top of the res. haha all of that while holding the can up with my other hand...
i thought that i was done and finished with dealing with the res but then when the watering cycle turned on i noticed the sound of dripping....which i shouldn't be hearing. it turns out that one the drains i'm using isn't watertight anymore (i'm not sure what changed to cause this). it was dripping onto the lid of the res and from there onto the floor. at this point i was tired of dealing with the epoxy so i made a funnel from a gallon container for the water to drip into. that funnel is the best part of the whole system i think

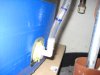
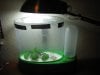
here's an update on the external water level indicator. hahaha that name still makes me laugh.... here it is
View attachment 592839
View attachment 592840
i like this thing a lot. it makes testing my water a breeze now that i don't have to mess with the can anymore...
i added one 6500K cfl just because i have it and it certainly won't hurt
View attachment 592864
i've decided to top and revert to veg to let it grow a bit. i'm scared shitless of doing this but the only way i learn is through experience. lastnight, after topping, i switched from 12/12 to 21/3 ( i hope this was okay) and also yesterday i dumped out the res and filled it with veg formula (recommended is 15-10-5 but i did more like 12-8-4)
the reason that i decided to top is because i figured i didn't have anything to lose. this plant was always a little behind its sisters. so i figured i'd try this and see how it goes. if it doesn't work then i'll throw an indica seedling in there.
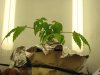
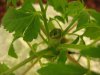
here is a couple of photos for reference. these seeds are from the same batch and sprouted on the same day.
here's mine in the can
View attachment 592875
here's another the same exact age and genetics
View attachment 592876
i'm sure you can see the differences. this huge difference in vegetative growth disappointed me.
i read the whole thread on uncle ben's technique (saw you there nikk) and it seems like a legitimate thing to do. and i figure that my plant isn't looking as good as her sisters so i'll try this.
the plant in the can was in the process of developing the seventh leaf set. so, per instructions from uncle ben, i made my incision above the second true node.
BEFORE
View attachment 592875
AFTER
View attachment 592867
i know it looks gruesome to see that much taken off but i believe that there will be a bounce back.
View attachment 592866
View attachment 592865
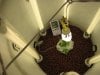
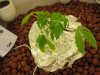
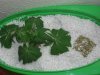
the top that i cut off i attempted to prepare to clone. i stripped of the leaf set above the cut, made some scratches on the stem (supposedly encourages root development), dipped it in water then a moistened rockwool. i also cut some of the bigger fan leaves back a little bit ( i later learned that this was probably not the thing to do.... oh well). the cutting was placed in this little hydro dome that i bought for fifteen bucks at a local shop, underneath a cfl.
View attachment 592904
View attachment 592905
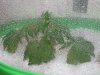
here is the cutting next to the indica seed that i've waiting to sprout. i figure if the plant dies i'll plant the clone. if the clone dies i'll plant the seedling. if the seedling doesn't sprout then i'm fucked and i'll just go hide in my hole...
View attachment 592906
i'm trying to mainain a high relative humidity by spraying the cutting often and ensuring that the dome is saturated as well. there is so much information on cloning that is incorrect. its difficult to decide if the information you gather is worth listening to. can anyone give me some pointers for next time? i don't have the gel all that i really have is this dome...
also... how do you guys germinate and sprout your little ones? i'm interested in hearing the different methods that people have for doing this. i've done the paper towel method and the "just stick them in a glass of water" method. i'm thinking about just sticking the seeds into the rockwool and waiting next time.
watering frequency for my cutting and the little seedling that hasn't sprouted? suggestions?
should the nutrient and watering regimen for the plant that was topped stay the same? i haven't changed it at all.
this one's for you nikk
View attachment 592903
my bro got that for me when he went to cuba a couple years back.
let me know what's up!