Sannies Jack and Shackzilla - organic grow.

Bigby

Well-Known Member
I'm just about to switch the Jacks and Shacks into the tent. They will get 400w of Metal Halide HID for about 8 days before I switch them to 12/12. I will keep the MH light in for the first 2 weeks of 12/12, along with adding a red 125W CFL. After that I will switch to a 600w HPS for the remainder of flowering.

It would appear that the Shackzillas are normal or maybe heavy feeders, with the Jacks being light feeders. Both Shacks are just starting to show lightening of colour, they will get 'Grow' at 2ml per litre from next watering. One of the Jacks has slight burning on the leaf tips, the other is looking healthy green, they will get plain water with 'Alg A Mic' for the next watering - I will gauge when they need nutes before adding them at low doses first. This sensitivity may go some way to explaining the mutant seedling Jack.
 

Bigby

Well-Known Member
Took some pictures today prior to doing the second lst training tie downs. One of the Jacks didn't need feeding, so she will be photographed tomorrow. The training went well, with one of the Shackzilla being developed enough for one of the side branches to be tide down as well as the main top. The first of the Jacks now has a crazy trunk angle, it almost doubles back on itself. I'll take some pictures tomorrow when they've had 24 hours to turn back towards the light.

Jack 1
Jack1.jpgJack1 above.jpg

Shackzilla 1
Shack 1.jpgShack 1 (2).jpgShack 1 above.jpg

Shackzilla 2
Shack 2.jpgShack 2 (2).jpgShack 2 above.jpg

Some very slight yellowing, so they have been started on 'Bio Bizz Grow' at 1ml per litre.
 

Bigby

Well-Known Member
Thanks dude. Some serious yield potential from these Shackzillas - one of them has started stinking lovely too already. Very excited.
 

Bigby

Well-Known Member
Thanks man. I love the way the SSH expresses itself in the Sugar Punch I've just grown. Very excited about possibly seeing a more sativa expression with the Shack. :-)
 

althor

Well-Known Member
I have a few grams in a jar curing up from my buddies grow. There is no mistaking it when I burp my jars. It has the sweetist, candy like smell coming out. It is starting to turn into a sweet tart smell, at first it was a bubblegum lipgloss smell.
 

Bigby

Well-Known Member
Nice! The sweetness sounds just like what I like.

Got some pictures from today. Some close ups of the training plus a couple of shots of the tent. The girls I trained last night have responded amazingly. I trained the second Jack today. I think if they still all look good on Sunday I will flip them to 12/12.

Training 1.jpgtraining 2.jpgtraining 3.jpgtraining 4.jpgTent 1.jpgTent 2.jpgenvironment.jpg
 

Bigby

Well-Known Member
The girls are all looking really good. Flipped them to 12/12 today. That was 6 weeks from seed. Will sort some pictures next time I feed them.
 

Bigby

Well-Known Member
Some pictures of both the Shackzillas on day 6 of 12/12. Both highly vigorous and stretching strongly. I upped the doses of all the nutes today - 25ml 'Grow' 15ml 'Bloom' 10ml 'Cal/Mag' 15ml 'Alg A Mic' in 10 litres of water put through both pots. Both have shown sex on the original main stems, and a couple of the 'side' branches (which are now as tall if not taller than the original top).


Shack 1
Shack 1.jpgshack 1 (2).jpgShack 1 (3).jpgShack 1 (4).jpg


Shack 2
Shack 2.jpgShack 2 (2).jpgShack 2 (3).jpgShack 2 (4).jpgShack 2 (5).jpg


The two Jacks are not as vigorous. Still healthy though. Pictures of them tomorrow when they get fed.
 

glockdoc

Well-Known Member
straight up bushes they will be!!! i know u probably touched upon the subject on ur other thread but can u walk us thru your topping and training techniques?!?! do u train them seedling young or top super early?!? whats the secret...?!!
 

Bigby

Well-Known Member
Been a bit slack updating, had a nasty cold this week. These pics of the Jacks were taken the day after the previous pictures of the Shacks - day 7 of 12/12. The Jacks are noticeably less vigorous - I guess will yield less - but still perfectly healthy. The Jacks got 20ml 'Grow' 15ml 'Bloom' 10ml 'Cal/Mag' and 15ml 'Alg A Mic' in 10 litre of water. Will see how they cope with that and up the dose if they cope fine.


Jack 1
Jack 1.jpgJack 1 (2).jpgJack 1 (3).jpgJack 1 (4).jpg


Jack 2
Jack 2.jpgJack 2 (2).jpgJack 2 (3).jpgJack 2 (4).jpg
 

Bigby

Well-Known Member
straight up bushes they will be!!! i know u probably touched upon the subject on ur other thread but can u walk us thru your topping and training techniques?!?! do u train them seedling young or top super early?!? whats the secret...?!!
Hey dude, thank for the interest. I have a picture of the flower tent from day 7 12/12, which I will pop in the next post along with an explanation on my thoughts on training. I think they will work well together. :-)
 

Bigby

Well-Known Member
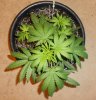
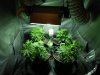
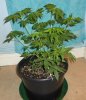
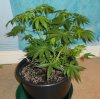
Here's a picture of the flower tent from day 7 of 12/12.

Tent.jpg

It shows what I am trying to do with my lst training - and have pretty much achieved. My flower space is square - a floor space of 120cmx120cm (3ft11x3ft11). In that I fit a desk fan at one end, and a dehumidifier in between the plants. What I wanted to do was create an even canopy that took up the whole area. I did my first training last grow, partly due to 100% germination and not wanting to lose any plants. This gave me a chance to try multiple tie downs over a 14 week veg period. Along with this I got to train a kolossus which vegged for 7 weeks. It was the kolossus which informed my plan, with the 14 week veg girls giving me the confidence to apply it, both then and on this grow.

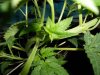
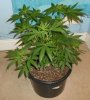
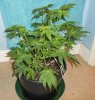
So, the details. What I do is to make a hole on one side of the pot - the opposite side I want to train (the decision on which side to bend down is based on a gut feeling, test the plant, see which way she's happier bending...and then bend her the opposite way, gently and slowly.) Before doing the actual training, tie string through the hole you have made, go around the base of the plants stem and then tie this off fairly tightly (but without cutting the plant - I find thicker string is better than thin chord). This acts as support for the plant when you begin to bend her top to the opposite side of the pot.

This is step two. Make a hole pretty much opposite the first hole, this will be the training tie down hole. Make this hole in the best place in order to pull down the top, bearing in mind that it must get lower than rest of the plant eventually. This means that on some strains you need to put the hole slightly to one side or the other to avoid fan leaves and side branches when the top is lowered. Don't be afraid to change your mind if once you get the top down under the string you find the hole is in a bad place - carefully pop the string off and the plant top back up and make a new hole in the perfect place you will now know. The whole time take things slow and gently, carefully move the leaves and branches as they come in contact with the string.

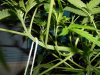
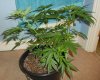
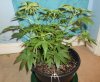
On the first tie down it can be possible to get the top below the rest of the plant. On others it must be a second tie down that achieves this. What you must do is get some string through the hole, and this time carefully work it around the top of the plant - either the first or the second node, the tightness of them informs my decision - back around the other side and down to the base of the pot. It is here that I tie the two ends of the string, which draws the top down. Be careful to do this slowly, as when the top lowers leaves and branches will need to be moved through the string in order to make room for the lowered top. You also need to keep checking the top to make sure the string does not cut into the stem - gently lowering the stem with your hand relieves pressure from string. Tie the string off in a bow at a point you feel comfortable with - do not force it lower than it will go.

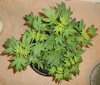
The Shacks were turning back to the light almost instantly. The Jacks far more slowly. One of the Jacks has even got an original main top that is inches below the new main tops. After a few days it is possible to tie the original tie down again, making it lower - easily below the rest of the plant on every plant I have tried it on so far. 6 weeks veg gives me the chance to do one further tie down, which is to a new hole further along the pot from the one used for the first tie down.

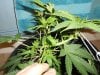
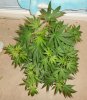
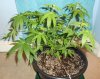
The way the plants react and develop side branches on one side of the main trunk works perfectly for a square grow space. They all reach in towards the centre of the tent and light. You get multiple tops, an even canopy, and minimal stress.

I just added a red CFL. But the main light is still the 400W Metal Halide. This will be used for the first 14 days of 12/12 to aid with veg growth during stretch.
 

glockdoc

Well-Known Member
great insight bro. not only will this help me bush out a plant or 2; but also many others! i did some lst work but it was during the 1st weeks of preflowering. check out my thread bigby! not much action ill have an update today or tomorrow but could use ur smarts and insights
 

Bigby

Well-Known Member
great insight bro. not only will this help me bush out a plant or 2; but also many others! i did some lst work but it was during the 1st weeks of preflowering. check out my thread bigby! not much action ill have an update today or tomorrow but could use ur smarts and insights
Nice one. I'll pop in and say hi some time later today. :-)
 

Bigby

Well-Known Member
Another little technique I use is to attach weights to the end of pipe cleaners, and use these to weigh down tops. One of the Shacks had a stretchy side branch that was stretching higher than all the others, straight up too which is no use. I therefore bent it down, attached the pipe cleaner with a little battery as the weight, and lowered the branch into the space in the centre of the tent. After 24 hours it had adapted to the weight and had bent back to the light. The difference now being that the branch is horizontal, with multiple bud sites all receiving extra light - plus I've fully optimised my space. All for minimal expense and 2 mins of my time.

Pipe cleaner training#.jpg
 
Top