Newby LED Micro Grow, W/3-HSS PF-1600's

Hi there, I'm Mr Green Scene but you-all can call me "G". I will be reporting on my rate of sucess growing in a micro-enviroment with LED panels.

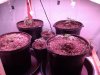
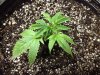
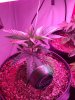
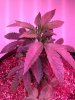
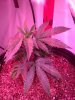
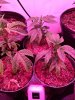
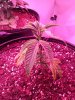
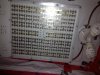
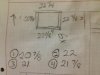
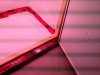
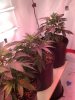
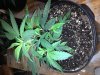
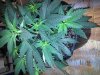
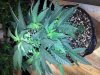
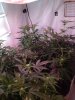
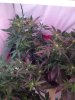
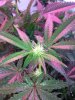
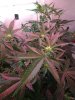
The panels I've obtained are 3x Haight Solid State PF-1600 grow LED's, in an enclosure I built that is 3x6x7. This considerably exceeds the manufacturers specification density of 4x4 per panel. I got a great deal on these panels, so I would like to give them a try this way, because they have gotten a bad rap so far.
16.jpg

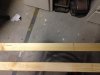
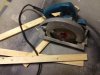
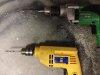
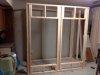
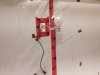
I started by framing a rear wall;
17.jpg13.jpg

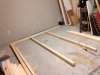
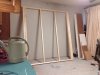
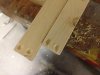
Then the side walls;
15.jpg

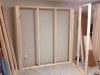
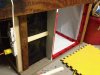
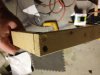
The front took a bit longer, framing up the openings for the doors;
12.jpg

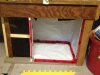
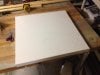
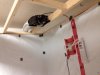
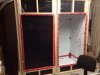
Next I added a plywood panel for power, and hung the 700CFM bathroom fan I am using for venting;
09.jpg10.jpg

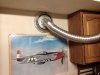
A panel to carry the one-way louvered intake vent was installed, and the exhast fan plumbed into a nearby de-commisioned chimney.

11.jpg05.jpg

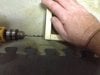
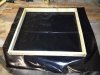
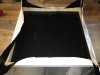
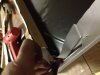
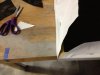
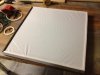
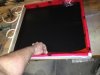
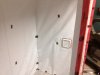
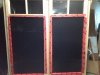
At this point the entire enclosure was lined with Panda film. All seams were sealed with Tuck tape, duct tape was used to strengthen the staple locations;
06.jpg07.jpg08.jpg

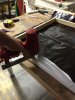
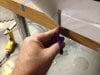
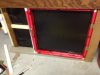
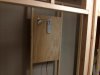
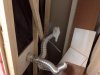
The doors were glued and scewed together using finger jointed .5x1 stock, with Panda film stapled and taped to the wood frames. Cabinet Hinges were used to hang them, and weather stripping to create a seal;
02.jpg03.jpg

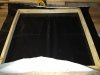
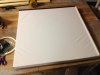
More.5x1 stock was screwed to the inside flange of the rough opening, providing a gasket type seal with the weather stripping on the door. The exhaust fan being plumbed with 4" vent tubing, and the intake vent being plumbed with three inch, creates a negative preasure enviroment inside the enclosure when the fan is running. When it is not runnig, the enclosure is absolutely sealed so none of the smell escapes. Not in this picture the taunt Panda film, with the enclosure under preasure;
01.jpg

So please stick with me if your at all curious about the ability of the LED lights. As I've mentioned I'm pretty green at this with most of my experience 25 years old and currently irrelevant. I have already been helped by some great people here such as; Fried Rice, Thundercat, and more. I will definately be relying heavily on many of you who have more experience, so please don't heasitate to add your two cents to this thread..........I have big shoulders

Thanks again...................................."G".
 

NightOwlBono

Well-Known Member
Looking forward to seeing what these can do.
but only two spectrums of red and one spectrum of white,it seems like they need to add some blue in there,and maybe a third spectrum of red.
what are the LEDs mounted too?aluminium that cheep stuff?

also they don't have a fan built in?all those LEDs are running around 5.3w each(330 divided by 63)
i know that's not 100% accurate but either way those LEDs will be running pretty warm

im subbed to see what these panels yield good luck.
 

puffenuff

Well-Known Member
Nice build! Not a fan of hss leds, but if you got a deal on them I guess they are worth a try. Good luck, im subbed!
 

Chronikool

Well-Known Member
Hey G spot....nice enclosure....! :)

What re you going to be running? Soil? Strains? Nutes?

I'll be fat...and by fat... i mean a'round'.....(dont worry my humour getz worse.... :) )
 
Alright then, here we go!!!!!!!!!!!

So, I scored 10 Purple Kush clones, and have no information regarding thier heritage! First pic from last week here;
clones.jpg

Eight of them went in to the enclosure, and 2 were withheld to grow as mothers. One is looking like it wants to die, and the remaining, seven have made an advance in the week since potting. They are in a mix of special secret soil from the local grow shop, and sunshine mix#4, 50/50. The grow shop tells me that they can go weeks without ammending with fertilizer, and I am still researching and awaiting recomendations from people I've been talking to on this forum on excactly how to fertilize these. These pics were taken today;
View attachment 2492232IMG_0130.jpgView attachment 2492241IMG_0129.jpgIMG_0128.jpgIMG_0126.jpgView attachment 2492234

So I have been shooting for 18/6 but realized today my timer programing was screwed up. Not really sure what it was doing!

The panels were temp.'ed today with a laser temp. gun. Top of the heat sink was 97.7F, lens was 84.4F. I have been maintaining 80F in the room with 38% humidity.
 
Right-on!................time for a weekly update here.
So, at the beginning of this project my significant other and myself had a healthy discussion of perceived grow methodologies. She is a"Master Gardener", by the way.

So she was amused that I intended to plant the tiny clones in a 4 gallon pot right off the bat, and said that the right way to do it would be in a series of larger and larger pots, to keep the root density up through the growth stage. I had read here, on the other hand that the best way is to plant in as large of a pot as possible right away, as transplanting through the growth stage could stunt the plants.

Not being an expert, and wanting to experiment, I did both.Three were planted in the 4 gallon pots right away, three were planted in6" pots, and one was planted in a 4" pot. Oh, also one obviously hurtin" clone was potted in the fourth 4 gallon but its condition appeared grave.
Flash forward two weeks and wholly shit, the 4 gallon pots are outperforming the rest almost 2 to1. What progress in just two weeks as seen below;
IMG_0138.jpg
IMG_0140.jpgIMG_0139.jpg

The 6" pots appear healthy, but are not nearly as bushy;
IMG_0141.jpg


A couple of days ago, I transplanted the one girl that got the 4" pot initially roots were observed to the edge of the pot which blew me away, here it is as of today;
IMG_0142.jpg

So this all has got me thinking that I need a veg. cabinet pretty quickly. There are also two clones that "she who is the boss of me" took from the beginning. They are at our place of business, and need to get out of there. These two will likely be our mother stock.


Today then, I'm contemplating the re-appropriation of one of the LED panels, to a veg. cabinet due to its small size. I have two T-8's and three T-5's to put in its place in the larger flower cabinet. So I guess this is my question of the day, will this be adequate in my 6x3 cabinet, I'm thinking it might just work a little better???

On another note, its day seven since watering and the 4gallon pots are still showing moist on the moisture gauge, the 6" are just dry today!!!!!!
 
Yesterday I built a veg. cabinet under my work bench, as requested in another thread I kept a closer photo record of my door building process, and will detail it here, now;

Here is the new cabinet;
IMG_0143.jpgIMG_0144.jpg

I took one of the HSS-HP1600 panels from the first enclosure, and added 4 23w cool white compact flourecent bulbs;
IMG_0147.jpg

I started by measuring each side to the 1/16th of an inch, and making a quick cut sheet;
IMG_0148.jpg

Then I measured the parts using 1/2x1 stock. This stuff is rarely perfect, so selection is key and accuracy will make up for the imperfections. I use a framing square to strike the measurement across the part;
IMG_0149.jpg

Then cut with trusty skill saw, "Skill" being the operative word here;
IMG_0150.jpg

Next I set up a couple of drills, one with about a 5/8's bit for screw head relief cuts, and one with a 1/8th bit for piloting;IMG_0151.jpg

So I'm going to but joint these parts, but first I drill shallow reliefs where I want the screws to be, as seen;
IMG_0152.jpg

On a flat/true surface I hold the parts on edge where they need to be fastened, and I drill a pilot hole the depth of the screw I'm using;
IMG_0153.jpg

Then its a simple matter of smearing with construction adhesive, and turning in the screw;
IMG_0154.jpg

So I'm going to make this a two part tutorial, as I need to get some other things done here right away.....................

Please stand by;
 

Attachments

Scotch089

Well-Known Member
Thats whats up brother,

I love it when ppl take the intiative to get the fuck up and make it happen instead of thinking that money will give them everything they will ever want or need!

Good for you man!
 
Right-on guy's n gal's, I don't mind investing a little time to do it right the first time and hopefully this will pay off for years to come!

So, having repeated the steps as neccesary to form my triangular frame, I've test fitted it and am going to wrap the plastic using a technique I learned to do "gallery wrap" canvass prints. Simply staple from the center on two opposing sides at a time, to a point about 3" off the corners;
IMG_0156.jpgIMG_0157.jpgIMG_0158.jpgIMG_0159.jpg

The first corner cut is straight up right on the edge of the corner as seen in the first photo below. The second and third cuts are 45% ones from the corner at the top of the frame as seen in the third photo. Then I completed stapling and trimmed flush with the inside of the frame;
IMG_0160.jpgIMG_0163.jpgIMG_0164.jpgIMG_0161.jpgIMG_0162.jpg

Next I've taped the inside of the frame to the plastic edge, applied the weather stripping, and hinged the door with small cabinet hinges;
IMG_0165.jpgIMG_0168.jpgIMG_0166.jpgIMG_0167.jpg

I next made marks of where the outside of the door was on the rough opening, and measured in the width of the door and installed more 1/2x1 stock on the rough opening for the weather stripping to strike up against. A handle completed this installation and the enclosure is a completely sealed space;
IMG_0169.jpgIMG_0170.jpg
 

Trailingpickles

Well-Known Member
yepp. I consider a micro to be PC size. But your grow room looks very well thought through and i love to see that. I hate seeing shit just thrown together and called a setup.
 
So I've added 3 t-5's and 2 t-12's to the enclosure, to make up for the one panel re-allocated to the veg.cabinet. Temp. is stable in the cabinet, so I've switched the enclosure timer to 12/12.

Now the real fun begins;
IMG_0171.jpg
 
Yes Koolio, there are healthy indeed, so now as of today we're 13 days into flowering 4 of the 6, that are in the flower enclosure. The other 2 are a couple of days in.This is what they look like as of today;

IMG_0191.jpgIMG_0192.jpgIMG_0193.jpgIMG_0194.jpg

Pretty f%$#@ng happy with that,...........let me tell ya!
 
Top