DWC Lowryder - Attitude Seed Bank

greenearth5

Well-Known Member
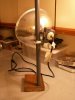
FYI .. there not feminized seeds.. hash your light rail looks pimp... post away and treat this journal as it is your own bud.. your allways welcomed to post here no matter what
 

Hash Lover

Well-Known Member
Thanks Green, I'll do that. As far as the cfl's go don't worry so much about the light color as the light output. The 42w soft white have much more light to them that the little 26-27w bulbs. That's the problem, I can only find the small ones anywhere local. FYI the 42w at Walmart are the best. A little cheaper and 100 more lumens than the ones at Home Depot. The ones at Lowes say for vertical use only so be sure to check. At one of the Home depot's they have a 65w soft white, that one is $15 and the 42w are about $10. I put 2 of the 42w in those reflectors. but to do that you also need a socket extension. I know the daylight color is best for veg but the extra light that you get with the larger bulb makes up for it. I have been doing all my veging with the CFL's until this run. I got an MH conversion for my light and vegged a couple weeks and changed to the HPS yesterday after seeing the start of true flowers. I was hoping to cut down on the stretching that I've had in the first part of 12/12 with the HPS in there. It did seen to help, I don't have the longer spacing that I've had before. You should really try to do some in soil IMO. It not really a height issue just easier to deal with and if needing to be moved in a hurry you don't have to worry about having to plug anything in but a light. And not even that, if you have to you can stash it anywhere it will fit even in the dark for a day in some cabinet to hide it. It won't hurt it. After my last run I have to say I do really like the smell and taste of the soil grow much better. Now that my major work is done for now I'll try to get some pics of the fan setup and my filter sometime today.
 

Hash Lover

Well-Known Member
Here's a couple things on lights. I made a couple of these stands for the lights with parts from electrical conduit. The only tool needed was to drill the hole in the stand. The nice thing about these is you don't need to hang them from something. Good for side lights or whatever. You can see the socket extension that I mentioned on the base of the "Y" splitter. And the three different CFL's 26w, 42w and 65w. You can get the larger daylight bulbs online but I didn't want to bother having to order them. Even though I would like to try some someday. They can be had up to 200w from this place. http://www.1000bulbs.com/2-to-200-Watt-Compact-Fluorescent-Screw-In-Light-Bulbs/
 

Attachments

Hash Lover

Well-Known Member
Here's some pics of the fans. Those are toilet flanges that can be had at Home D, Lowes or hardware store. You can get them in a few different sizes, 4",4 1/2" and 5" outside diameter depending on what size duct you want to use. I'll post it in a few different posts to make it easier to show you guy's. Some of these don't need anything done to them, just bolt the fan to it. The holes line up well enough. But some need to have 2 holes drilled in them. The 2 that don't need to be drilled will line the fan up in the center for you. The fan I have been using is a Delta 120mm w/130 cfm. I got them on Ebay for $7.99 w/free shipping. None on there right now though, I checked. They do come on every now and then though from the sane seller. Just make sure that the adapter/transformer has a high enough amp rating for the fan you use. You can also use anything up to 12v dc, a 6v will just run it slower which is something I have done if I wanted to slow it down. You can get adapters on Ebay cheap. You can also get ones that you can adjust the speed and or have temp sensors that will come on at a preset temp that you can adjust. Again they are cheap on Ebay. Or if you had discount computer store near you. I had a Tiger Direct near me when I lived in NC. They have good prices on line also. You can also see the white one in there that I trimmed down to match the fan. We like it to look good right?
 

Attachments

Hash Lover

Well-Known Member
This is one I made for a 6" duct. I wrapped 1/2" weather stripping around the 5" flange to size it up for a 6" line. This one I think is the best air mover (except for the double one I posted a while ago). The smaller fan and larger duct should help the air move through easier. You could also use one flange mounted to your box to be able to run a line off it. which is what I did on one of my grow boxes. I put that one together for less than $20.00. On a long run I put 2 fans together to try to get more power. Or to increase the static pressure I think is what it is called. Roll might know something about that. You do HVAC right Roll?
 

Attachments

Hash Lover

Well-Known Member
Here is the filter I made. I mostly went with the idea from the one I posted in your other journal. But I used PVC for the outside parts so I would be able to just slide one of the flanges on with a fan. You could just stick this in your grow area to clean the air in the room. It doesn't have to vent out. If I were to do that I would want to mount the fan up high and put a 90 degree elbow or a line on it to blow the air down and maybe circulate the air better. Or do a 6" line and vent it to also get rid of heat if need be. I'll post more pics of the filter too.
 

Attachments

closetkiller

Well-Known Member
Here is the filter I made. I mostly went with the idea from the one I posted in your other journal. But I used PVC for the outside parts so I would be able to just slide one of the flanges on with a fan. You could just stick this in your grow area to clean the air in the room. It doesn't have to vent out. If I were to do that I would want to mount the fan up high and put a 90 degree elbow or a line on it to blow the air down and maybe circulate the air better. Or do a 6" line and vent it to also get rid of heat if need be. I'll post more pics of the filter too.
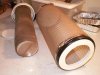
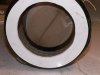
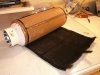
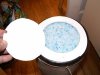
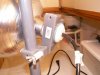
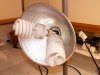
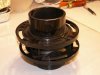
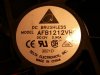
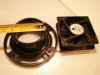
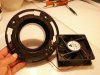
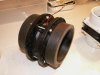
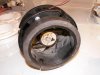
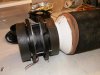
nice set up. would have never thought of the toilet flanges:dunce: that will change my set up. i am a carpenter and made it from wood. :peace:
 

Hash Lover

Well-Known Member
Thanks man, I'm a carpenter myself. Ya, I was in a Lowes a while back and saw some flanges in a discount area and when I picked one up that light went off in my head. Hmmmm I know what I can use this for. But I do home remodeling and do anything that has to to do with a house. It's nice to be able do my grow shopping on company time. Saves more time to work on the grow in my off hours. They work really well. I had 2 inline with the filter and it kept it cool with the 400w. But when I got the 600w and was getting warmer outside I had to upgrade.
 

Hash Lover

Well-Known Member
This is the fan and parts list. The pics pretty much show it but if anyone has a question just let me know. Not much for tools needed on this and you might be able to do something different on the end cap so you wouldn't need to cut it. And then you would only need some sheet metal snips and a screwdriver. A cordless drill would be nice (or any drill) if you want to screw the 4" adapter to the 6" to 4" pvc reducer. And if you are doing a grow you really should have a cheap cordless drill and a jig saw. You can do a lot of stuff with just those 2 tools and would make your life so much easier. I'm fortunate that in my work I have all the tools I need and then some. I'll go back and try to find the post I did on the fan before, that would probable help and save my slow ass from having to type to much.
Parts:
6" to 4" pvc reducer
6" pvc cap
4" metal duct adapter (I think that is what it is called)
4" metal duct cap
24" roll of 1/2 hardware cloth (that's the wire mesh)
Large ladies nylon stocking or panty hose.
That black stuff is a carbon filter for something (I don't remember what) some kind or room air cleaner. I put that around the inside and outside to help catch some of the dust that would be drawn into the pantyhose and cover it so I wouldn't tear them.
2- 4" hose clamps
2- 6"-7" hose clamps
Bag of Fresh Step Chrystals cat litter (researched it and was most recommended) I have no complaints with it.
 

Attachments

Hash Lover

Well-Known Member
I'm going to try to get fancy and copy and paste them here.

Pic 1- Here are all the supplies you need for this 4" carbon scrubber. Attached Thumbnails
 

Hash Lover

Well-Known Member
First thing to build is the inner chamber.

pic1 - supplies:
6"-4" reducer
4" cap
2 - 4.5" screw fasteners
10" length of Heavy duty chicken wire
2 - pannyhose legs

pic2 - Wrap the 10" length of chicken wire around the 4" end cap to form a cylinder. I used a bunch of zip ties to secure the cylinder's shape.

Pic3 - Slide the pannyhose legs over the cylinder to act as a screen for the carbon.

Pic4 - Secure the end cap on one end of the cylinder with one of the 4.5" screw fasteners.

Pic5 - Secure the 6"-4" reducer to the open end of the cylinder with the other 4.5" screw fastener.

That's it. The inner chamber is done. Set aside we'll need it in a bit.

Attached Thumbnails


Hash Lover

Well-Known Member
Next to build is the Outer Chamber.

Pic1-Supplies
6" cap
2 - 6.5" screw clamps/fasteners
12" length of Heavy duty chicken wire
3 - pannyhose legs

pic2 - Wrap the 12" length of chicken wire around the 6" end cap to form a cylinder. I used a bunch of zip ties to secure the cylinder's shape.

Pic3 - Slide the pannyhose legs over the cylinder to act as a screen for the carbon.

Pic4 - Now you should have all of these parts....almost done


Pic5- Now slide the 6" cylinder over the 6" section of the 6"-4" reducer (and the inner chamber) and secure with a 6.5" screw fastener Attached Thumbnails
 

greenearth5

Well-Known Member
I have a 6in to 4in duct reducer I was going to stick a computer fan onto but after seeing what you have done I will mimic what you have done. I checked the price of a vent fan and they run 100 bucks at the cheapest so a 30 dollar setup using some computer fans and accessories will be beneficial. As far as the carbon scrubber, I totally need to get some air quality control going on in my room. Tomorrow... im gettin a small bag of foxfarm ocean forest to put these sprouted seeds in... tearing down my grow room and boxing it all up for another time.

I got the bud from my previous grow drying in a paper bag... its a creeper type of buzz and feels good
 

Hash Lover

Well-Known Member
At least you got a little smoke out of it. For how much you smoke you don't need to much to keep you in weed. Check out some of the CFL grow threads. Do a nice little stealth grow that know one can come across like in your room closet. And try to not let anyone know. You should be able to do 1 or 2 plants and get an ounce each time. The heat is probably the biggest issue.
 

greenearth5

Well-Known Member
I already have 7 seeds germinating and several sprouted so im going to go ahead and do the 7 plants in some ocean forest 1/2 gallon bags.... that should keep them smaller then a foot
 
Top