Legal Preface: My girlfriend and I are both authorized medicinal marijuana patients and as such are allowed to grow a total of 12 flowering, 24 vegetative plants. Our current count is 9 flowering thereby easily falling under the maximum number allowed to us by the state of CA.
Thanks for checking out my first grow! If you have constructive criticism or any pointers, they will be highly appreciated! As with anyone new to growing, I spent countless hours researching an array of different techniques. There is so much information out there and while most of that info seems to agree at a base level, when you get more in-depth into the intricacies of nutrient cocktails, PH & temperature affecting nutrient uptake, etc. it seems like there are varying opinions from "experts" everywhere, many of which conflict.
Essentially, I have tried to find the best of those expert opinions and give it a try. I tried to take the most reputable forum posters with the most experience and weight their information highest to try to get the best idea of how to complete a successful first grow. In this journal, I will try to represent all of the information I've come across and hopefully anyone who sees this will be able to point out any bad or incorrect information. Please feel free to respond at any time with constructive criticism!
---------------------
After much research, I have decided to start off in my first foray into the growing world by doing an Ebb & Flow set-up in my closet. The space in this closet is pretty unique and having researched for a month for a grow tent that will actually fit into a 2x6x9 space. Depth is the obvious limitation and almost all tents are deeper than 24" so I decided to build my own enclosure within the closet. I am using the following parts:
1x XtraCool Air-Cooled Reflector
1x 400w HPS Hortiluxe Bulb
1x 400w switchable ballast
1x 200CFM Carbon Scrubber
1x 400CFM Inline Fan
1x 2x2 Botanicare Flood Tray (Part #707050)
1x 20Gal. Botanicare Reservoir (Part #707135)
1x set of flood/drain fittings
1x Sunleaves Durapump Air Pump (Part #SDA500)
1x Sunleaves 3" Air Stone (Part #SDAS506)
1x ActiveAqua AAPW250 - 250gph Reservoir Pump
1x ActiveAqua AAPW160 - 160gph Backup Pump (used for draining reservoir)
1x Pair of Adjustable Grow Light Reflector Hangers
25' Ultra-reflective 6" ducting
4'x25' Ultra-reflective Mylar
4'x10' Ultra-reflective Mylar
1x Oscillating Fan Tower (already had this)
Some people may think that I over-purchased for my first grow but my goal was to be able to expand in the future for minimal additional investment. Additionally, the goal is to expand into additional grow trays as opposed to larger trays so that I can uniquely control nutrient saturation in each tray and can set up a perpetual harvest similar to Al B Fuct's famous harvest every 2 weeks SOG.
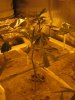
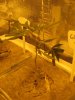
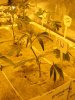
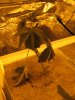
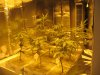
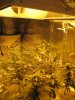
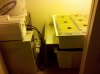
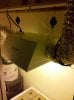
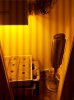
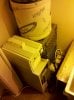
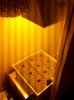
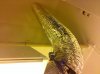
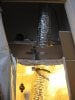
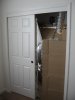
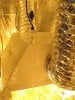
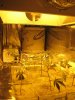
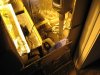
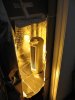
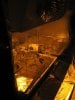
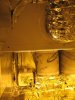
After picking up all the required parts, I started first by getting everything situated in my closet in the final positions so that I knew how best to utilize my space. Please see the attached pictures for an idea of how things are set-up in my closet.
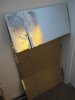
Once I had spaced everything appropriately, I took moving boxes from Home Depot and cut them down one side and folded them out flat. This left me with an approx. 6'x3.5' cardboard panel that I used as backing for the Mylar. I used 3M spray adhesive and rolled the Mylar out across the cardboard and let it dry. When finished, each panel has flexibility at the joints and the flaps can also be used to complete corner transitions in the closet.
After finishing up all my panels, I mounted them to the walls using Command adhesive strips (no long-term damage to the closet = win) and let the upper portion of the box fall over the hanger rod in the closet. It was like a revelation when the first panel fit perfectly and tented across the hanger rod, lol. Once I had the rest of the panels in, I attached one to the inner-most door and allowed it to extend ~6" across the end of the doorway to cover the open gap between sliding doors when closed. To cover the inside of the outer sliding door, I simply created another cardboard/mylar panel that I manually put in place prior to closing the door. This allows me ease of access for reservoir/plant maintenance. Additionally, I created movable panels for the areas that cover my light/pump timers and my reservoir heater/base of oscillating fan for ease of access to my equipment. Finally, the last touch was using foil tape (Home Depot) to patch any holes and close up anything that did not need to be accessible.
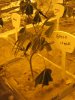
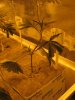
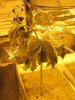
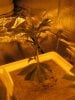
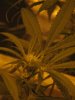
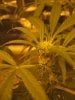
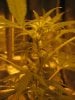
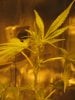
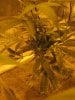
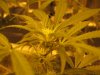
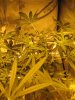
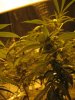
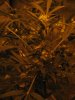
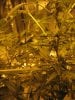
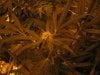
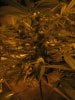
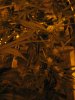
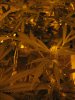
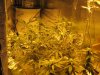
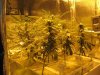
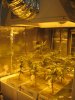
You can see the finished result in the 'Final' pictures below. These pictures are from the end of Week 1 so you can also see my plants in their current state. My next Journal entry will detail my nutrients, PPM, PH, plant types, and a picture of each with height and a general assessment of the plant's health. I will follow up each week with updates including the same information.
Thanks for checking out my first grow! If you have constructive criticism or any pointers, they will be highly appreciated! As with anyone new to growing, I spent countless hours researching an array of different techniques. There is so much information out there and while most of that info seems to agree at a base level, when you get more in-depth into the intricacies of nutrient cocktails, PH & temperature affecting nutrient uptake, etc. it seems like there are varying opinions from "experts" everywhere, many of which conflict.
Essentially, I have tried to find the best of those expert opinions and give it a try. I tried to take the most reputable forum posters with the most experience and weight their information highest to try to get the best idea of how to complete a successful first grow. In this journal, I will try to represent all of the information I've come across and hopefully anyone who sees this will be able to point out any bad or incorrect information. Please feel free to respond at any time with constructive criticism!
---------------------
After much research, I have decided to start off in my first foray into the growing world by doing an Ebb & Flow set-up in my closet. The space in this closet is pretty unique and having researched for a month for a grow tent that will actually fit into a 2x6x9 space. Depth is the obvious limitation and almost all tents are deeper than 24" so I decided to build my own enclosure within the closet. I am using the following parts:
1x XtraCool Air-Cooled Reflector
1x 400w HPS Hortiluxe Bulb
1x 400w switchable ballast
1x 200CFM Carbon Scrubber
1x 400CFM Inline Fan
1x 2x2 Botanicare Flood Tray (Part #707050)
1x 20Gal. Botanicare Reservoir (Part #707135)
1x set of flood/drain fittings
1x Sunleaves Durapump Air Pump (Part #SDA500)
1x Sunleaves 3" Air Stone (Part #SDAS506)
1x ActiveAqua AAPW250 - 250gph Reservoir Pump
1x ActiveAqua AAPW160 - 160gph Backup Pump (used for draining reservoir)
1x Pair of Adjustable Grow Light Reflector Hangers
25' Ultra-reflective 6" ducting
4'x25' Ultra-reflective Mylar
4'x10' Ultra-reflective Mylar
1x Oscillating Fan Tower (already had this)
Some people may think that I over-purchased for my first grow but my goal was to be able to expand in the future for minimal additional investment. Additionally, the goal is to expand into additional grow trays as opposed to larger trays so that I can uniquely control nutrient saturation in each tray and can set up a perpetual harvest similar to Al B Fuct's famous harvest every 2 weeks SOG.
After picking up all the required parts, I started first by getting everything situated in my closet in the final positions so that I knew how best to utilize my space. Please see the attached pictures for an idea of how things are set-up in my closet.
Once I had spaced everything appropriately, I took moving boxes from Home Depot and cut them down one side and folded them out flat. This left me with an approx. 6'x3.5' cardboard panel that I used as backing for the Mylar. I used 3M spray adhesive and rolled the Mylar out across the cardboard and let it dry. When finished, each panel has flexibility at the joints and the flaps can also be used to complete corner transitions in the closet.
After finishing up all my panels, I mounted them to the walls using Command adhesive strips (no long-term damage to the closet = win) and let the upper portion of the box fall over the hanger rod in the closet. It was like a revelation when the first panel fit perfectly and tented across the hanger rod, lol. Once I had the rest of the panels in, I attached one to the inner-most door and allowed it to extend ~6" across the end of the doorway to cover the open gap between sliding doors when closed. To cover the inside of the outer sliding door, I simply created another cardboard/mylar panel that I manually put in place prior to closing the door. This allows me ease of access for reservoir/plant maintenance. Additionally, I created movable panels for the areas that cover my light/pump timers and my reservoir heater/base of oscillating fan for ease of access to my equipment. Finally, the last touch was using foil tape (Home Depot) to patch any holes and close up anything that did not need to be accessible.
You can see the finished result in the 'Final' pictures below. These pictures are from the end of Week 1 so you can also see my plants in their current state. My next Journal entry will detail my nutrients, PPM, PH, plant types, and a picture of each with height and a general assessment of the plant's health. I will follow up each week with updates including the same information.
Attachments
-
 78.6 KB Views: 114
 -
 45.1 KB Views: 52
 -
 47.9 KB Views: 60
 -
 52.1 KB Views: 64
 -
 48.8 KB Views: 62
 -
 59 KB Views: 55
 -
 50.5 KB Views: 63
 -
 46.2 KB Views: 59
 -
 49.6 KB Views: 72
 -
 54.3 KB Views: 62
 -
 38.2 KB Views: 85
 -
 67.1 KB Views: 59
 -
 70.6 KB Views: 65
 -
 71.6 KB Views: 69
 -
 40.1 KB Views: 70
 -
 52 KB Views: 79
 -
 58.7 KB Views: 71
 -
 71.1 KB Views: 71