12 plant stealth-ish setup
- Thread starter KillHit
- Start date
smoote1987
Well-Known Member
thats the kind of thinking i like. Target's got a sale on those 4 inch min cage fans. Atleast my target has them on saleahhh.. the temps are creeping up to 85.. I think the additional fans will be right on point.. if not, ill just turn one off lol. BOOM, passive!
smoote1987
Well-Known Member
hmmmm you'd have to nix the envioros and probably completely isolate the hps light from the box by making it it's own intake and out put attached to a cooltube because they get much hotter than fluorescents. Other than that i don't see why not.hey smoote, I see you've made your own cool tube...
would it be possible for me to use a 250w hps in a cooltube running horizontally across the top of my box?
I just want to have the best light for flowering but I am limited to this box.. which isnt bad so far.
I love my hps and can't speak highly enough about them. Following suit with my new metal halide as well. HID lighting is just so much more efficient when compared to similar wattage fluoros. If you have any questions just let me know.
KillHit
Well-Known Member
well, with the creative mind that I have.. I have already planned out a better grow box.. in the lower portion of my closet..
The dimensions are 53"w x 27"d x 48"h. its a good size area.
I want to use the enviros for veg.. so not necessarily nixed")
but for floweringg.. I want to use a 400w hps in a cooltube running horizontally across the top of the space.. leaving approx 36" for plant growth. I will scrog if I have to haha. I have an idea for cooling the tube and the grow area.. but too tired to type it lol. if i can i will post a pic of my plans.
The dimensions are 53"w x 27"d x 48"h. its a good size area.
I want to use the enviros for veg.. so not necessarily nixed
but for floweringg.. I want to use a 400w hps in a cooltube running horizontally across the top of the space.. leaving approx 36" for plant growth. I will scrog if I have to haha. I have an idea for cooling the tube and the grow area.. but too tired to type it lol. if i can i will post a pic of my plans.
KillHit
Well-Known Member
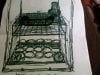
So here's that picture I was talking about.. it shows the closet and the enclosed grow space inside, containing 15 grow pots (circles)haha, and the two fans below for room venting..(circles with spokes) prob use those honeywell fans.
I hope you can tell what's going on haha, there is the carbon scrubber on top, im assuming I will need a larger exhaust fan to accomodate this grow..
The cooltube is shown above the scrog canopy, which will prob be lower than what is shown in the pic.. the tube is said to be 16" long and 6" in diameter.
let me know what you think.
Attachments
-
 49.5 KB Views: 24
KillHit
Well-Known Member
as for the building.. all I would have to do Is make a frame, or secure a piece of plywood ontop of some 2"x4" ledges mounted to the wall at the desired height. I want to use plywood or a sturdy material so that it will support the cooltube and exhaust without a problem.
covering the inside with panda filmm.. also to make things easy for me.. I would love to just use the panda film as the entry door/ front wall. I could easily velcro the panda film to the frame.. peel it away, or roll it up as I work on the grow.
covering the inside with panda filmm.. also to make things easy for me.. I would love to just use the panda film as the entry door/ front wall. I could easily velcro the panda film to the frame.. peel it away, or roll it up as I work on the grow.
smoote1987
Well-Known Member
Sounds like you've been doing your research. I'm linking two threads for you one i helped a grower work through the build process. So it has all the info i gave him and my buddy JigFresh gave him. It is also the thread talking about my grow room so there's plenty of ideas in there. The second is of the guys actual build and grow afterwards. So that could be very valuable. Though he has a larger space that you he wanted to scrog and was thinking of scroging 15 plants. We talked him out of it because it would have been a bitch to manage.as for the building.. all I would have to do Is make a frame, or secure a piece of plywood ontop of some 2"x4" ledges mounted to the wall at the desired height. I want to use plywood or a sturdy material so that it will support the cooltube and exhaust without a problem.
covering the inside with panda filmm.. also to make things easy for me.. I would love to just use the panda film as the entry door/ front wall. I could easily velcro the panda film to the frame.. peel it away, or roll it up as I work on the grow.
https://www.rollitup.org/grow-room-design-setup/181047-vertical-lighting-scrog-should-i.html ~ look for moose88's first post. then read all of his posts and mine and jigs responses.
https://www.rollitup.org/indoor-growing/176092-second-grow-auroa-indica.html ~His grow.
As for the build i was going start suggesting that you build a chamber inside the closet if you don't have the ability to cut into the closet walls but you already covered that. Yep could see what you're thinking. I don't think you'll need a larger fan at all. That one fan you have should to the job easily in venting your cool tube. I mean i use a pc fan to exhaust my cool tube so anythings possible after that
Let me know if you have anymore questions.
GL
KillHit
Well-Known Member
Back to reality!actually the bigger fan was going to be for ventilating the space and filtering odor. i suppose i could use the fan I have now for the cooltube, is the 4" inline fan a bit excessive for the cooltube? id rather not use the loud thing if i dont have to.
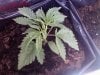
just thought i should show you my diesel ryders auto flowering under many watts of cool white.
day 24..
8- 100w equivs
1- 200w enviro... waiting on one that arrived broken
so far so good.
I have them in a rubbermaid clamshell with some white skunk, and power kush babies.
and the 6 bag seed that sprouted.. i went a lil over bored.. just hoping the bag seed is prodominately indica.
Attachments
-
 81.3 KB Views: 13
 -
 68 KB Views: 8
smoote1987
Well-Known Member
It's not excessive, but if its too loud thats your call. I'd say you could easily vent your whole space just through the cool tube if you were to use that fan. Just a thought, but again i mean i use only pc fans for my space with two hids so you could probably use something smaller and be fine.actually the bigger fan was going to be for ventilating the space and filtering odor. i suppose i could use the fan I have now for the cooltube, is the 4" inline fan a bit excessive for the cooltube? id rather not use the loud thing if i dont have to.
For what its worth your plants look pretty damn good. I'd say you don't really need to think about a new box just yet. Keep up the good work.
GL
KillHit
Well-Known Member
I dont understand how I can vent the whole grow space through the cooltube if my intake must be from the cool air outside of the box..
I would prob hook up a smaller fan to the cooltube, and use the 4" with filter to vent tthe grow box. I know what you mean about the box and keeping for a bit.. but I just want the best setup for the space, even if that means changing over to the hps cooltube.. I just NEED to be sure that I can ventilate properly and have enough room for vertical growth.
I would prob hook up a smaller fan to the cooltube, and use the 4" with filter to vent tthe grow box. I know what you mean about the box and keeping for a bit.. but I just want the best setup for the space, even if that means changing over to the hps cooltube.. I just NEED to be sure that I can ventilate properly and have enough room for vertical growth.
smoote1987
Well-Known Member
For the cool tube to vent your space you have it pull air from your space to cool the bulb instead of outside. The reason that i said you'd have to completely isolate it was because putting a cool tube in your current box all the air in the box is getting heated by all the fluoros you have. So i would be pointless to try to cool a bulb with all that hot air. In the new box no air is getting heated by other lighting so the air in the box is relatively cool and you can use it to cool your bulb.I dont understand how I can vent the whole grow space through the cooltube if my intake must be from the cool air outside of the box..
I would prob hook up a smaller fan to the cooltube, and use the 4" with filter to vent tthe grow box. I know what you mean about the box and keeping for a bit.. but I just want the best setup for the space, even if that means changing over to the hps cooltube.. I just NEED to be sure that I can ventilate properly and have enough room for vertical growth.
Hey man do what you feel is right. I say test out a few different options again much like you did with the test runs on your box. That 4in inline could be used to do whatever you want it to do, and since your custom making the chamber you can set it up however you want. Haha just don't make hasty decisions be as thoughtful as you were with the box and you'll do just fine.
KillHit
Well-Known Member
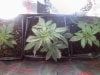
I love itt!
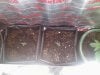
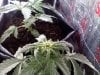
check out my plants at day 26 from seed..
the small ones are a few bag seed and power kush.
check out my plants at day 26 from seed..
the small ones are a few bag seed and power kush.
Attachments
-
 86.1 KB Views: 11
 -
 66.4 KB Views: 10
 -
 81.2 KB Views: 9
 -
 87.7 KB Views: 8
 -
 75.3 KB Views: 8
 -
 83 KB Views: 6
smoote1987
Well-Known Member
They look damn good!I love itt!
check out my plants at day 26 from seed..
the small ones are a few bag seed and power kush.
smoote1987
Well-Known Member
I think you'd just be wasting it with the amount of ventilation you're using to keep that box cool. Any co2 you'd add to the atmosphere of the box would just be sucked right out before it could be used.yea, I dont know why I'm so negative. I guess I just want the best for my babies lol. Would it help to add CO2 to the mix now?
Though if you do want to go that root, here's a post i made that gives all my tips and improvements to the whole process:
Quote:
Originally Posted by motif
do the homemade co2 (yeast/sugar in water shaken up) work well? what doses would you use for a 12 fl oz bottle?
is this too risky of getting mold to try?
NewGrowth i hope you don't mind if i try to give motif some info on the yeast co2 method, i have a lot of experience using them to supplement co2 for my aquariums and have a very long-lasting and very productive recipe. However i cannot comment on whether or not it will be enough to maintain the optimum levels of co2 (which i think is 1200- 1500 ppm co2 but don't quote me on that) as i have never tried it or have the equipment to measure it. But if i were ever going to try to supplement co2 with a yeast co2 reactor this is the recipe i would use.
Ok motif, the formula that i use was developed to be long lasting and produce alot of co2 by Tarah Nyberg. If you search "Nyberg, yeast, co2" in google you will find quite a few hits. The first of which is a powerpoint presentation explaining about yeast and how the process works and etc. Its a short read and very informative.
Here is her recipe:
Improvise at will, but here is a good start:
2 tblsp yeast
Use 1 cup sugar per 2L luke warm H20 (tank water is great or dechlorinated tap -- chlorine, but not ammonia, kill yeast. ) (they like ammonia)
Add 1-2 tsp of a protein drink mix(optional)
Add 1 tsp of ammonium sulfate, otherwise use 1 T mollasses. (or both)
1 tsp baking soda is also nice to keep the pH from crashing (they like it >pH3-4)
Leave yeast from previous mix in the bottom.
I used everything that was in that recipe and it worked great, i made a few adjustments and it worked even better for me. Originally i only used yeast, sugar and water but with the addition of the ammonium sulfate (syrup) and protein mix the longevity of the recipe and quantity of co2 doubled. With just the basic formula the co2 production would last about 2 weeks, and had a very bell curve production rate meaning slow to start, peak at the middle, slowly falls to nothing. This was not good for aquarium use as it is important to maintain consistent water parameters or you can stress out and harm your fish. The Nyberg recipe on the other hand starts out fast in production and then plateaus as the cultures of yeast are being kept very healthy, then it tapers off slowly and quickly ends. This was much better as the amount and production of co2 was more consistent.
I tried adjusting the recipe every so often and found that 2 cups of sugar for 2L of water lasted about 3-4 weeks. Another thing to take account for is preparing the yeast before you add it to the mixture.
This is a very much over looked practice but pays off greatly when done properly. I used regular bakers yeast that you find at the grocery store in the baking aisle. I happened to come across two kinds from red star i think one was regular yeast, and the other was highly active. I chose the highly active of course and it was the better choice. The yeast is dry when you buy it so it needs to be rehydrated to start the process of making co2. This being said most just pour the yeast into the mixture shake it up and let it go. When i did this i waited a full 12 hours before i saw my first bubble of co2 in the bottle. This was because by adding them straight to the mixture you end killing off a large portion of the yeast.
What i do to ensure that more of the yeast bacteria survive the journey into the sugar mixture is add the 2 tblsp of yeast to a small glass of luke warm water with sugar. I then oxygenate the water through aeration by whisking it with a fork. This essentially wakes up the yeast bacteria and rehydrates them. I do this for about 5-10 mins stirring off and on making sure i'm creating bubbles as that ensures i am causing enough turbulence to cause a gas exchange to occur. I then add the yeast mixture to the sugar mixture and give it a little shake. When i did this i usually saw the first bubbles of co2 in 30 mins to an hour.
Some other things that i did to improve the whole process:
attribute for the yeast mixture when creating the sugar mixture. I over flowed the bottle once and learned my lesson.
A good funnel is a god-send.
Adding a second bottle to function as a bubble counter to i could have at least some gauge of what was being produced was helpful. Basically it was yeast bottle outlet to bubble counter bottle, bubble counter has its own outlet. The outlet from the yeast bottle is inserted into the bubble counter bottle so that it is near the bottom of the bottle and then the outlet from the bubble counter was inserted just barely into the cap of the bottle. The bubble counter bottle is then filled with water. The co2 then bubbles up through the water and out of the shorter outlet hose. This also functions as a check valve for the yeast bottle as it sometimes can leak out a bubbly goo.
Ummm the vitamin water bottles in 12 fl oz and 32 fl oz worked well as the bubble counter bottle and yeast bottle respectively. 32 fl oz is one liter so just cut the recipe in half.
When making the holes in the caps of the bottles to insert the airline hose i used an awe, a screwdriver that come to a sharp point. It goes through the plastic caps easily when twisted and forced through with pressure and doesn't crack them. This allows you to not have to use a power drill or some other means. Also make sure the hole that you make in the cap is smaller in diameter than the airline hose you use so when you thread the hose through it forms a pressure seal and eliminates the need for bulkhead fittings or sealants.
When threading the hose through the small holes in the caps it helps to cut the air line hose to have a point. You can then shove quite a bit of the point through the small hole and use pliers to pull it the rest of the way through.
Keep a spare cap that fits on your yeast bottle because you can't very well shake up the mixture with the air line outlet cap when you make the following batches. It saves you from getting a sticky hand when you realize thats the only way you're going to be able to cap the bottle to shake it.
keep your yeast cold it will last longer
Last but not least you'll eventually realize that its a bitch to have to change and mix all that crap up and replace it every three weeks and will spring for a nice co2 tank and regulator with a solenoid valve that hooks up to a co2 meter. Thats what i ended up doing at least well actually i still went on the cheaper side and started using a 20 oz paintball tank ($16 on ebay) and a paintball regulator, and needle valve combo ($34.99 from thatfishplace.com). A solenoid valve and meter would be really nice though. Let me know if you have any questions, i hope i didn't step on your toes here NewGrowth.
GL