jcannons
Active Member
Well I wish I would have found this site prior to starting this grow. I definitely would have healthier plants at this point in the grow. I thought that I had read a lot but like everything else in life, you learn from your mistakes and the problems that you have send you seeking information and knowledge.
I started by building my grow room and getting everything onsite ready for the clones I was going to buy from my collective. I built a 4 x 6 x 9 ft closet, painted the walls flat white, installed my 4" inline fan on the wall and vented it through the roof. Installed my switchable 1000w ballast and light then hung mylar on the walls and the floor. I installed a 4" dryer vent on the opposite side of the room from the exhaust fan as low as possible for the air inlet. The air inlet would allow air in from the adjacent room that is climate controlled to 68 degrees. I sealed the room so that no other air could enter. I removed the base from an oscillating fan that I had and hung it from the ceiling with some lag bolts. I tied the light, the exhaust fan and the oscillating fan into a timer.
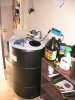
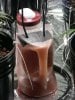
I then set up the Cap Ebb & Grow reservior and controller bucket in an adjacent room and ran the fill tubes through the wall and set up 6 buckets, which I then filled with the Hydroton that I had washed. I filled and ran the system through a couple of cycles and decided everything was ready to roll.
I picked up 6 Grape Ape clones at the collective I belong to and brought them to the grow site. The clones were in 2" rockwool cubes which were in 2" plastic containers. After removing the cubes from the plastic containers to transplant them to the hydroton, I couldn't see any roots so I peeled a little of bottom layers of rockwool away and exposed roots that were about 3" long but all coiled together in a circle. All the clones had about the same amount of roots. I decided to leave the upper part of the rw to act as a stablilizer for the plant and then put the clones in the hydroton with the roots directly in contact and at about 1/2 below the flood level of the pots and then covered it all up with hydroton.
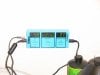
I then put the clones into the grow room under the 1000w Metal Halide lamp, which I put at 30" above the plants. I set the lights at 18/6 and closed the door. I had already mixed the newts to the "grow" strength recommended in the BC Grow kit that came with the Cap system. The ppm were about 1100 and the ph was about 6.0. I set the flood timer to flood the plants about every 3 hours during the light on cycle.
Ok I know all of you experienced growers are probably screaming at your computer screens about now. Like I said at the start, I wish that I had found this site prior to the transplant..... I had bought the Bible but it obviously wasn't enough.... The first day, my temps went to 89 degrees in the grow room, 3 of the 6 plants practically layed over and died.
I drilled holes in the grow room door to allow more air in but it wasn't enought to keep the temps down so I ended up leaving the door open and adding a box fan blowing into the room, this worked and brought the max temp down to about 80 degrees. I also decided to raise the light up to about 4 feet above the plants and started combing the internet for more information. That night the temps in the room dropped to 57 degrees, obviously not good but that is the temp in the unconditioned space.
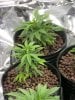
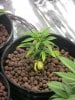
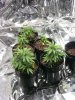
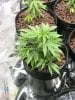
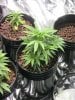
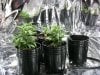
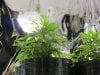
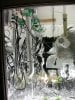
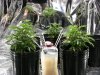
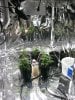
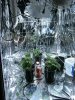
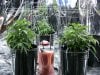
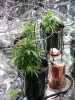
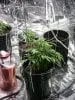
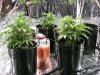
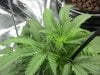
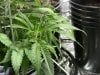
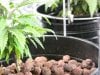
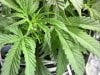
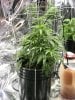
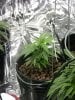
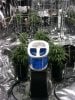
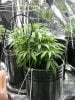
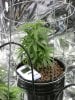
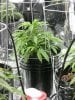
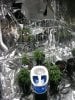
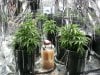
I spent the next two weeks figuring out the feeding schedule and dealing with yellow burned leaves due to the nutrients that were too high. Here are pictures that I took after 2 weeks. I couldn't save one of the clones so I pulled it.


I started by building my grow room and getting everything onsite ready for the clones I was going to buy from my collective. I built a 4 x 6 x 9 ft closet, painted the walls flat white, installed my 4" inline fan on the wall and vented it through the roof. Installed my switchable 1000w ballast and light then hung mylar on the walls and the floor. I installed a 4" dryer vent on the opposite side of the room from the exhaust fan as low as possible for the air inlet. The air inlet would allow air in from the adjacent room that is climate controlled to 68 degrees. I sealed the room so that no other air could enter. I removed the base from an oscillating fan that I had and hung it from the ceiling with some lag bolts. I tied the light, the exhaust fan and the oscillating fan into a timer.
I then set up the Cap Ebb & Grow reservior and controller bucket in an adjacent room and ran the fill tubes through the wall and set up 6 buckets, which I then filled with the Hydroton that I had washed. I filled and ran the system through a couple of cycles and decided everything was ready to roll.
I picked up 6 Grape Ape clones at the collective I belong to and brought them to the grow site. The clones were in 2" rockwool cubes which were in 2" plastic containers. After removing the cubes from the plastic containers to transplant them to the hydroton, I couldn't see any roots so I peeled a little of bottom layers of rockwool away and exposed roots that were about 3" long but all coiled together in a circle. All the clones had about the same amount of roots. I decided to leave the upper part of the rw to act as a stablilizer for the plant and then put the clones in the hydroton with the roots directly in contact and at about 1/2 below the flood level of the pots and then covered it all up with hydroton.
I then put the clones into the grow room under the 1000w Metal Halide lamp, which I put at 30" above the plants. I set the lights at 18/6 and closed the door. I had already mixed the newts to the "grow" strength recommended in the BC Grow kit that came with the Cap system. The ppm were about 1100 and the ph was about 6.0. I set the flood timer to flood the plants about every 3 hours during the light on cycle.
Ok I know all of you experienced growers are probably screaming at your computer screens about now. Like I said at the start, I wish that I had found this site prior to the transplant..... I had bought the Bible but it obviously wasn't enough.... The first day, my temps went to 89 degrees in the grow room, 3 of the 6 plants practically layed over and died.
I drilled holes in the grow room door to allow more air in but it wasn't enought to keep the temps down so I ended up leaving the door open and adding a box fan blowing into the room, this worked and brought the max temp down to about 80 degrees. I also decided to raise the light up to about 4 feet above the plants and started combing the internet for more information. That night the temps in the room dropped to 57 degrees, obviously not good but that is the temp in the unconditioned space.
I spent the next two weeks figuring out the feeding schedule and dealing with yellow burned leaves due to the nutrients that were too high. Here are pictures that I took after 2 weeks. I couldn't save one of the clones so I pulled it.


 ......LOL.....Good luck