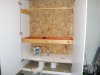
I cant express how frustrating putting this box together was. If the wood had been perfectly flat, it wouldnt have been so bad, but trying to get bowed wood to line up on the edges was such a challenge. I would have to nail on a temporary angle bracket, press the edges together
while hammering on a new angle bracket to keep them together, and then take the older bracket it off and move it into a more permanent position. I had to do this for almost every bracket, but hey, im done, and having a door and a sealed box will make hiding this setup so much easier and also much easier to tend the plant.
So yeah, spent like 6 hours on it, but I figure with all the time I will save over the 3 month grow, this was a great investment. Tons of room for one plant, (hopefully) an airtight seal, good airflow if I can caulk right, conveinence, and I can lock it for security
")
Spent way too much money on it though, but hopefully its a keeper