a tech observation I made while fooling around on this build :
On the dehumi I am using, (Breezome MCS008
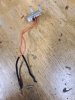
amazon link ), the cooling module inside has 2 Peltier cells, each with it's own pair of red/black wires, but they are wired in series at the board - NOT parallel. In other words, two pairs of red/black wires, one to each cell, are connected in series when plugged into the PCB. Also, on the Koolatron WC20, there are 2 cells in the cooler module (TEC), and they are also wired in series. They split the voltage and have the same current.
I checked at the board connectors, and red on socket one is definitely connected to black on socket two, so the sockets are in series. I confirmed it by measuring on the stock unit before I took it apart. If I connected these in parallel, I'd get 4 times the current and would be doubling the power to the cells, possibly exceeding the capacity of the power supply and/or cells. Also getting twice the heat when it runs inside the cooler. Something to be aware of...
I connected mine in series. IOW, instead of splicing both reds together, and both blacks together (parallel wiring), I spliced red from one cell to black from another, and connected power to the other red and black (series wiring). On the bench it drew 2.46A at 17V (the included dehumi wall wart says 16 VDC, but it puts out 18 unloaded and about 17 loaded), for around the rated 40W.
I have not checked the one everybody is using from page one, but it def has 2 cells, and I wonder if they should also be in series. Does anyone know, or anyone checked? HTH