Thermoelectric wine cooler drying and curing - DIY

Hook Daddy

Well-Known Member
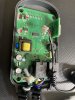
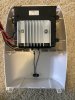
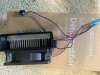
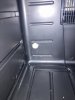
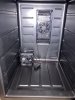
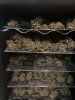
I had read about these for a while before trying, this is not by any means a new idea nor did I come up with the idea. I was tired of over drying and drying too quickly in the winter, then freaking out about mold in the summer. A google search will give lots of other ideas, but I get a lot of questions about it here on RIU and there’s not a dedicated thread, at least until now. I started out with 3 main pieces of equipment, a thermoelectric wine cooler, a small thermoelectric dehumidifier, and a humidity controller. The basics are easy, drill a hole in the fridge, run your dehumidifier power and humidity sensor cables through, seal up the hole, plug it all in and start drying in style. I got everything on Amazon. I was going to try linking items but it doesn’t want to work for me today for some reason, I’ll try again later. It’s a thermoelectric Kooltron 20 bottle. The dehumidifier is a Pohl Schmitt mini dehumidifier. The humidity controller is an Inkbird of course, the IHC-200, I recommend the one with wi-fi.
 
Last edited:

Hook Daddy

Well-Known Member
I first opened the Inkbird and removed the humidity sensor connector from the circuit board. It is smaller than the sensor itself so you can drill a smaller hole in the fridge later. Here’s what it looks like inside the Inkbird with the connector on, then removed.

96057863-6B75-421A-B352-B545367CEA40.jpeg

Connector removed.
1E586FEC-C800-4BA0-BFD0-9CDB1FE049CB.jpeg
 

Hook Daddy

Well-Known Member
Then I stripped all the useless stuff off the dehumidifier leaving just the unit itself. Here’s with the front of the case removed.

5136E520-17EC-4326-B11C-26E2411CCAC7.jpeg

Here’s the rest removed.
12E221DF-84EE-44C4-B468-4D6EE87EE3ED.jpeg

There is a small circuit board you can leave if you want. I removed it just putting the humidifier and fan power together with the power wires from the small plug in transformer, of course positive to positive, negative to negative. If you don’t know about wiring get help or just leave it as is. I only remove the case and junk to save space. Oh I ditched the water collection bin as well, the water will drip from the fins of the dehumidifier into the channel in back of the fridge made for draining.
 

Hook Daddy

Well-Known Member
Next I drilled the hole in the fridge. I chose lower and to the right, staying away from the power cable and any other fridge parts. It’s just thin metal and insulation. I had a half inch hole saw that was the perfect size. I cleaned up the hole so there were no sharp edges that could cut cables, the fed the sensor cable and dehumidifier power cable through. I read in other threads to be careful using silicone to seal the hole, the smell is hard to get rid of. I used hot glue, and two neoprene plugs from an old cloner I had made that I cut down to fit tight. After it was finished I think I could have skipped the hot glue all together.

Hole in the fridge from the front
6D6A0C05-CEED-4C14-856C-EFCC6E5A33F9.jpeg

Hole from the back of the fridge with wire through. I had not taped up and protected the power for the humidifier here yet, I did that later.
73B2C73B-262A-4459-8F4F-F1FD59395818.jpeg

Humidifier in place. It just sets there with the fins in the channel that drains to the tray under the fridge. At first I worried about the tray filling up but it is designed to evaporate out fairly quickly, it never had more that a dozen tablespoons or so of water in it. The Inkbird sensor is next to it, I ended up mounting the sensor with hot glue to the back right of the fridge fan and between shelves where it will not touch anything including your drying flower once loaded up.

A92F7888-CE17-4327-96D9-95A49ADC0C06.jpeg
 

Hook Daddy

Well-Known Member
That’s it for the basic construction. I cleaned it all out, the plastic and insulation is a pain with the static. Smoke a bowl and take your time. I put the shelves in and marked where I wanted the Inkbird sensor. I read most people put silicon cooking mats on the shelves but I didn’t have any. I found some 1/4” mesh stainless screen I had from another project that worked great. I think you just want to hold your buds and allow air flow. I also turned everything on and ran it for a couple days with a few shallow trays of baking soda inside the fridge. While it didn’t have much of a plastic smell I had read from other posts that any smell can transfer, I didn’t want that. The baking soda works well to remove any odors, so it made sense and I wasn’t in a rush. Overall I am very happy with the results.
 

Hook Daddy

Well-Known Member
Here’s my latest going now. It’s finishing the dry stage and going into curing after about 4 weeks. When harvesting I took the main branches and removed the fan leaves, then hung to dry as normal for 36 hours. Best colas went into the wine fridge, set for 62% rh to trigger the dehumidifier, 9% drop until it turns off, fridge set to 60f. Ran it there until it starts to level out. At first it will bounce back and forth from 53 rh to 62 rh, but take a several hours to go down, then climb in minutes. Once it settles after about two weeks it will get to 53% rh, then take several hours to rise back to 62%. At this point I change the settings to start the dehumidifier at 62% but stop at 56%. After a while longer I change it to cycle between 58 and 62 and just let it go u til I am ready to reload and start again. Hope that makes sense and helps some.

Here’s it loaded now with Laughing Buddha. It’s a clone I have grown a couple seasons, and the smell and taste is far better with this dry than with just hanging and hoping. I can’t say the high is better, but it is superior in every other way.

E4E8056F-3A0A-42D7-AAAC-AE0F766AC253.jpeg
 

Hook Daddy

Well-Known Member
Impressive!
Thank you!

I like those racks
Thanks, they seem to work well allowing the air to circulate all around. I don’t see much deformation of buds some people talk about, like getting a flat side, don’t know if the mesh helps with that or not. I don’t open it for the first couple weeks unless I have to, or want to try a sample, so there’s really no time to turn the buds but I don’t see any reason to either.
 

Hook Daddy

Well-Known Member
So do you go straight from cut into the fridge?
No I gave them about a day and a half this last time just hanging as normal at about 60f and as close to 60 RH as I could get, although it was probably closer to 45%. First time I went straight in and it took awhile to really start drying, longer than I was comfortable with to get under 68% anyhow. This way once I started in the cooler they were at about 70% to start. First time I tried and went straight in they were at about 80% or higher when I started.
 

Tikbalang

Well-Known Member
Really appreciate this, I could make 3 for the price of a cannatrol, not that I need 3, I can dream though, lol.
Thanks for taking the time to put this together.
If you are taking questions-
How long have you been using it now and what capacity does it handle comfortably, (either wet in or dry out)?
Do ambient operating temperatures need any significant consideration?
Thanks again
 
Last edited:

Hook Daddy

Well-Known Member
Really appreciate this, I could make 3 for the price of a cannatrol, not that I need 3, I can dream though, lol.
Thanks for taking the time to put this together.
If you are taking questions-
How long have you been using it now and what capacity does it handle comfortably, (either wet in or dry out)?
Do ambient operating temperatures need any significant consideration?
Thanks again
This is my second dry in it now, it’s just finishing up. It will dry about a half to 3/4 Lb. dry weight depending on how you load it, it could maybe do more but not much. I’m not sure about ambient temp but I think it would make a difference if the temp was too high. The thermoelectric coolers will only drop temp 10f-20f, I have it inside with AC so may never know the effects of it being too hot.
 

pahpah-cee

Well-Known Member
I would personally ditch the wire and use silicon baking sheets. I did the 1/4 mesh wire as well but I get worried about the coating on the metal. I think it’s zinc but I can’t remember. None the less It isn’t something I would want to smoke.

You do have to keep the cooler in a somewhat regulated environment. If you’re in a 80F room the wine cooler will already be working hard to maintain 60F. Factor in that Dehum and you will struggle with temperature.

I spent less than $150 for it all. Totally works and paid for itself in electricity in comparison to me setting up a drying room with ac and a Dehum.
 

Hook Daddy

Well-Known Member
I would personally ditch the wire and use silicon baking sheets. I did the 1/4 mesh wire as well but I get worried about the coating on the metal. I think it’s zinc but I can’t remember. None the less It isn’t something I would want to smoke.

You do have to keep the cooler in a somewhat regulated environment. If you’re in a 80F room the wine cooler will already be working hard to maintain 60F. Factor in that Dehum and you will struggle with temperature.

I spent less than $150 for it all. Totally works and paid for itself in electricity in comparison to me setting up a drying room with ac and a Dehum.
Yes, I have it a temp controlled room for just that reason..
 

amneziaHaze

Well-Known Member
soo when you reach the perfect humidity dehumidifer turns off? and you dont have any other fan inside to move the air inside?
how long do you dry inside?
 

Hook Daddy

Well-Known Member
soo when you reach the perfect humidity dehumidifer turns off? and you dont have any other fan inside to move the air inside?
how long do you dry inside?
There’s two small fans inside, one with the dehumidifier and the cooler has one as well. And yes the Inkbird controls humidity turning on and off, which if you get the Wi-Fi one you can view both real time and graphs over time, and adjust settings from anywhere. This dry I took about 3 weeks to get down to around 65 rh, and it’s been another couple weeks just slowly dropping from there. I’m still vegging now so no need to rush, it will slowly dry and cure from here as long as I want I think. I’ll put everything in grove bags once the next batch is ready to go in.
 

Hook Daddy

Well-Known Member
i got a few branches inside and at day 3 i have to put water inside. fridge is almost empty
i hanged mine from the racks down and it drips in to a dish
Interesting. Is your fridge thermoelectric or compressor based? I have not had to add water in at all yet, which originally I thought I might have to. I have never tried mine without a fairly large load, I wonder if that could be the difference?
 
Top