BlackRoses
Well-Known Member
Damn what a gorgeous bud!! congrats bro!
+rep!
+rep!
muy excellente senor .... the horns are friggin fabulous .... I like the cured buds with the horns even better .... !!! Harvest on!~~~~~

beautiful")
Hey there Cross glad to see you got that person handled on the clones. I saw your post thanks for helping him. Glad your harvest is proceeding so well.
Damn what a gorgeous bud!! congrats bro!
+rep!


how can you re-veg your plant if it doesnt have any leaves on it? i wanna see if that works for you cuz im not very confident it will....best of luck
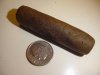
Thanks for that tahoe. I'll just bust off a horn and roll a paper around it lol
Thanks buddy
Thanks Cane,
The drying process is coming along nicely. I moved them to the paper bag today, so the outsides of the buds don't get too crispy. Yield on 5 plants looks like about 4 fingers deep in a brown grocery bag lol the last of the 6 should be ready for harvest soon.
Thanks for the compliments BlackRoses
I've been busy, but hopefully I can find the time to transplant the remaining clones soon. I want to make sure I have the soil mix and PH just right, so they don't go into shock.
What's left of the Sativa mother is still in my fridge. As soon as I get a heating mat - or the equivalent -I'll be re-vegging her.
And I still have a few things to gather for this grow;
HPS bulbs, cloning supplies, and flowering nutes. Check back next week.
exceelent post, never realized you could do that .... thanks for sharing the knowledge.
 you start to feel it in your eye's and as you take the second hit you feel the top of your head float away. It's very psychedelic, but also excellent meds; cures nausea instantly, and helps with appetite stimulation... when you come down. Hopefully the mother re-vegges as planned, otherwise I'll be on the lookout for some super lemon haze seeds.
 hey man thanks for the update. the lemon haze is one that I have added to my GrowsToDoList .... good luck walking forward.

I want I want I want !!!!!! LOL! awesome pic man!!


thar she be ....

 Keep up the good work!
Sorry to hear about your brother man.I have been through stuff like that far 2 often. My prayers are with him. I think he'll be proud of how sexy your ladies are.
+rep and subbed.
I'd like to sample some right now, but I'm sure it would leave me incapable of putting a sentence together lol 
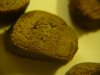
 I can't get over how sticky it is, like modeling clay - pure trichomes!
 That hash kicked my ass last night
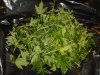
I trimmed up the 7 ladies - in flower - removing the lower branches, and the undergrowth, so that the energy is forced to the tops.
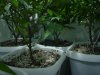
The Indica is already flowering profusely, after giving them a little high phosphorous bat guano last week.
The HPS bulbs won't be switched in, until the 2nd, or 3rd week of flower, to help reduce stretch. I've also continued grow nutes, further, into the first part of this flowering cycle, and will be using less molasses... because as it turns out Molasses is pretty acidic (5.0). 1 tsp per gallon should be plenty, and maybe I'll pick up some earthjuice "catalyst" to help supplement micro-nutes.
The thumbnails show the branches I pruned out, and the buds forming on the Indica ladies.
P.S. I'm still waiting for male flowers on the 1 BMS female. You can see part of what's left of her main stem, in the background, of the last thumbnail. I pruned off all but one bud, and super-cropped her main stem, so she fits under the lights. I've been feeding her aspirin water for several weeks, and still no male flowers. Next comes root pruning - I guess - in order to stress her enough to push male flowers? I better pick up some colloidal silver (to force female pollen). if I plan to do any more serious breeding
Nice bubble hash teaching? Is gourmet hash worth the extra prep time?kiss-ass