Two Commersh Plants w/CFLs

cho0b

Active Member
NOTE: THE FIRST FEW POSTS IN THIS JOURNAL ARE JUST COPIES OF PREVIOUS POSTS I HAVE MADE IN "Newbie Central" and "Indoor Growing."

We're working with a very tight budget and this is our first time growing cannibis. I've learned most of what I know from lurking the forums here and watching a BUNCH of grow videos. I'd like to thank everyone here on rollitup before I ask any questions. Thank you!

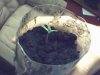
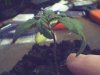
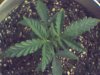
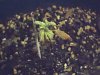
Okay, here goes. We are using 3 small CFLs (i don't recall the wattage but they are probably around 24 each) inside of a small grow box to sprout four plants. We will most likely be purchasing some better CFLs for later on, but this is all we have to work with now. The first two images are the plant that is doing the best. I don't know much about the process but I'm very happy to see these results after only a few days. The last two images are the only other plant to sprout of the four, so far. The soil we are using is from last summer and it was out in the freezing cold for some time. We had to thaw it out before we could even use it. Hopefully that won't cause any problems, although I don't know why it would.

Are there any pointers anyone has for us at this point? What should we be paying attention to this early in the process? And before anyone links me to the 101 questions already answered thread, I've already read it over numerous times.
 

Attachments

cho0b

Active Member
Just adding some new images to the thread to keep it alive. The first two pictures are plant A and the last two are plant B. Maybe we should start a grow journal or something.. I wish we had a working digital camera, these webcam images blow. I've been thinking about getting nutrients ready for a couple weeks from now. From what I've read it's not good to give your babies nutrients until they are at least two to three weeks in. Is this agreed upon by everyone or what?

What nutes do you guys use and for which stage(s) of development?

I was thinking of going with organic nutrients for our first time. Seems like it will be a lot harder to mess up with organics. Anyone have any personal preferences when it comes to organic nutes?

Will organics be more cost effective than chemical nutes?

Sorry about all the questions but I've got one more!

What types of medium do you guys prefer? If soil, which brands and what else do you usually mix in with the soil?

Any replies are appreciated.

Happy smoking. :joint:
 

mogie

Well-Known Member
HOW DO I MAKE A SIMPLE REFLECTOR FOR YOUR COMPACT FLUORESCENT?

To build this reflector you will need a regular soda can, any brand will do, which you will need to rinse thoroughly until no residue is left inside. You will also need a good pair or scissor and a robust kitchen knife to cut the metal accordingly. An alternate method to remove the lid, would be to use a can opener. The lip of the lid can be used, and it will cut it cleanly. These tools should be chosen carefully as they will determine over failure or success of this construction. A lack of caution and a sharp metal edge can be fatal to your fingertips so think twice if your tools are capable of doing the job.


How and where to cut:
Firstly, draw a plan of your cutting path on the outside of the can using a permanent marker or a wax crayon. This will aid you to get a better overview of you plan and to avoid silly mistakes on the way.

Cutting the top part of the can out needs to be done first, adjusting the opening according to the size of your bulb. You do not have to cut it exactly to shape as glue (super or high-temp hot glue) can be used to stick the reflector to the bulb ballast later on. A can opener is the preffered tool for this job. The reflector is purposely not covering the ballast to ensure good aeration and to avoid damage to the ballast components, resulting in a short circuit.

Next, you will need to cut the main part of your soda can in half using your scissors. A hole may need to be drilled first using your kitchen knife to get a good starting point for the scissors.

The inside of the can is coated with a thin plastic layer that should not cause any trouble cutting through the sheet metal. The bottom side of the can does not have to remain in place but leaving it will add stability to the reflector and enhance the reflectivity. An extra hole can be cut into the bottom as well to improve ventilation along the bulb or to connect a 50mm pc-fan to the end.

Lastly, two more cuts have to be made into the sides of the semi-circle reflector to ensure that the sides do not reflect the light back to its origin but rather focus it to where it is needed. The reflector can now be bent according to your light requirements thus making it possible to focus it directly on your plants. If your reflector does not quite fit the bulb yet you can now use glue to stick it to the ballast.
 

cho0b

Active Member
First three images are plant A. The last two are plant B.

Is the drooping of the two big leaves normal? Am I under watering them?

I found a bag of bone meal in my garage! Has anyone used bone meal in their soil/with their chronic?
 

mogie

Well-Known Member
I would go with Fox Farm soil and fertilizer. The trick is to start of at 1/4 strenght and slowly work you way up. Flush once a month while in veg.
 

cho0b

Active Member
How are my babies lookin'?

We just added more soil to their pots yesterday because I noticed their roots were starting to spread outwards at the bottom of their 'pots.'
They should have enough soil to last until we get larger pots and more soil for them.

My girl mixed some bone meal into the soil so i'm hoping that will help the plants in whatever way it can.

The first two images are of plant a and the last three are of plant b. The lighter is there for size reference.

I am thinking of forcing them into flowering when they get about six inches tall. Just so I can see if they're males or females. Then I'll take them off 12/12 and back to 18/6 to grow more. Has anyone tried this?
A friend told me it was a good way to sex your plants early in the process.
 

cho0b

Active Member
Thanks a lot man. I will read through all of this and make the reflector later on (when i'm sober.) Totally trashed right now... fkn stoned too. Just wanted to get my grow journal started. DSVzsvbbeetfdbfdbfdbvdfbfds:spew:

HOW DO I MAKE A SIMPLE REFLECTOR FOR YOUR COMPACT FLUORESCENT?

To build this reflector you will need a regular soda can, any brand will do, which you will need to rinse thoroughly until no residue is left inside. You will also need a good pair or scissor and a robust kitchen knife to cut the metal accordingly. An alternate method to remove the lid, would be to use a can opener. The lip of the lid can be used, and it will cut it cleanly. These tools should be chosen carefully as they will determine over failure or success of this construction. A lack of caution and a sharp metal edge can be fatal to your fingertips so think twice if your tools are capable of doing the job.


How and where to cut:
Firstly, draw a plan of your cutting path on the outside of the can using a permanent marker or a wax crayon. This will aid you to get a better overview of you plan and to avoid silly mistakes on the way.

Cutting the top part of the can out needs to be done first, adjusting the opening according to the size of your bulb. You do not have to cut it exactly to shape as glue (super or high-temp hot glue) can be used to stick the reflector to the bulb ballast later on. A can opener is the preffered tool for this job. The reflector is purposely not covering the ballast to ensure good aeration and to avoid damage to the ballast components, resulting in a short circuit.

Next, you will need to cut the main part of your soda can in half using your scissors. A hole may need to be drilled first using your kitchen knife to get a good starting point for the scissors.

The inside of the can is coated with a thin plastic layer that should not cause any trouble cutting through the sheet metal. The bottom side of the can does not have to remain in place but leaving it will add stability to the reflector and enhance the reflectivity. An extra hole can be cut into the bottom as well to improve ventilation along the bulb or to connect a 50mm pc-fan to the end.

Lastly, two more cuts have to be made into the sides of the semi-circle reflector to ensure that the sides do not reflect the light back to its origin but rather focus it to where it is needed. The reflector can now be bent according to your light requirements thus making it possible to focus it directly on your plants. If your reflector does not quite fit the bulb yet you can now use glue to stick it to the ballast.
 

mogie

Well-Known Member
Plants can also droos after flushing or heavy watering take a pencil and poke holes in the dirt this is due to lack of O2 in the rootzone.
 

cho0b

Active Member
Yesterday we bought the miracle grow organic soil mix you see in the images i have attached. We also bought perlite. And a couple larger pots for when they need transported.

Does this soil seem like a decent choice? The soil we started them with is a lot different, will that be a problem? I'm pretty sure that's a stupid question but I figure I'll ask it anyway.

I'll take some pics of the plants and post right after this post.

I would go with Fox Farm soil and fertilizer. The trick is to start of at 1/4 strenght and slowly work you way up. Flush once a month while in veg.
 

Attachments

cho0b

Active Member
Should I poke the holes in the top or from the holes in the bottom of the pots?

Plants can also droos after flushing or heavy watering take a pencil and poke holes in the dirt this is due to lack of O2 in the rootzone.
 

cho0b

Active Member
First two pics are of plant a and the last two are of plant b.

Some of plant b's leaves started to turn slightly red/brownish where they met the stem but they seem to have returned to mostly green this morning. :mrgreen:

Any idea what could have caused that? Over/under watering? Heat?
 

Attachments

cho0b

Active Member
We've been house sitting for my grandparents this week so the babies have been waking up a half hour late here and there. We end up getting really baked and forget to come home to turn on the lights. We really need a timer. Anyone know where we can get one for cheap?

The first three images are plant a and the last two are plant b.

In the first image you can kind of see a brown spot in one of plant a's large leaves. It doesn't look that bad but I am hoping it goes back to green!

The second image shows the leaf on the opposite side as the one in image one. It's turning slightly yellow around the tip. I read that this is normal in plants, but what causes it?

Image three is just a kyoot side shot of plant a. I'm happy with how (s)he looks so far.

Images four and five show plant b's leaves starting to curve slightly inward. Is this due to lack of water? This plant stands nice and straight and seems nice and perky. If the leaves were tits I'd be arrested. Oh wait I'd be arrested either way. :roll:

I'm thinking about sexing the plants when they get about six inches tall and then putting them back into veg when I find out they are female (hopefully.)

:peace:
 

Attachments

cho0b

Active Member
I guess that makes sense. Sexing the plant early would only be a good idea if you're really concerned about it.
 

cho0b

Active Member
It's been a sad ten or so days for plant B. You can see her in the first image. Should I just give up on 'er? :cry:
She's had no growth whatsoever since we moved them to larger pots (about 10-12 days ago,) and before we did we suspected root rot (not to mention poor soil airation.)

As for plant A... I couldn't be happier. This baby's been growing at a great rate, especially over the past week. Right now it's got four ~13watt CFLs around it, two are low and two are above. I've been watering every two or so days.
Since plant A is the only plant we have left that's doing well, I really hope it turns out to be a female.

We're coming up on the one month mark. Should we start nutes soon? Our budget is tight and the nutrients in our soil should last us at least another week, probably two.
What are some low-cost nutes?

Thanks in advance for any replies. :blsmoke:
 

Attachments

cho0b

Active Member
Things are still going well for our last living child. Attached to this post are three fresh (shitty webcam) pics of her. Er.. I hope it's a her. Only time will tell, aye?

As you can see, there are plenty of new leaves starting to grow off the already established nodes. The lower leaves don't recieve much light because the plant is still fairly short and there is no room for lights to fit between the plant and the pot. Will this be alright? Should I trim anything off the plant at this point?

When I watered it today I dissolved 1/2 teaspoon of miracle gro food into 3 quarts of our water. I don't plan on using the miracle gro food often; I just wanted to see if it would make a good/noticeable difference in the growth.

I'm thinking about flowering her when she gets about 7/8 inches tall. I know this won't lead to many bud sites and won't bring about much yield, but this is our first test grow and we plan on purchasing some good seeds for our next grow.

As usual, all questions and comments are appreciated. :blsmoke:
 

Attachments

Top