Northern Lights, CFL Miracle-gro, germ in soil first time grow.

So I'm a noob, and I can use all the help I can get! So any and all comments are appreciated. But +rep if you give me some solid advice. I'll be providing alot of details up front to help anyone else out in the future. I'm planning to grow 1 female, and maybe 2 if they appear to be staying quite small. I was tired of dealing with shady characters to acquire some. I will only be growing enough for myself.

First of all I'd like to refer people to two articles I found very useful to a noob and anyone growing on a budget or with "ordinary" item you can find at almost any place in your hardware stores and local walmart.

First Time CFL grow

Cranker's Guide to using Pre-nuted soil and not failing

I wanted to not have a ballast, as they are scary and can cause fires...but more importantly I wanted something user friendly, cheap, and well I wanted CFL's lol. So the above article was great as a grow showing that it can be done.

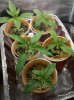
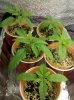
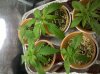
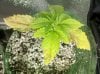
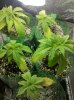
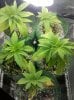
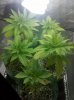
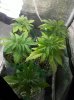
Cranker's miracle gro guide was great and I used something very similar. I also germinated my seeds directly in this mixture and got 5/5 to pop! I was very happy.

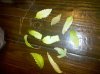
Lots of pics up front as I've been waiting to germ to upload them. I purchased my seeds from the single seed centre (normal Northern Lights seeds) and I was very anxious. I placed an email bc my seeds had not having shipped two days after I placed the order. But I ordered on a saturday, and they shipped the next morning. I received a prompt email though, which was comforting, in reply to my anxious email. I received my seeds about 10 days after placing the order but I wasn't home when the mailman swung by and I had to wait till the weekend to pick them up at my local post office.

In that time I read pieces of two grow books (grow great marijuana from Logan Edwards and The bible from Cervantes), purchased supplies and asked questions and read here on RIU.

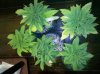
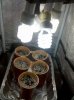
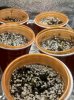
While I placed 5 seeds (of my ten for fear of losing them all to a freak accident) into a shallow cup of water to soak for 6.5 hours (I aimed for 6 but was asleep lol), I mixed my soil.

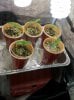
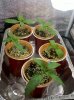
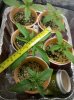
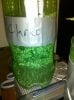
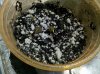
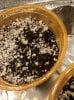
I used Cranker's soil mix referenced above.... Miracle-gro perlite and Miracle-gro moisture control in a 2.5:1 ratio. I Put the appropriate amount in a trash bag, closed tight and stomped on it to break the nute containing spheres in the soil. Then I put the soil into the clear cups (i later put opaque cups over these to prevent light reaching my roots).

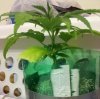
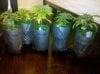
Then I put the seeds into the soil, and sprayed with pH 6.0 water (using the cheapo drop solution to adjust pH with vinegar as my tap was 8.0+) whenever the soil was dry. I ran a humidifier in the room of my 2'x2'x4' tent to increase the ambient humidity and ran 3 cfl's about 1.5 ft from the top of the soil to keep the temps in the tent up.

No exhaust fan was run to keep temps in the tent up. In my next post I'll talk about temps/humidity and how the babies germed.

IMG_20111003_182531.jpgIMG_20111003_182503.jpg

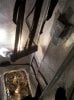
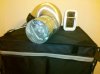
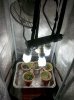
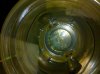
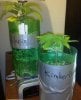
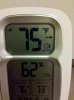
These are pics of my setup. I'm using the GL40 tent from growlab bought on ebay. I have an exhaust fan (80 CFM) connected with 4" ducting and a humidity/temp monitor inside my tent which relays info to the screen on top of the tent shown. The little box taped to the inside of the tent is shown here. (it can be confusing but the "outside" temp/hum on the unit is actually inside the tent).
 

Attachments

Ok so 2 days after I had planted the little guys I came home and found that my first seed had popped!

This seed had a rock from the soil mixture at the very top of the mix...so in honor of this distinguishing feature I named the seedling Raquel. (I used all female names in hopes that the vibes will transfer on). Here's Raquel....

View attachment 1823769

Next are the temps/hum the day she popped up.

View attachment 1823770

AS you can see the humidity was at 62% in the tent when I looked, and the temps over the past 24hrs had been between 76-73F. I kept all 5 cups moist with a spray bottle, and kept the fingers crossed.

Then Stacy's Mom showed up.

View attachment 1823771

In this pic "Stacy's Mom" is just poking out in a weird mid-stem fashion. I was originally confused and wondering if she'd ever make it and pop out, which she eventually did. I could've put other pics but I wanted to share the presentation of the seedling, it could confuse someone who is a noob like me.


Last but not least is a shot of all my seedlings (they all germed in about 3.5 days from soaking).... from Top Left to Bottom Right: Raquel, Stacy's Mom, Kimberly, Clarice, and Lily.

View attachment 1823768
 

idontlikesociety

Well-Known Member
I just started my very first grow and I'm also using CFL so it will be interesting to follow this one.

Are you planning to use 4 CFL's during the entire grow or will you add more later? Or any other lightning?
What wattage are your CFL bulbs? Sorry for the bomb of questions, I'm just really curious since our setups looks very similar in many ways.

Thanks for sharing, best regards :)

EDIT: Thanks alot for the links by the way, find some interesting stuff in those journals.

+rep
 
Hey
So I'm now running (3*27 + 26) = 107w. But below are all the bulbs I currently have.

2 GE 26w (.4A), 2700K, 1650 Lum…(smaller n red) +
3 ecosmart 27w (.45A), 5000K, 1750 lum (bigger n blue)
2 GE 26 w (390mA), 6500K, 1610 lum, blue/big)

I'm using 3 of the exosmart and one of the GE 6500. I couldn't find 6500's my first shopping trip to home depot so I settled. I'll upgrade to 6 bulbs (3 5000K + 3 6500k) in about a wk. I'll be using about 8 bulbs once I go into flower....and I'll be using mostly bulbs I have so it is a very fluid situation.

I'll be using an ONA block for odor and maybe a DIY carbon filter like this one. although I hear NL is a low odor strain.
Easy build DIY carbon Filter

I'm currently going to have to buy a small oscillating fan online which I will hang from the top, as it is getting cold no local stores carry simple fans anymore...they all have heaters now.

Thanks Idont....and I'm glad to help.
 

idontlikesociety

Well-Known Member
Alright, sounds cool! Hehe, I also do the Northern Light strain , and just yesterday I did order 3 ONA Blocks fresh linnen ;)
 
Updating to have a record....up until this point the lights have been on 24/7 to keep temps up in the tent. Now I'll have an 18/6 cycle through veg....until I switch to 12/12 and then toss the males.
Also the exhaust fan has been off to keep warm air and humidity in the tent...it will now run when the lights are on. The humidifier is still running although it may stop running soon as the seeds have popped and I can have the humidity lower and prob should to prevent mold creeping up.

Idon't I got the same flavor lol....are you posting pics soon? did u start ur grow?
 
So today is 8 days since the babies were planted (after a 6.5 hour soak). Today all 5 have big leaves, relative to the first baby leaves. Henceforth the day of planting will be day 0.

I've added a fan today Air King Clip-on 6" Fan $25 The two speed fan is set on 1 (low).

8 days since Fan first added.jpgDay 8.jpg

Also I've started the watering as of yesterday. Yesterday I put an estimated 20-25 mL into each cup. I will be misting daily and watering every 2-3 days depending on whether my plants appear to be dry on the 2nd day. As cranker has statedin the article I posted all the way up top, the miracle grow releases nutes on every watering so I'll lean towards watering on 3rd days unless things appear very dry. Otherwise, I risk nute burn of my young plants.

They seems fine so far and I don't know where all the hate on the miracle-gro stems from.

So I'm contemplating what to do for transplantation. I have 2 large 2gallon pots. I was planning on growing up to 2 females...however if I flower these puppies in the cups they will be quite small. I have to decide how to sex these plants and grow fems only. Otherwise I have to flower them all in a large pan with soil and just pluck the males.

Any advice is appreciated.
 
Today is Day 11 (day 0 = put seeds in dirt). As you can see below there has been some growth and it seems to be picking up. I'm amazed to be honest how quickly these are coming along.

I'm considering some form of training/fim. I'll be reading up on those methods and consider one. I'd also like to maybe add some more soil to the cups. I've read about doing so to a slightly stretched seedling. From my recollection, by doing so the darkness induces the lower portion of the stem which you cover with dirt to sprout roots. In a small container like my cups here, that may represent a significant percentage increase in roots so I'd like to do so. Most likely this saturday I'll give this a whirl.

Another concern I have is my ventilation. The fan I have in the tent is blowing air down. My exhaust is blowing air out the top of the tent. However when my small inside fan is blowing my temps tend to shoot up to the high 80s. Something Im not comfortable with. If anyone has any suggestions that'd be great but so far I'm keeping it off and only on a few hours when I'm home.

Also I'm putting together a DIY carbon filter soon and I'm following this article. So far I've spent like 16 dollars buying materials and I only need to buy a 4" end cap and I'm set to build my filter. Dunno when I'll make/install it, but I'll throw my ona block into the tent prob by like next week.

Easy to Build DIY Carbon Filter

IMG_20111013_235510 Day 10.jpg

As always, help and comments or suggestions are appreciated but so far so good IMO.
 
Today is Day 13 since seed into soil, I finally legit measured yesterday. The tallest plant (Raquel) is now 3.5" tall, and the second tallest (Clarice) is now 3" tall.

LIGHTING UPDATE: ok so last night I was reading my book and decided I was going to veg 24hr until I decide to switch to 12/12. No reason why not to so I hope this works out well and doesn't shock/ dry my plants too much. Up until this point I was running 18/6 since all 5 seeds popped.

The widest is like 6.5" wide on one set of leaves....dunno which lol. As you can see I've added my ONA block early. Prob gonna get another as a backup in the next month. Today I watered and pH'd my runoff (water I add in is pH 6.0). I also noted some droopiness from my plants today so I watered earlier than I normally do. Hopefully later today they look better.

The runoff was once again pH 8.0+, as my kit only goes up to 8.0 with the cheap drops and color chart for comparisson.....nothing to do but keep trucking as Cranker's guide (referenced in first post) proves this soil can take me to harvest and I'm committed, but it does raise the Q about this soil being a little too alkaline for the ideal nute absorption, just an aside note to consider.

The below pics are from yesterday and today.
IMG_20111014_232637 Day 12.jpgIMG_20111014_232222 Day 12.jpgIMG_20111015_143142 Day 13.jpg
 
So today I noticed that my plants were kind of droopy. As documented in my last post I had watered yesterday. If you look at my last post the Top Right plant was a bit droopy, I noticed this and so decided to water a little sooner than usual. I notmally water in the afternoons and this time it was really 2.5 days since watering instead of 3.

Now as you can see below, my plants grew quite a bit in 24 hours but they all look droopy. I also looked for signs of water still draining from the cups but there was none. The soil on all the cups however is still damp and moist but not "wet."

I also looked at the roots b/c while they are in a double cup setup, the inner cup is transparent. I saw that all of them had some healthy roots growing through to the cup edges. So I'll be thinking of transplanting into 2L soda bottles soon. That way I can sex them in the coming weeks and have them fit into my tent. I only have 2 large 2 gallon pots that I will be growing a max of 2 females inside of in the late stages of my grow. However the 5 growing now is a safety net in case I kill a few or 4 turn out male lol.

IMG_20111016_121940 Day 14 Droopy.jpg

I suspect I overwaterred b/c I watered early and I gave a bigger dose than usual b/c I believed they were all drying up yesterday. Any advice is appreciated and from now on I'll be religiously waiting to water on 3rd days. Input here gets +rep if you can help a brother out.
 
Hey all, So today was a big day for the garden. As stated previously and discussed on the following link, I had some droopy leaves and one plant (kimberly) was quite small and turning brown on a few leaves.


droopy plants: over or under water

The most common advice I got was to transplant b/c I was getting rootbound. Some lower leaves have also started to yellow (a sign of some rootbounded plants). A few other funky suggestions were made. I'm not sure if rootbound, but I did notice the roots were showing in see-through cups.

As far as transplantation technique. I used a boxcutter blade to cut my cup down one side, then pried the bottom of the dirt wedge up and shimmied the whole thing out, plopped on top of a large base of soil in the bottles, and then covered on all sides and on top with some more soil.

Also today I transplanted the plants into 2L soda bottles, the plants took a little bit of a beating in the process. One lost a few leaves, another had it's rootball squished. But the end product is much bigger room for the root system to expand and absorb. There are some holes in the bottom of each bottle and I waterred before moving the plants (prob like 3 hours before) and also after the fact.

the soil I used was flushed 3 times before the plants were moved in, and probably like 70-80% of the water I added as a final watering once the plants were in drained out the bottom in a matter of a few minutes. (I've read that after transplantation you need to be liberal with waterings but I had also watered earlier today and I hope this works out.
IMG_20111018_225045 Day 16.jpg

As you can see above there is my new setup. I will be wrapping the bottles with Duct tape to prevent light from penetrating into the bottles. I also chose lime-green soda bottles versus clear b/c the green tint only allows the green hue of light to penetrate and absorbs all other wave-lengths (ie less light reaches the roots in case of an accident)

Here is my Kimberly that isn't looking so good, I then plucked the very brown leaf right after this pic. Hopefully after this my plants won't be droopy and will also stop to show signs of nastiness.
IMG_20111018_225144 Day 16.jpg

EDIT: Interior Fan is not being run now b/c of fear that the babies need to be babied for a few days as I've just traumatized them a bit by manhandling the roots and squahsing some rootballs.
 

Kronikkk

Member
So today is 8 days since the babies were planted (after a 6.5 hour soak). Today all 5 have big leaves, relative to the first baby leaves. Henceforth the day of planting will be day 0.

I've added a fan today Air King Clip-on 6" Fan $25 The two speed fan is set on 1 (low).

View attachment 1830250View attachment 1830251

So sorry if I sound like a dumbass but I'm doing a cfl grow of my own and I'm just wondering....what is a "6.5 hour soak" and why did u do it? Cuz I just soak my soil in water before I plant the germed seeds. Is this just your personal preference or is it important to do this sort of "soaking process"?
 

geturgrowon

Well-Known Member
knight u didnt needs to soak ur plants man u could kiil them by over soaking them be carefull how are they now i havnt heard from yAy
 
So first off the pics by day. Im surprised how well the plants adjusted to the transplantation and how much progress they've made in just a few days. (24/0 light cycle running now). Also I didn't soak the plants lol just the seeds as stated next.

First off soaking for our new bud Kronikkk (I imagine u got anxious and looked this up already but here goes)....So when you're going to germ seeds it's recommended in several sources so simply put them in tap water. It's commonly referred to as a "soak." People argue about how long to do it, but I've seen ppl report success with a 6 hour soak. Others say "when the seeds sink they're good" and will tell you to wait 24 hours until some sink, and toss the ones still floating. I can tell you I put 5 seeds into the water for 6.5 hours (I aimed for 6 but was asleep lol) and none sank, and I got all 5 to germ in soil so IMO the sink/float method is BS. I doubt you can see them but they're in there below in the orange cup doing they're soak thing. I would recommed the soak b/c the best germination rates I've seen so far involve Soak and Plant directly into soil before the seeds germ, AKA "Direct Germination."

IMG_20111002_220733.jpg

Day 18 (2 days after transplanting)
IMG_20111020_011725 Day 18.jpg
This was the first day I started to feel like kimberly might make it after all. I was pretty worried about her for a while.

Day 19
IMG_20111021_180139 day 19.jpg


Day 20 (today)
IMG_20111022_230502 Day 20.jpg

I'm happy with the growth I've seen so far and I'm thinking once the veg growth goes for maybe another 2 weeks I can switch to flowering.

Also if you follow the plants from day 18 to 20, they become less droopy. I watered on day 19 and 16, so I'm not sure what was going on entirely as far as over/under waterring potentially. However as far as "rootbound" goes, I'm not sure if that is what caused Kimberly to be doing bad as she was a much smaller plant than the likes of Raquel and Stacy's Mom.

However, the growth since transplantation is undeniable and I'd recommend switching out of Solo Cups sooner than I did as I was likely slowing the potential growth. I'd recommend switching out at about the 2 week period a few days sooner than I did. I had been considering Nute-lock for Kimberly (the plant with dark brown leaves) but she's been doing great since transplant so I'm not rocking the boat just yet.
 
Day 22. So today I watered and I added duct tape around the outside of the green soda bottles.

As you can see here, I had the roots uncovered for a while and they grew all the way out faster than I anticipated. I'm surprised by how fast these guys are growing and I'm limited by the space I have. Otherwise they'd all be in 5 gallon pots and beasting!
IMG_20111024_193144 Day 22.jpg

So here is kind of a before-after shot with clarice and kimberly
IMG_20111024_193132 Day 22.jpg

Here is a close up of Clarice's leaf tips. As you can see the tips of the leaves are yellow and curl down. I'm going to look this up, I suspect some nute burn may be happening. If so I'm kinda stuck b/c the soil is pre-nuted and I have yet to add any nutes.
IMG_20111024_193803 Day 22.jpg

Here is a wide shot of all 5 plants in the tent.
IMG_20111024_202642 Day 22.jpg

Here is a close up of I believe raquel....notice the yellow spots on the leaf on the left
IMG_20111024_202656 Day 22.jpg

So far the project is going good, I hope they grow tall. I'd like to build a carbon filter on sunday as all parts are acquired.
 
So today is day 25. I watered and clipped a few discolored leaves. I have been suspecting nute-lockout for some time as the leaves were very lightly colored and the run-off pH was 8.0+ So my solution has been to water with pH 5.5 water for the last 2 waterings. Previously I'd been using pH 6 water. Below are the clippings taken today. (of course I put the scissors in peroxide and then rinsed them off first)
IMG_20111027_160412 Day 25.jpg

Here is a shot of the 5 plants. I only plan to keep one female but for now these are insurance if I kill a few, or if 4 turn out to be male lol.
IMG_20111027_155756 day 25.jpg

here is a shot from the top
IMG_20111027_155657 Day 25.jpg
 
Yo bro, what's up w/ your plants? Just read through your journal and interested in the progress cause i'm going to be doing a miracle gro/cfl grow starting soon.
 
Top