My First Grow, Start to Finish

portfedh

New Member
Hi Guys,

I recently completed my first grow (buds are currently curing in glass jars). I had absolutely no prior knowledge before and learned absolutely everthing thanks to youtube, Rollitup, and a couple of books of Ed Rossenthal.

Anyway, now that its all said and done Id like to share my experience to give back to the community.

I will be posting with as much detail as I can, but I don´t believe I will do it in one sitting. I took lots of pictures all the way through.

Anyway here's the basic info:

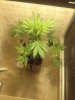
Strain grown: Northern Lights (feminized)
Medium: GH Waterfarm w/ Hydroton & Rock wool cubes. (1 plant).
Nutrients: General hydroponics, flora series, expert recirculating chart.
Light: 400Watt Metal Halide during veg, 400Watt HPS during flowering. Supplemental T8 Fluorescent lights (4).
Time: 6 weeks Veg, 8 Weeks flowering (including flush).
The extra weeks of veg were because of cloning experiments (normal+air layering).
Harvest: 232g dry weight, no stems.
Space used: 1m2 for plant growth.

My objective was to follow through as best as I could a standard growing method to have a baseline to compare to other growing methods (SOG, SCROG, etc). Plant was cropped minimally and super cropping techniques were used sparingly, mainly as small scale tests.

Initial Setup:

Germination: Germination was achieved by placing seeds in a glass full of water overnight and then placing it in the rock wool cube, which had been previously soaked in ph corrected water for about an hour. Germination took about 24-48 hours. Comparing it with other germination methods, the paper towel method was more effective and is now my preferred method for germinating seeds. Seeds were transplanted in medium sized cubes, and the gap in the cube was filled with a smaller rock wool cube about two weeks after germination, making a shorter stem and a lower plant canopy.

To germinate I also used a heat mat. This particular seed had no problems but as I later discovered with other seeds, overwatering and overheating is as much of a problem as their opposites. Rockwool cubes can be watered and any excess water should be drained. I tried leaving some water as a "flood" but ended up rotting about 4 good seeds. Heat helped this as well. About 21 degrees celsius seems to be just right.

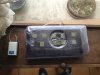
Nutrients were added once the first set of true leaves appeared and GH Flora Series Expert Recirculating chart was followed exactly. Initially the rock wool cube was placed in a small container and nutrient solution was added, changing the solution twice per week. Nutrients were mixed in a 1L container and nutrient quantities were measured using separate 3ml syringes. A HM EZ TDS meter was used to measure ppm (really good meter), and the General Hydroponics PH solution tester was used to measure water PH. PH was kept between 5.5-6.5.

As soon as cotyledons were green the plant was placed under 24hr lamp light. As soon as true leaves appeared the plant was placed under the 400W metal halide lamp. This helped the plant grow considerably faster, but economically was wasteful, since there was far more light than what the plant could manage.

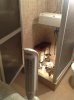
Setup was placed in a bathroom at the top of my house and the 1m2 shower area was where the plant grew. Room was cleaned and fumigated prior to growing and no pesticides were necessary during germination, vegetative growth or early flowering.
 

Attachments

portfedh

New Member
Early Growth
The plant started growing quickly after lighting it with HID lights. To make sure nutrients were readily available the rock wool cube was set in a small bowl and premixed nutrient solution was added. Solution was changed daily to make sure oxygen was readily available. This was very impractical since a lot of nutrient was wasted. To solve this problem an airstone was added to the bowl to keep water oxygenated.

After sprouting the plant started bending slightly, since the lamp was lighting the plant at an angle. To keep it straight twist ties were added as support to center the main shoot. Soon secondary leaves appeared. The first and second pair of true leaves were single serrated leaves, while the third pair developed into a three point leaf (not yet the five point classic leaf). After the third pair of true leaves developed the extra space in the rock wool cube was filled with a smaller cube cut in half. About two weeks later fully developed roots had appeared where the shoot had been covered by rock wool. By the end of the third week roots had started growing outside the rock wool cube. At first this presented no problems, but soon early algae formation made it clear it was time to move the plant into the hydration, where roots would not be exposed to light and algae would not form.

After the air-stone was added nutrient solution was changed weekly. As the plant absorbed water and nutrients more pre mixed solution was added. This increased TDS considerably. The solution started at 400ppm in the beginning of the week and would end in about 800ppm on Sunday. Soon nutrient buildup started showing in the plant. The tips seemed slightly burned, as if from lack of watering. Also, some of the new growth had started twisting sideways, or in some cases in a spiral like way. The problem was solved by simply refilling with plain tap water (100 tds) and adding fresh nutrients weekly. Water and nutrients were PH corrected daily and the plant was checked twice per day for about 15 min each time. Water was not set to aereate overnight to evaporate chlorine, since it felt unnecessary.

IMG_2973.jpgIMG_3033.jpgIMG_3034.jpgIMG_3044.jpgIMG_3045.jpg
 

portfedh

New Member
Mid Growth
As soon as the nutrient burn was solved the plant was moved from the rock-wool cube soaked in nutrients to a Water Farm with a hydroton substrate. Almost immediately the plant started growing considerably. In Just a few weeks the plant passed from being a small 12cm plant to a 50cm plant ready to flower.

Since the rest of the Northern Lights seeds had been ruined in my first germination attempts i decided to give cloning my best shot. Clonex, mini rock wool cubes and a humidity dome were purchased. About 5 cm of the main top shoot was cut, dipped in Clonex, and left to root in the humidity dome. The dome was placed under a 85W compact fluorecent bulb with 24hr lighting.

The cloning experiment didn't turn out very well. At first the plant seemed to be dying from its inability to absorb enough water. I tried flooding about a cm of the rockwool cube in water, but it turned out that this helps the plant rot. The plant still looked withered, since the shoot was unable to transport all that water into the fan leaves. After some youtube research it seemed that placing a glass of water with an air-stone inside it was all it took to keep humidity and air circulation in adequate levels for the plant. The next problem was the fluorescent light.

I had imagined that although an 85W CFL was not enough to grow a plant, it should be enough to get it started. It seems its more complicated than that. At first the plant looked really well, however soon yellow started appearing from the centre of the plant, where new shoots are supposed to be forming. I assumed it was a nutrient deficiency, since ph was being controlled. I tried adding a mild 300ppm nutrient solution to correct the problem but it didn't help at all. After some time the plant died. It was after some experiments with other plants that I discovered that the light was somehow not adequate. To solve the problem I changed the cloning system to air layering.

I chose a lower branch and very slightly scraped it with a knife. I added some Clonex (not too much, just a thin layer) and covered the area with a small rock-wool cube soaked in water. The cube was kept in place by a zip tie and covered in aluminium to keep humidity from escaping. The cube was watered twice per day with a syringe for three weeks before cutting the new plant. The weight of the cube once watered was considerable, and so a Gerber container was used as a support to keep the branch from bending. Air layering takes about two weeks but since it was the last chance of cloning before flowering the plant I left the plant an extra week just to make sure.
 

Attachments

portfedh

New Member
As soon as the plant started growing in the Waterfarm explosive growth started showing. I heard somewhere that plants double after flowering (sometimes more).

My plan was to flower the plant when it was 30cm high (not including pot size). But I ended up flowering at 50cm. My end plant was about 1.50cm.

I did some suppercropping, but I did it by crushing the main stems without bending. This made the stems thicker & stronger but didn't change the plant's direction. Besides the single clone made from the main top & the side branch that was air layered I tried not to modify the plant at all. My idea was to use it as a baseline to use as a comparison with future grows. I removed all leaves that started to show ageing from the beginning and tried to keep the place as clean as possible. My main concern was not to give pests a chance to get into the set-up.

IMG_3234.jpgIMG_3245.JPGIMG_3248.jpgIMG_3249.jpgIMG_3251.JPG
 

Jloi

Well-Known Member
Awesome man! I'm glad you had such a great grow for ur first time. If you haven't please read up on jarring,curing and drying. It's the true final make or break after a grow. And from many grows of trial and error please don't rush, over drying or under drying can happen which welcomes mold to set up shop. I still have some vanila kush in cursing jars over a year old. Smells and tastes top shelve. Plus rep
jloi
 

portfedh

New Member
I started the flowering phase after 6 weeks of Veg. Supposedly 4 weeks is enough but i took the extra time to practice with cloning. I changed light settings from 18/6 to 12/12.
During 18/6 light hours were in the day, but the room got so hot that I ended switching the light hours to cover most of the night. During 12/12 period I could not risk it, since some light got into the room during the day and could fuck up the plants night cycle. Lights on was 8am to 8pm. I also changed my bulb from Metal Halide (MH) to High pressure sodium (HPS). I bought an electronic ballast that could use both. If you don't you need two different ballasts. I did this because according to many bloggers HPS is better for flowering and MH promotes better veg growth.

I tried keeping the bulb at 30cm from the plant canopy, but if you use bulbs with more than 400w you will probably need more distance.

Plants started showing flowering signs one week after the light cycle was switched, with small little hairs growing everywhere. As the canopy grew bigger, I started noticing the lower areas of the plants received very little light. I supplemented with a CFL with good results. Interestingly, plants started bending downwards, as if sick or sad, but it was because of the new light.


IMG_3342.jpgIMG_3346.jpgIMG_3347.jpgIMG_3352.jpgIMG_3353.jpg
 

portfedh

New Member
After 8 Weeks of Flowering the plants were definitely ready to be harvested. Flowers started swelling considerably and fan leaves started to yellow towards the end. The buds were thick with resin and the white hairs on the plant sarted turning orange gradually until about 50% of the little hairs were orange.

Top buds were bigger and ripper than lower ones, which were considerably smaller (the famous popcorn buds). After testing them out later I could not find any substantial difference in the high of different sized buds, however bigger buds look far nicer, are sturdier, easier to transport and don't crumble as easily as popcorn buds.

I decided to harvest gradually in about a week, going from the top down. I could see no visible change except that the plant would drink smaller quantities of water as it became shorter.

The plant was flushed with flora kleen for a day and then three times with water one week prior to harvest to make sure excess nutrients were not present in the plant.

I read that you could add food extracts to the water and that excellent results could be achieved. I was tempted to give it a try but decided not to in the end to have a baseline to compare future grows. I will probably try lemon/orange (banana?) flavours next time and post the results.

Buds were trimmed and manicured when cut. After a week they were dry enough for curing and lost more than half their weight. The transformation when drying is truly incredible.


IMG_3535.jpgIMG_3537.jpgIMG_3538.jpgIMG_3577.jpgIMG_3597.jpg
 

portfedh

New Member
The end product after drying and curing for my single water farm plant under 400w was 232g. It´s a whole lot of weed and was definitely worth the wait.

After drying i found some jars and stored all the product there, burping (opening) the jars for about 15 min twice per day for about two weeks. After that I left it for a whole week closed and the buds preserved perfectly. (Pics below).

Waterfarm review
- Waterfarms are great for single plants or a few plants at most. It would be better suited for a SCROG than for a SOG.
- They work exceptionally well, and produce massive plants compared to other systems.
- Roots will eventually reach the main reservoir and explosive growth will follow.
- A very low maintenance system *
- They are a perfectible system: An airstone in the reservoir, more drain holes is better.
- Timed irrigation is better than permanent irrigation. A digital timer is the way to go. Permanent Irrigation produces edged roots while timed will create more root branching.
- Hydroton is a superb substrate. Drains quickly, gives plant support, cleans easily and does not become a breeding ground for pests like coco.
- The system can cause problems towards the end. Specifically:
- Plant will become root bound if left too much time.
- Rootbound plant will not drain properly
- A huge plant drinks a huge quantity of water. The reservoir lasts a week in the beginning and a day towards the end.
- There is no way of expanding the reservoir, a second reservoir and major system changes are needed if you want to modify it.
- A huge plant weighs a ton and cleaning the reservoir is difficult towards the end. You can add water & nutrients through the water level tube, however this is not optimal.

In conclusion: I absolutely loved the water farm. My friend is trying ebb & flow and I have seen him struggle so much more in comparison. I will definitely continue using this system. Having said this, it still has its problems and its not the way to go if you are looking for a massive amount of plants.

Final Thoughts
Surfing the web I found "smart pots" which work using a system called air pruning. To keep my strain going I made a clone using air layering and planted it in rockwool. I then planted the rockwool in coco substrate and drilled holes all over the pot to test air pruning. Compared to control plants air pruning is real. Normal pots develop roots that reach the outer surface and then wrap around the substrate, entangling and eventually compacting the substrate. This does not let roots develop inside and end up impeding the plant to grow stronger roots or to absorb water properly. In comparison, air pruning develops inverse christmas tree root systems that don't compact substrate, absorb more water and don't make the plant root bound. A friend tried this with normal fabric bags and it also works like a charm. No special pots are needed.

The point of this is, when i saw the root system in the water farm, it was clearly taking the normal root bound way of developing. This is a nuisance, so i figured (this has not been tested) that with more holes, and fewer irrigations roots would develop more towards the centre (which has more moisture) and in a more controlled manner than that achieved with permanent irrigation. This would allow plants to stay longer in the water farm before eventually becoming root bound.

I hope you found my posts useful. Please contribute and make our community larger. Shared knowledge is the way.

Cheers & Good Luck

P.

IMG_3619.jpgIMG_3620.jpgIMG_3623.jpgIMG_3624.jpgIMG_3625.jpg
 

portfedh

New Member
End product in Glass Jars & photo comparing my Grown Northern Lights plant (right), with organically grown Mango Kush (Left)(Also a delicious strain).
IMG_3641.jpgIMG_3642.jpgIMG_3643.jpg
 
Awesome grow. I'm doing my first now and doing a similar setup but with cfls instead of HID, but that's for $$$ and electricity reasons. Maybe one day lol. But wow, just an awesome grow.
 

LosingAllPride

Well-Known Member
it's good to see that the General hydroponics flora series, expert recirculating chart you used worked. I'm on my fourth week using the same chart and haven't seen any buds actually blow up yet. When did yours really take off?
 

portfedh

New Member
Fourth week flowering?
After the whole "transition" week with 12:12, it took two more weeks to get the female hairs visible. Im starting the third week and the hairs are very noticable, but they are still extremely small buds.

Still, it also depends on how much time you vegged the plant and the strain. If it wasn't mature enough it may have taken an extra week or two. I vegged two more weeks than recomended on this grown, but maybe your plant took a bit longer or the strain is not as fast.

I read somewhere that if you think you need more time in veg or flower you should repeat the mid veg or mid bloom week charts.

Expert recirculating is very cool, I have seen very good results from the nutrient mix.
 

portfedh

New Member
I just realised that i didnt really answer the question... sorry.
Buds really swelled in the last three weeks, specially the last two. That dry kool bloom really does it.
 
Top