Bignutes
Well-Known Member
My light design as follows:
TRAHMAS - Threaded rod aluminum heatsink modular adjustment simulator
30 sq ft space
The light:
960 watts
Lighting schedule is the "sun" (provided by my light) rises and sets, so my sunrise or sunset I can go down to about 2800k, rises to about 3600k by midday for 32 watts per sq ft max, this is for flower, for veg I can run this setup to go 2700k at sunrise/sunset and get to 4300k at midday for 15 watts per sq ft minimum. I transition to flower so its a mix during transition period.
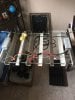
Three 320 watt inventronics drivers - eud-320s320dt, these drivers are programmable and these simulate sunrise and sunset.
Vesta dual channel 2700k and 5000k - 2 footers x 32, good one and done strips for this as with drivers above they will adjust the current ratio applied to each channel to change cct.
2x - 4 parallel x 4 series for the 2700k channel for two of the 320 drivers, so 640 watts are applied to the 2700k for flowering
1x - 8 parallel x 4 series for the 5000k channel for one 320 watt driver so 320 watts are applied to the 5000k channel
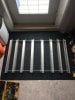
The light build itself is modular, meaning I can build it, add on or subtract, shrink, expand, tear down, repurpose lighting components any way I see fit depending on my grow. Can also use part of it to dedicate to side lighting on one grow and go back to scrog from solely above on the next grow.
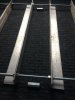
Start with the frame:
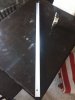
1.5x1.5x.188 aluminum angle
3/8" dia. ready rod
3/8" nuts
Pics to follow
TRAHMAS - Threaded rod aluminum heatsink modular adjustment simulator
30 sq ft space
The light:
960 watts
Lighting schedule is the "sun" (provided by my light) rises and sets, so my sunrise or sunset I can go down to about 2800k, rises to about 3600k by midday for 32 watts per sq ft max, this is for flower, for veg I can run this setup to go 2700k at sunrise/sunset and get to 4300k at midday for 15 watts per sq ft minimum. I transition to flower so its a mix during transition period.
Three 320 watt inventronics drivers - eud-320s320dt, these drivers are programmable and these simulate sunrise and sunset.
Vesta dual channel 2700k and 5000k - 2 footers x 32, good one and done strips for this as with drivers above they will adjust the current ratio applied to each channel to change cct.
2x - 4 parallel x 4 series for the 2700k channel for two of the 320 drivers, so 640 watts are applied to the 2700k for flowering
1x - 8 parallel x 4 series for the 5000k channel for one 320 watt driver so 320 watts are applied to the 5000k channel
The light build itself is modular, meaning I can build it, add on or subtract, shrink, expand, tear down, repurpose lighting components any way I see fit depending on my grow. Can also use part of it to dedicate to side lighting on one grow and go back to scrog from solely above on the next grow.
Start with the frame:
1.5x1.5x.188 aluminum angle
3/8" dia. ready rod
3/8" nuts
Pics to follow