sensisensai
Well-Known Member
If your like me you were growing in a room with solid walls and it allowed for extra floorspace on account of being able to use wall mount fans but an unforeseen relocation forced u into a Mylar tent. Between the battle of finding a reasonably priced fan in mid winter in Oregon and the issue of needing every millimeter of the floor a stand fan isn't an option for me but I meed air moving in my tent. So I walked down to the shop and this is what I came up with. Cost nothing to make and took all of 2 minutes. You could revise it and make it more aesthetically pleasing I'm sure. There's hundreds of approaches I'd be interested in seeing similar projects posted in here as well. So please feel free.
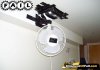
OK as promised here's the blatantly obvious enviously ghetto wall fan mount lol
I used the corner plate provided with my (and most) grow tent. If ur unfamiliar they're simply a triangle shaped piece of metal with two screw holes the the sides are bent to contour the frame of the tent. I'm positive u could buy one online if ur tent didn't come with one.
Corner plate
First thing.. I'm paranoid but anyone should be. After making this unit I disassembled it and let everyything soak in bleach for 20 minutes then neemed every square inch. No bugs no spores
I then took a 2x4 stud and cut it to three feet. Then using a portion of the remaining stud I made 2 45 degree cuts leaving a triangular block that fits in the plate and covers the screw holes but leave enough room for the frame to pop into the plate.


After marking where the screws going through the plate will enter my triangle block. Then take the triangle block and screw it to an end of the 3ft stud (I put the screw in dead center to allow me to pivot the 3ft for fine tune the angle once installed) then attach the plate to the block.


Using yet another piece of the leftover stud I cut a 2inch block and then notch one end with a "v" this will cradle the frames upright and eliminate excess noise and wobble. take this block and put the uncut end (without the v) flush against the backside of the 3ft on the end opposing the corner plate using 2 screws.

Then attach the mounting plate for the wall fan as about 3 inches from the bottom of the unit we just made. Install the unit then hang the fan on the bracket and enjoy. Not pretty and I'm sure there's great ways of achieving the same goal but this was what I came up with. It cost me nothing and took about two minutes


Hope it helps someone and doesn't just take up space lol.
OK as promised here's the blatantly obvious enviously ghetto wall fan mount lol
I used the corner plate provided with my (and most) grow tent. If ur unfamiliar they're simply a triangle shaped piece of metal with two screw holes the the sides are bent to contour the frame of the tent. I'm positive u could buy one online if ur tent didn't come with one.
Corner plate
First thing.. I'm paranoid but anyone should be. After making this unit I disassembled it and let everyything soak in bleach for 20 minutes then neemed every square inch. No bugs no spores
I then took a 2x4 stud and cut it to three feet. Then using a portion of the remaining stud I made 2 45 degree cuts leaving a triangular block that fits in the plate and covers the screw holes but leave enough room for the frame to pop into the plate.
After marking where the screws going through the plate will enter my triangle block. Then take the triangle block and screw it to an end of the 3ft stud (I put the screw in dead center to allow me to pivot the 3ft for fine tune the angle once installed) then attach the plate to the block.
Using yet another piece of the leftover stud I cut a 2inch block and then notch one end with a "v" this will cradle the frames upright and eliminate excess noise and wobble. take this block and put the uncut end (without the v) flush against the backside of the 3ft on the end opposing the corner plate using 2 screws.
Then attach the mounting plate for the wall fan as about 3 inches from the bottom of the unit we just made. Install the unit then hang the fan on the bracket and enjoy. Not pretty and I'm sure there's great ways of achieving the same goal but this was what I came up with. It cost me nothing and took about two minutes
Hope it helps someone and doesn't just take up space lol.