FLoJo
Well-Known Member
Ok so I have had some requests on how to construct a vertical system so i am going to give you a rough blueprint on how to build mine. I dont have a lot of pics from the construction so If anything is unclear or you need more pics just let me know and ill post more pics or elaborate..
so here we go
The measurements:
This construction requires a little more than 9 ft by 5 ft. the inside base is 4 feet wide by 8 feet long.. this is the inner dimensions of the system where the lights hang.
each pot and shelf sticks out an extra 6 inches in each direction, and could be more or less depending on how big of pots you use.
Frame:
first of all you need to construct the frame. the frame is constructed by using 8ft 4x4s for the corner posts, and 8ft 2x4s.
I laid out 2x4s on the ground.. one 8ft long and one 4ft wide and then connected them to the bases of the 4x4s with the use of metal brackets and screws.
then i connected metal joists for house framing at a 45 degree angle to the 4x4s to make the crossbeams to maintain the 4x8 integrity.
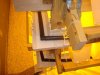
I also added the shelving for the buckets which in my case consists of 8 inch blocks of wood connected to the 4x4s by use of 90 degree metal angles on the tops and bottoms. a crossbeam is then attacted to make an angled shelf for the pot to sit in so that they face the lights

here is a better picture so you can see the angles i used to mount the brackets, as well as the brackets used to make the shelving for my pots.

now after you get the frame secure, and the shelving set up you will be ready to move onto the plumbing.
as far as the shelving goes you can add more or less shelves depending on the sizes of the pots (mine are 7inch i believe) and the wattage you are using.
I also made a space for an 18 inch door to get in and out. you will need to notice the gutters that are capped off by the door to understand this next part

Plumbing:
First of all you need to get silicon, and pvc gutters with the standard brackets.
you then connect them underneath the gutter shelves so that they will drain into the middle of the gutters.
there are plastic brackets which hold the gutters and give them support so that they wont tip over when full of water. these are the standard brackets used to connect them to the side of a house.
run the gutters around the perimeter of your frame on each level.
BE SURE to make the gutters that are the farthest from your res at least 3 inches higher so that they will drain back to the res using gravity.
ALSO dont forget that you need to elevate the side that is capped off (for your entryway) higher than the other sides so that it will drain in a clockwise direction back to your res. ( think of the gumball machines with a spiraling ramp.. that is what you are trying to achieve with different levels for drainage.) USE GRAVITY TO YOUR ADVANTAGE otherwise you will have standing water which will be a breeding ground for algae and bacteria.. trust me i know LOL.
now this is where it gets tricky.. First of all you need to decide how you are going to feed and where your res is going to be..
i thought about doing multiple res' but ended up settling on a single res system due to my limited space.
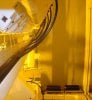
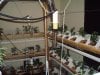
Now how mine works is that i have a pump in my res, which pumps up my main drain which you can see on the right side of this picture.

That white gutter is my my main drain where all of the collected water drains back into the res. there is a pump with a 1 inch hose that runs straight up the drain pipe to the top level, splits in both directions and goes around to the back side to the down tube.

The down tube takes the nutrient solution that was pumped to the top level, and takes it down to hoses on the second and first levels.
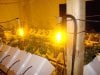
the hoses sit in the gutters so that if there are any leaks or problems it will leak into the gutters and back into the res without making a big mess.
here is a look at how the hoses sit in the gutters.
Now what i did was used a drip irrigation supply store and got 4mm tubing, 4mm flow valves (to regulate how much or how little solution goes into each pot.. believe me this is a must for getting even flow through the whole system) and the 4mm nipples that connect to the 1inch main tube.
to connect them simply buy a punch gun for the size of nipples you use, punch the hole, and stick in the hose plain and simple.
Then i used a drill to make holes in the back of my pots to put the hoses into.
now when the pump in your res starts sending nutrients through your one inch hose, it will also go up the 1mm hose and into your pots, then back into the gutters and down to your res! beautiful!

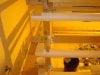
now you that you have the frame up, and the gutters hung, and the plumbing functional, you gotta hang the lights!
What i did was screwed in eye hooks into the tops of the 8ft 4x4s.
I then connected two long chains in an X pattern from corner to corner.. not only does this work great for hanging lights but makes the system much sturdier as well.
you can kinda see it in this pic.
now i got eye hooks and screwed them to the sides of each light which you can kinda see above. this makes the connection point where you use the C hooks with screw in locks to connect the lights to the smaller chains you will hang.
the beauty is that you can adjust the lights up and down by just moving them up a few notches on the chain.
i like to put two fans on the bottom below the lights to make a convection effect and blow the hot air up and out.
with the large chains crossing the system you could hang anything from meters, co2, carbon scrubbers etc.. be creative!
dont forget to add fans and get that air moving.. its a lot of plants in a small space
then just let em gro!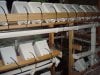

if you have any questions or anything is unclear feel free to chime in! Enjoy
FLo
so here we go
The measurements:
This construction requires a little more than 9 ft by 5 ft. the inside base is 4 feet wide by 8 feet long.. this is the inner dimensions of the system where the lights hang.
each pot and shelf sticks out an extra 6 inches in each direction, and could be more or less depending on how big of pots you use.
Frame:
first of all you need to construct the frame. the frame is constructed by using 8ft 4x4s for the corner posts, and 8ft 2x4s.
I laid out 2x4s on the ground.. one 8ft long and one 4ft wide and then connected them to the bases of the 4x4s with the use of metal brackets and screws.
then i connected metal joists for house framing at a 45 degree angle to the 4x4s to make the crossbeams to maintain the 4x8 integrity.
I also added the shelving for the buckets which in my case consists of 8 inch blocks of wood connected to the 4x4s by use of 90 degree metal angles on the tops and bottoms. a crossbeam is then attacted to make an angled shelf for the pot to sit in so that they face the lights
here is a better picture so you can see the angles i used to mount the brackets, as well as the brackets used to make the shelving for my pots.
now after you get the frame secure, and the shelving set up you will be ready to move onto the plumbing.
as far as the shelving goes you can add more or less shelves depending on the sizes of the pots (mine are 7inch i believe) and the wattage you are using.
I also made a space for an 18 inch door to get in and out. you will need to notice the gutters that are capped off by the door to understand this next part
Plumbing:
First of all you need to get silicon, and pvc gutters with the standard brackets.
you then connect them underneath the gutter shelves so that they will drain into the middle of the gutters.
there are plastic brackets which hold the gutters and give them support so that they wont tip over when full of water. these are the standard brackets used to connect them to the side of a house.
run the gutters around the perimeter of your frame on each level.
BE SURE to make the gutters that are the farthest from your res at least 3 inches higher so that they will drain back to the res using gravity.
ALSO dont forget that you need to elevate the side that is capped off (for your entryway) higher than the other sides so that it will drain in a clockwise direction back to your res. ( think of the gumball machines with a spiraling ramp.. that is what you are trying to achieve with different levels for drainage.) USE GRAVITY TO YOUR ADVANTAGE otherwise you will have standing water which will be a breeding ground for algae and bacteria.. trust me i know LOL.
now this is where it gets tricky.. First of all you need to decide how you are going to feed and where your res is going to be..
i thought about doing multiple res' but ended up settling on a single res system due to my limited space.
Now how mine works is that i have a pump in my res, which pumps up my main drain which you can see on the right side of this picture.
That white gutter is my my main drain where all of the collected water drains back into the res. there is a pump with a 1 inch hose that runs straight up the drain pipe to the top level, splits in both directions and goes around to the back side to the down tube.
The down tube takes the nutrient solution that was pumped to the top level, and takes it down to hoses on the second and first levels.
the hoses sit in the gutters so that if there are any leaks or problems it will leak into the gutters and back into the res without making a big mess.
here is a look at how the hoses sit in the gutters.
Now what i did was used a drip irrigation supply store and got 4mm tubing, 4mm flow valves (to regulate how much or how little solution goes into each pot.. believe me this is a must for getting even flow through the whole system) and the 4mm nipples that connect to the 1inch main tube.
to connect them simply buy a punch gun for the size of nipples you use, punch the hole, and stick in the hose plain and simple.
Then i used a drill to make holes in the back of my pots to put the hoses into.
now when the pump in your res starts sending nutrients through your one inch hose, it will also go up the 1mm hose and into your pots, then back into the gutters and down to your res! beautiful!
now you that you have the frame up, and the gutters hung, and the plumbing functional, you gotta hang the lights!
What i did was screwed in eye hooks into the tops of the 8ft 4x4s.
I then connected two long chains in an X pattern from corner to corner.. not only does this work great for hanging lights but makes the system much sturdier as well.
you can kinda see it in this pic.
now i got eye hooks and screwed them to the sides of each light which you can kinda see above. this makes the connection point where you use the C hooks with screw in locks to connect the lights to the smaller chains you will hang.
the beauty is that you can adjust the lights up and down by just moving them up a few notches on the chain.
i like to put two fans on the bottom below the lights to make a convection effect and blow the hot air up and out.
with the large chains crossing the system you could hang anything from meters, co2, carbon scrubbers etc.. be creative!
dont forget to add fans and get that air moving.. its a lot of plants in a small space
then just let em gro!
if you have any questions or anything is unclear feel free to chime in! Enjoy
FLo

