DIY: Next Level LST Tie Downs, drying rack(air/water), Water Cure strainer etc....
- Thread starter pelt1
- Start date
pelt1
Well-Known Member
I wrote the original HERE. But consolidating in this one post.
-----------------------------------
LST'ng is something I've been doing for a while, and I pretty much suck at it.
But I am happy with my latest contraptions for helping me through this. I used to do some type of tape with string or something similiar, and it would pretty much always come loose.
And since I use grow bags after transplanting from dixie cups, there really is nowhere to add a tie down that will be stable. For Dixie Cups, I would usually use some tape and string, but of course that works itself loose all the time as well.
I finally have a solution for each that works out really well for me.
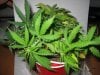
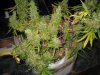
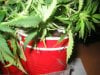
For Grow Bags
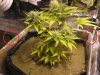
I have been cutting metal coat hangers in half, basically long enough so that I can stick one end ALL THE WAY down to the bottom of the grow bag. Then the side that is sticking out of the dirt, I shape and bend that to the form I want to hold down the branches. Check the pic with the purple circle around it to see what I mean.
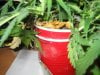
For Dixie Cups:
Similar concept, except I poke a small hole into the side of the Dixie Cup, I and fish hook a paper clip through the hole. Then with the other end, I shape it to what I need to hold down the branches.
Both of these methods are easy to move around as the plant grows, and they are NOT coming loose.
-----------------------------------
LST'ng is something I've been doing for a while, and I pretty much suck at it.
But I am happy with my latest contraptions for helping me through this. I used to do some type of tape with string or something similiar, and it would pretty much always come loose.
And since I use grow bags after transplanting from dixie cups, there really is nowhere to add a tie down that will be stable. For Dixie Cups, I would usually use some tape and string, but of course that works itself loose all the time as well.
I finally have a solution for each that works out really well for me.
For Grow Bags
I have been cutting metal coat hangers in half, basically long enough so that I can stick one end ALL THE WAY down to the bottom of the grow bag. Then the side that is sticking out of the dirt, I shape and bend that to the form I want to hold down the branches. Check the pic with the purple circle around it to see what I mean.
For Dixie Cups:
Similar concept, except I poke a small hole into the side of the Dixie Cup, I and fish hook a paper clip through the hole. Then with the other end, I shape it to what I need to hold down the branches.
Both of these methods are easy to move around as the plant grows, and they are NOT coming loose.
Attachments
-
 69.7 KB Views: 117
 -
 60.5 KB Views: 114
 -
 90.6 KB Views: 145
 -
 66.1 KB Views: 88
pelt1
Well-Known Member
This is the way I have been drying my buds now for over a year. I use metal coat hangers.
You simply cut them with a pair of wire cutters near the bottom as in this pic, where the pen is pointing.
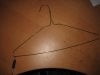
Next you will want to take the upper portion, and bend it into a hook like in the pic below.
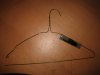
Then you can see how when you put the bottom side back in the hook, it is like a hanger again. See pic below.
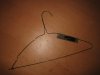
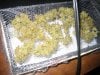
Now, after you trim your buds, you simply slide the buds onto the hanger. See two pics below.
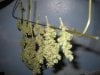
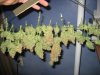
And that's it for the air dry rack. Again, nothing special, just the way I like to do it.
You simply cut them with a pair of wire cutters near the bottom as in this pic, where the pen is pointing.
Next you will want to take the upper portion, and bend it into a hook like in the pic below.
Then you can see how when you put the bottom side back in the hook, it is like a hanger again. See pic below.
Now, after you trim your buds, you simply slide the buds onto the hanger. See two pics below.
And that's it for the air dry rack. Again, nothing special, just the way I like to do it.
pelt1
Well-Known Member
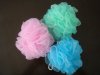
Here is the way I dry my water cure.
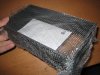
What You see here is a little cardboard box, with the top and bottom cut off of it. This way you should get plenty of airflow across your buds.
Then you take a luffa, like the one in the pic below and un-wrap it and cut a piece big enough for your box.
Then you simply wrap it around your box, and maybe place a piece of paper towel at the bottom to catch any water that drips, and it looks like this:
Lastly, after your buds have been soaking and you are ready to dry them out, simply lay them on the luffa and allow them to dry.
pelt1
Well-Known Member
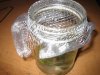
This is another little simple idea for those that like to make a little water cure.....
This simply is a way to soak and change your water that you are using for your water cure.
For this you need a jar, a piece of luffa, and a rubber-band.
Again we are going back to the luffa spounge.... you need to cut a piece large enough to fit around the top of your jar, and secure it in place with a rubberband.
Now, every day when you go to change your water, you simply turn it upside down to allow the water to drain, while the luffa holds all of your buds inside. Then refill with water and voila.
pelt1
Well-Known Member
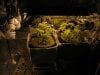
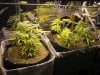
I have been watering my girls this way for several grows now, it's totally a lazy mans way to do things. But I like it, as it works well if you use grow bags, and like to keep a layer of sand on top of your soil.
The idea is to allow the plants to absorb water from the bottom via capillary action. I originally started doing this as I like to keep a layer of sand on the top of my soil, and watering from the top would take forever as I would constantly have to reset and redistribute the sand. Also with the added bonus of it being a really quick and easy way to water.
What you will need is cardboard box large enough for your grow bag to fit in. You will also need a stapler, and some water proof plastic(plastic without holes that will hold water).
You simply need to line the inside of your cardboard box with the plastic. Make sure you fit it completely in the box. Then staple it in place. Make sure you staple it at the TOP, ABOVE where you know your water level will be.
Below you see a picture of what it looks like. Now when I water, I know that my plants like between ¼ to ½ gallon of water depending on how far along in flower they are. I just dump it in the sides and walk away till it's next time to water.
Here is what it looks like, I have circled the area where the staples go :