frostythesnowthug
Well-Known Member
This is a 'how to' on turning an HPS light from one of the Home stores into a remote ballasted HPS.
I chose this model TRAC pro 70w SON as its very easy to make remote, and i only need it for supplemental lighting in my cab..
....If you're looking for a remote ballasted HPS for your cab,
if possible try to get one that looks similar to this model, as theyre all pretty much the same to rig up regardless of wattage.
Ok here goes..
Firstly remove the screws holding down the Lens.

Next remove the Bulb, and put it somewhere safe..

Now remove the screws that hold the Aluminum Reflector to the housing (usually 4 screws)....Next remove the screws that hold the Ballast/starter etc into the housing.
Now CAREFULLY lift the Reflector from inside the housing, this should give you access to the screws that hold down the bulb holder to the housing.
Remove the bulb holder fixing screws, and carefully remove the ballast and bulb holder etc from the housing.
Discard the housing (unless you wish to use it later to re-house the ballast control gear.

Now follow the two wires that exit the bulb holder to where they meet the ballast control gear....in this case, theyre blue and brown... use a sharpie to mark where the wires exit the ballast/starter...ie BR for the BROWN wire - BL for blue wire.
Now find a piece of cable suitable for High wattage electrical items.
For this i will be using a piece of cable from an old welder power supply, as its ample for the task in hand.
Using this wire,strip the ends to a suitable length,and now connect it to the terminals you just marked with the sharpie..
(the BR + BL)
Now strip the other end of the cable and connect it to the Bulb holder...ENSURE YOU CONNECT THE CORRECT COLORS
(Please note: i have used small 'chocolate block' type electrical connectors for Mocking up the light only - see pic - These will later be replaced with a single piece of the welder power supply wire , without any block connectors.)

You should now have a ballast/starter assembly with a long extended Cable (cut to the length you need) complete with bulb holder attached to the end.
Now double check your connections, ensuring that all colors correspond with each other ie blue to blue - Brown to Brown
or
for example, if you have used block type connectors to extend the cable ensure the colors match to which ever color you wire you joined the block to... ie blue wire from ballast --> block connector---> to red wire in extension cable---> to Block connector ----> to blue wire on bulb holder
Now check all connections are tight, and free of exposed wire, so as to be sure not to create potential electrical shorts or a FIRE HAZARD. If you wish you can also use electrical tape to cover the joins, after you have tightened the connections for peace of mind.
US residents - If You are using a U.S. 3 pin plug do the following:-
Now you will need a length of wire with a suitable plug attached to it to create the power supply lead...
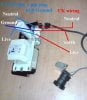
Strip the lead to reveal the wires, and attach the Ground wire,Live wire and neutral wire from the lead to the terminals on the BALLAST.
The ballast terminals are marked as L/Ground/N....

If you are using an old 2 pin U.S. plug, you will need to run a wire from the GROUND terminal on the Ballast to a suitable ground... I wired my ground from the ballast of the 70w hps to the metal enclosure on my other 150w hps, which is fused for obvious safety reasons.

UK residents will need a 5 amp rated 3-pin plug and a length of 3 core wire cut to size(enough to reach the nearest power outlet)
Now Attach the plug to the wire, Brown wire to LIVE, yellow + green striped wire to earth and Blue wire to Neutral, check all connections are tight and replace plug cover.
Now strip the ends of the wires and attach the wires to the corresponding connections on the ballast terminals.
See pic....
Now, you should have a ballast/starter with and extended cable to the bulb holder, and a power lead.
PLEASE, check your connections once again, and MAKE SURE you have a GOOD ground/earth connection.
Fingers X'd and its time to plug the sucker in..
Ok, So if it lit up, good work, and now all you have to do is create something for the ballast to sit on/in..I bolted mine to the other 150w HPS ballast on my cab.
The 'new' remote ballast will still get quite warm,so its probably not ideal to mount it on wood or leave it on carpeted floors..
Adding a pc fan to the ballast will remove most of the heat just swell, and help your control gear last a lil longer.
I chose this model TRAC pro 70w SON as its very easy to make remote, and i only need it for supplemental lighting in my cab..
....If you're looking for a remote ballasted HPS for your cab,
if possible try to get one that looks similar to this model, as theyre all pretty much the same to rig up regardless of wattage.
Ok here goes..
Firstly remove the screws holding down the Lens.
Next remove the Bulb, and put it somewhere safe..
Now remove the screws that hold the Aluminum Reflector to the housing (usually 4 screws)....Next remove the screws that hold the Ballast/starter etc into the housing.
Now CAREFULLY lift the Reflector from inside the housing, this should give you access to the screws that hold down the bulb holder to the housing.
Remove the bulb holder fixing screws, and carefully remove the ballast and bulb holder etc from the housing.
Discard the housing (unless you wish to use it later to re-house the ballast control gear.
Now follow the two wires that exit the bulb holder to where they meet the ballast control gear....in this case, theyre blue and brown... use a sharpie to mark where the wires exit the ballast/starter...ie BR for the BROWN wire - BL for blue wire.
Now find a piece of cable suitable for High wattage electrical items.
For this i will be using a piece of cable from an old welder power supply, as its ample for the task in hand.
Using this wire,strip the ends to a suitable length,and now connect it to the terminals you just marked with the sharpie..
(the BR + BL)
Now strip the other end of the cable and connect it to the Bulb holder...ENSURE YOU CONNECT THE CORRECT COLORS
(Please note: i have used small 'chocolate block' type electrical connectors for Mocking up the light only - see pic - These will later be replaced with a single piece of the welder power supply wire , without any block connectors.)
You should now have a ballast/starter assembly with a long extended Cable (cut to the length you need) complete with bulb holder attached to the end.
Now double check your connections, ensuring that all colors correspond with each other ie blue to blue - Brown to Brown
or
for example, if you have used block type connectors to extend the cable ensure the colors match to which ever color you wire you joined the block to... ie blue wire from ballast --> block connector---> to red wire in extension cable---> to Block connector ----> to blue wire on bulb holder
Now check all connections are tight, and free of exposed wire, so as to be sure not to create potential electrical shorts or a FIRE HAZARD. If you wish you can also use electrical tape to cover the joins, after you have tightened the connections for peace of mind.
US residents - If You are using a U.S. 3 pin plug do the following:-
Now you will need a length of wire with a suitable plug attached to it to create the power supply lead...
Strip the lead to reveal the wires, and attach the Ground wire,Live wire and neutral wire from the lead to the terminals on the BALLAST.
The ballast terminals are marked as L/Ground/N....
If you are using an old 2 pin U.S. plug, you will need to run a wire from the GROUND terminal on the Ballast to a suitable ground... I wired my ground from the ballast of the 70w hps to the metal enclosure on my other 150w hps, which is fused for obvious safety reasons.
UK residents will need a 5 amp rated 3-pin plug and a length of 3 core wire cut to size(enough to reach the nearest power outlet)
Now Attach the plug to the wire, Brown wire to LIVE, yellow + green striped wire to earth and Blue wire to Neutral, check all connections are tight and replace plug cover.
Now strip the ends of the wires and attach the wires to the corresponding connections on the ballast terminals.
See pic....
Now, you should have a ballast/starter with and extended cable to the bulb holder, and a power lead.
PLEASE, check your connections once again, and MAKE SURE you have a GOOD ground/earth connection.
Fingers X'd and its time to plug the sucker in..
Ok, So if it lit up, good work, and now all you have to do is create something for the ballast to sit on/in..I bolted mine to the other 150w HPS ballast on my cab.
The 'new' remote ballast will still get quite warm,so its probably not ideal to mount it on wood or leave it on carpeted floors..
Adding a pc fan to the ballast will remove most of the heat just swell, and help your control gear last a lil longer.
Attachments
-
 55.3 KB Views: 1,912
