kratos015
Well-Known Member
Hey RIU,
I've never really posted anything like this, forgive me if it's been done already, but I just wanted to share my solution to the harsh SoCal/AZ/etc temps that I've had to deal with. The last few harvests I had I thought I did everything right especially the drying cause I did everything that people on here said to do. There are topics that say "just hang it in your closet and let it dry" but that's much too vague. Maybe those guys live in an area where the humidity/temps are perfect for drying, but down here we don't so just hanging it in the closet is going to result in quickly dried grass. Please be sure to take note of your temps and go from there. I invested around $100-150 into this project but it was SO worth it because of the results, now I'm able to dry for at least 4-7 days which is by no means perfect but it's a hell of a lot better than just putting in the closet in SoCal weather. My final product has the same smell it did on the plants and it has a nice little flavor to it, not trying to talk about that, just a bit of a compare and contrast with my results before this little project. Also something to consider, this is mainly assuming you're an outdoor person because if you're indoor you can likely just shut off the lights and change your temps and be all set drying in there obviously
I'm hoping that this will at least help someone because I've received so much help on here that I hope I'm able to give back to the community someday")
Anyway, onto what I did, sorry if it's a bit long, I try to be thorough haha.
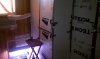
Go ahead and ignore the bottom left, just a few babies so I can keep going So I tried to capture it as best as I could so let me try and explain. On the left you see the window AC unit connected to the ducting which is connected into the box of insulfoam.

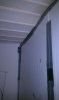
The middle part of this photo is actually a door believe it or not, I took paper clips and connected one side like legos and then duct taped the rest. There's a lone paper clip on the right hand side keeping the door closed. Don't laugh too hard, I know it's totally ghetto but the results are worth the investment
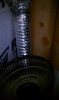
Inside I have the ducting with a little hole in it with the ducting going down. The reason that I did this is because on my right of the first few photos there's another box where I have my lone mother. Perhaps I'll post her sometime but that's not what this thread is about, just trying to explain the excess ducting You don't need the ducting going down to the other box like I do unless you want to build another box sometime, but all you really need is ducting long enough to connect your window AC unit to your drying room. I've also got your typical $15 fan blowing at the wall and a humidifier I bought from Walmart that was only $20.
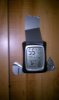
Here you can see the temps I'm getting, I spilled water on the dang thing so it's a bit messed up as you can see but fortunately it tells me the ranges and I look more in term of the ranges than the specific number. I don't know if you can see but if you zoom in the humidity ranges from 51%-74% and the temps are from 66-72 degrees. Unless you build something like this or have a location in your home that has these conditions, you will always get grassy tasting/smelling weed. I know $150 might sound bad at first, but think about how much it sucks to wait for harvest and get grass?

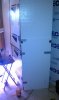
A little Blue Dream I harvested outdoor. Just in case anyone is thinking I pulled it early, I think she was ready. In fact, I harvested the first half of her about 3 weeks ago and let the bottom half get a little more light and nutes. They filled out a little and I started noticing quite a few amber trichs with my naked eye, my pocketscope confirmed it so I cut her up and it's amazing medicine
The main reason I posted this photo though is because I wanted to note the strings I have them hanging from. I drilled 4 screws in the roof in the form of a square, I then tied cheap twine to the top and stretched it down as much as possible. Once that was done I duct taped the hell out of the bottom of it and got 4 tight strings from the top of my roof to my floor. At this point I proceed to tie more twine around this making it kind of a cube in a way if that makes any sense It's very cheap but quite effective.
So let me explain what you're going to need.
- Paper clips
- Twine or other sturdy string
- Insulfoam (http://www.lowes.com/pd_41336-10477-1X24X48+R-TECH_0__?productId=3033248&Ntt=insulfoam&pl=1¤tURL=?Ntt=insulfoam&facetInfo=)
- Humidifier
- Window AC
- AC Ducting
- Duct Tape
The amount of insulfoam will depend on how much space you choose to make your drying room, be sure to measure first If you have a window AC or a humidifier that'll save you a few bucks for sure, if not I can tell you the cheapest ones I found. You can get an awesome humidifier for $20 at Walmart and it'll be useful for other things. As for the window AC, your best bet if Craigslist, you can find some nice ones for $40-80 bucks if you're lucky.
So what you're gonna do is take two of your insulfoam and stack them on top of each other vertically for however high your roof is from the floor. I like to put mine against a corner so that's less money I spend on insulfoam so I'm gonna assume you'll be doing the same thing, it makes it way easier than a freestanding box and more sturdy. So you take the two duct taped pieces of insulfoam and put it against your wall and duct tape the hell out of it against the wall. Then duct tape it on the floor and the ceiling if you can, this will not only make it sturdy but more insulated as well")
 As you can see here it's connected to one side and there's duct tape all over
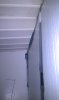
 And here's the other corner, all nice and duct taped and sturdy.
The next thing you're gonna do is take 2 more duct taped insulfoams and lay them on the ground. Take some paper clips and bend them so they're completely flat. Then you're gonna stick them half way into the side of your insulfoam and connect it into the one you just duct taped, just like legos. Just repeat this process and duct tape everything so it's all nice and sealed and you'll be good to go!
Now as for the door to the box, I like to put it on the corner that's completely insulfoam. Once your box is done you will have 4 corners, one that's the wall of your house entirely and one that is made entirely out of insulfoam.
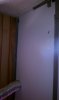
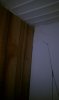 Here's the corner of my room, note the screw with the twine connected to my twine cube for drying

 And this is the corner that's completely insulfoam, I tried to capture how I made the door as best as I could so hopefully I can explain. What I did was connect my insulfoam from the walls outward, I started from the walls of my room and kept going until I knew where the insulfoam was going to intersect. But before duct taping everything up, the only thing I did was duct tape the part where the insulfoam corners up. I then didn't duct tape the right part of the "door" so that I could open it freely while maintaining the "structures" integrity lol.
And once you've got everything all taped up you're just about done!
I hope that I was able to explain it thoroughly enough, unfortunately I wasn't smart and didn't take photos of the actual building process so I tried to explain it as best as I could without that. I hope that this helps anyone that's having problems with properly drying their meds. It wasn't too expensive for me but depending on if you have an AC or how cheap you get it that may be pricey, but necessary. I got an AC for 40 bucks used, spent 30 on 10 sheets of insulfoam, another 20 on the humidifier, 8 for the ducting, and another 10 on duct tape and twine. So after taxes and such it was about $115 and 4 harvests later it's been WAY worth it. Hope this helps and sorry for the wall of text
I've never really posted anything like this, forgive me if it's been done already, but I just wanted to share my solution to the harsh SoCal/AZ/etc temps that I've had to deal with. The last few harvests I had I thought I did everything right especially the drying cause I did everything that people on here said to do. There are topics that say "just hang it in your closet and let it dry" but that's much too vague. Maybe those guys live in an area where the humidity/temps are perfect for drying, but down here we don't so just hanging it in the closet is going to result in quickly dried grass. Please be sure to take note of your temps and go from there. I invested around $100-150 into this project but it was SO worth it because of the results, now I'm able to dry for at least 4-7 days which is by no means perfect but it's a hell of a lot better than just putting in the closet in SoCal weather. My final product has the same smell it did on the plants and it has a nice little flavor to it, not trying to talk about that, just a bit of a compare and contrast with my results before this little project. Also something to consider, this is mainly assuming you're an outdoor person because if you're indoor you can likely just shut off the lights and change your temps and be all set drying in there obviously
I'm hoping that this will at least help someone because I've received so much help on here that I hope I'm able to give back to the community someday
Anyway, onto what I did, sorry if it's a bit long, I try to be thorough haha.
Go ahead and ignore the bottom left, just a few babies so I can keep going
The middle part of this photo is actually a door believe it or not, I took paper clips and connected one side like legos and then duct taped the rest. There's a lone paper clip on the right hand side keeping the door closed. Don't laugh too hard, I know it's totally ghetto but the results are worth the investment
Inside I have the ducting with a little hole in it with the ducting going down. The reason that I did this is because on my right of the first few photos there's another box where I have my lone mother. Perhaps I'll post her sometime but that's not what this thread is about, just trying to explain the excess ducting
Here you can see the temps I'm getting, I spilled water on the dang thing so it's a bit messed up as you can see but fortunately it tells me the ranges and I look more in term of the ranges than the specific number. I don't know if you can see but if you zoom in the humidity ranges from 51%-74% and the temps are from 66-72 degrees. Unless you build something like this or have a location in your home that has these conditions, you will always get grassy tasting/smelling weed. I know $150 might sound bad at first, but think about how much it sucks to wait for harvest and get grass?
A little Blue Dream I harvested outdoor. Just in case anyone is thinking I pulled it early, I think she was ready. In fact, I harvested the first half of her about 3 weeks ago and let the bottom half get a little more light and nutes. They filled out a little and I started noticing quite a few amber trichs with my naked eye, my pocketscope confirmed it so I cut her up and it's amazing medicine
The main reason I posted this photo though is because I wanted to note the strings I have them hanging from. I drilled 4 screws in the roof in the form of a square, I then tied cheap twine to the top and stretched it down as much as possible. Once that was done I duct taped the hell out of the bottom of it and got 4 tight strings from the top of my roof to my floor. At this point I proceed to tie more twine around this making it kind of a cube in a way if that makes any sense
So let me explain what you're going to need.
- Paper clips
- Twine or other sturdy string
- Insulfoam (http://www.lowes.com/pd_41336-10477-1X24X48+R-TECH_0__?productId=3033248&Ntt=insulfoam&pl=1¤tURL=?Ntt=insulfoam&facetInfo=)
- Humidifier
- Window AC
- AC Ducting
- Duct Tape
The amount of insulfoam will depend on how much space you choose to make your drying room, be sure to measure first
So what you're gonna do is take two of your insulfoam and stack them on top of each other vertically for however high your roof is from the floor. I like to put mine against a corner so that's less money I spend on insulfoam so I'm gonna assume you'll be doing the same thing, it makes it way easier than a freestanding box and more sturdy. So you take the two duct taped pieces of insulfoam and put it against your wall and duct tape the hell out of it against the wall. Then duct tape it on the floor and the ceiling if you can, this will not only make it sturdy but more insulated as well
As you can see here it's connected to one side and there's duct tape all over And here's the other corner, all nice and duct taped and sturdy. The next thing you're gonna do is take 2 more duct taped insulfoams and lay them on the ground. Take some paper clips and bend them so they're completely flat. Then you're gonna stick them half way into the side of your insulfoam and connect it into the one you just duct taped, just like legos. Just repeat this process and duct tape everything so it's all nice and sealed and you'll be good to go!
Now as for the door to the box, I like to put it on the corner that's completely insulfoam. Once your box is done you will have 4 corners, one that's the wall of your house entirely and one that is made entirely out of insulfoam.
Here's the corner of my room, note the screw with the twine connected to my twine cube for drying And this is the corner that's completely insulfoam, I tried to capture how I made the door as best as I could so hopefully I can explain. What I did was connect my insulfoam from the walls outward, I started from the walls of my room and kept going until I knew where the insulfoam was going to intersect. But before duct taping everything up, the only thing I did was duct tape the part where the insulfoam corners up. I then didn't duct tape the right part of the "door" so that I could open it freely while maintaining the "structures" integrity lol.And once you've got everything all taped up you're just about done!
I hope that I was able to explain it thoroughly enough, unfortunately I wasn't smart and didn't take photos of the actual building process so I tried to explain it as best as I could without that. I hope that this helps anyone that's having problems with properly drying their meds. It wasn't too expensive for me but depending on if you have an AC or how cheap you get it that may be pricey, but necessary. I got an AC for 40 bucks used, spent 30 on 10 sheets of insulfoam, another 20 on the humidifier, 8 for the ducting, and another 10 on duct tape and twine. So after taxes and such it was about $115 and 4 harvests later it's been WAY worth it. Hope this helps and sorry for the wall of text
Attachments
-
 21.3 KB Views: 23