Seeds (TSSC)
2x Auto & Feminized Skunk #1 (link)
2x Auto #1 Feminized (link)
2x random feminized seeds free with that order (link)
Materials bought or salvaged from my garage so far
*the "Georgia formula" consists of 70 - 80% processed forest products, sphagnum peat moss, coir and organic fertilizer. The organic fertilizer is described as"
"0.09 - 0.06 - 0.09
Net Weight 20 lb (9.07 kg)
Guaranteed Analysis ... F1632
Total Nitrogen (N) ... 0.09%
0.005% Ammoniacal Nitrogen
0.030% Other Water Soluble Nitrogen
0.055% Water Insoluble Nitrogen*
Available Phosphate (P2O2) ... 0.06%
Soluable Potash (K20) ... 0.09%
Derived from: Poultry Litter
*This product contains 0.055% slow-release Nitrogen from poultry litter."
Grow Method / Master Plan
I want to grow in the corner of my closet. I have the lights dangling off the clothing rack. The 5 gal. bucket will probably sit in a 18 gal. rubbermaid storage container to collect drainage. I just got the seeds in the mail today. I am planning on germinating one seed at a time since the space and lights I have are not ideal for more than 1 or 2. As of this typing, I have done the following:
Day 1
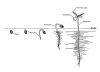
Most of the following is based on this post (link) about germination on another website which suggests that the peat moss pellet method has a higher success rate than the glass of water and wet paper towel method. I believe this can also be done with rockwool cubes and peat pots filled with seedling soil. It is supposed to be more successful because with peat or rockwell, you don't have to touch the baby plant when transferring it which reduces stress.
2x Auto & Feminized Skunk #1 (link)
2x Auto #1 Feminized (link)
2x random feminized seeds free with that order (link)
Materials bought or salvaged from my garage so far
- 4x 2700k 23w (100w equiv) CFLs (link)
- 6x Light bulb socket to regular plug adapters (link)
- 2x Y-shaped light bulb splitter (link)
- I also have a couple dozen different spectrum 13w CFLs in my garage after swapping all the bulbs in my house to LED. It is a mix of spotlight style bulbs and spiral bulbs. I tested several of them and found 4 spiral bulbs with a much whiter looking light than the 2700K lights which look yellow next to them. I those 4x bulbs on a power strip with the socket adapters. I believe they are either 5000k or 6500k.
- 1x 5 gallon utility bucket (link)
- 1x 18 gallon storage container (link)
- 1x pack of Jiffy 12 Peat Pellet Greenhouse (link)
- 1x bag of Vigoro Organic Potting soil 32 QT Georgia formula* (link)
- 1x bag of Miracle Gro Perlite 8 QT (link)
*the "Georgia formula" consists of 70 - 80% processed forest products, sphagnum peat moss, coir and organic fertilizer. The organic fertilizer is described as"
"0.09 - 0.06 - 0.09
Net Weight 20 lb (9.07 kg)
Guaranteed Analysis ... F1632
Total Nitrogen (N) ... 0.09%
0.005% Ammoniacal Nitrogen
0.030% Other Water Soluble Nitrogen
0.055% Water Insoluble Nitrogen*
Available Phosphate (P2O2) ... 0.06%
Soluable Potash (K20) ... 0.09%
Derived from: Poultry Litter
*This product contains 0.055% slow-release Nitrogen from poultry litter."
Grow Method / Master Plan
I want to grow in the corner of my closet. I have the lights dangling off the clothing rack. The 5 gal. bucket will probably sit in a 18 gal. rubbermaid storage container to collect drainage. I just got the seeds in the mail today. I am planning on germinating one seed at a time since the space and lights I have are not ideal for more than 1 or 2. As of this typing, I have done the following:
Day 1
- set up the final grow area
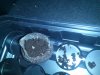
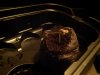
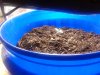
- soaked only one of the peat moss pellets in water
- put one of the Auto Skunk seeds about 1/4 inch deep and covered it with peat moss
- drained the excess water out of the container
- put the clear plastic lid that came with the Jiffy kit on
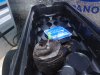
- put the container in a small box that my PC's GPU came in
- logged into rollitup and wrote this while I wait 1-3 days
Most of the following is based on this post (link) about germination on another website which suggests that the peat moss pellet method has a higher success rate than the glass of water and wet paper towel method. I believe this can also be done with rockwool cubes and peat pots filled with seedling soil. It is supposed to be more successful because with peat or rockwell, you don't have to touch the baby plant when transferring it which reduces stress.
- Check the peat moss pellet daily until it sprouts and
- Make sure the pellet stays nice and moist and the tray is dry
- Make sure it stays at around 70-75 F
- Drill 3/8 inch drain holes into the bottom of the 5 gal. bucket
- Prepare and amend my soil
- If / when it starts emerging from the peat moss, put the Jiffy germ. tray under the smaller 13w CFLs
- [Or should I just transfer the entire plant and pellet into the soil mix and turn the lights on?]
- When placing in final 5 gal. pot, I will bury the small seedling's stem about halfway into the soil
- Water and drain any excess
- Go buy an eighth of fire crypt to tidy me over until harvest