Pelt's First Grow Box and Indoor Grow Journal

pelt1

Well-Known Member
yo pelt

i know you posted the model name of that dresser but can't find it. whats it called and how much was it? al do you know of any more links to dresser grow box grows? like to see other set ups as well. so far yours is the raddest lol

peace bro
Yeah, that particular dresser I got wasn't there on Ikeas site 2 weeks after I purchased it. So they must have discontinued it. I dont have the manual so I'm not sure what model in particular it was.

But this looks like the closest: http://www.ikea.com/us/en/catalog/products/20090194

But the one above is over twice the price I paid for mine. If I could do it over again, I would build a box from scratch, especially given the cost of that dresser above. At least then I could make it exactly the way I want.
 

pelt1

Well-Known Member

Group A(Northern Lights): COMPLETED Day 58 of Flower
Group B(Northern Lights): Currently Day 34 and 29 of Flower
Group C(Northern Lights): Currently Day 29 of Veg
Group D(Jock Horror): Currently Day 10 of Veg
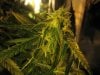
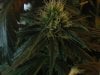
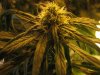
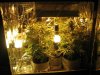
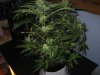

-----------------------------------------------------------
Group B:
My most mature plants so far.

The one plant that started out and barely made it through the seedling phase continues to impress me. I really did this plant wrong, cutting off a ton of leaves early on like a retard. It also had/has some serious 'clawing' on a lot of her fan leaves, particularly right near the bud sites. In the past few weeks, she has really picked up. Generating a lot of new green growth, along with a lot of reduction of the 'clawing.'

The other plant is normal and growing along just fine. It started out as a great seedling and has all of her leaves. Her buds are noticeably larger and fuller than her sister I spoke of above
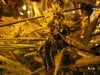
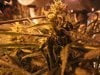
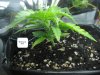
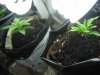
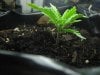
IMG_0007.jpg IMG_0005.jpg


-----------------------------------------------------------
Group C:
Group B was a NL that started out fine, then just stopped growing while it was a seedling. A while back I gave it some blood meal, and it started growing and getting green again. It has been doing much better lately and is close time to begin topping. A few days ago I transplanted it into some FF soil, so hopefully growth continues to accelerate. I'm attaching a pic of group B here that shows the progress of 17 days ago in comparison with progress 11 days before that, which isn't much, but at least it's coming along.
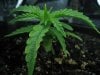
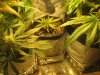
IMG_0002.jpg

-----------------------------------------------------------
Group D:
These are my two 'Jock Horror' females. I'm pleased with their progress and no complaints. They are a ways off from topping and getting their transplant to FF soil.
IMG_0008.jpg
 

crazytrain14

Well-Known Member
lookin good bro. how are the two boxes working out for you? i was told that i am not allowed to make a dresser box til we move out of the apt ang get a house so looks like ill be stuck in my pc case for another few months lol
 

pelt1

Well-Known Member
Yo!!!

Given growing with two boxes is the only way I've ever done it, I enjoy it very much. It's nice to be able to continually have something that is ready to start flowering. So you always have another batch close to harvest.

LOL, I can say that if I had to only have one box for some reason, ending a harvest would be depressing, cause I know I have to wait an ENTIRE 10-12 weeks for my next one. But this way, I can always know that I'll be harvesting in another 30 days or so.

Man, once you get your dressor, you'll then want a whole closet :)
 

pelt1

Well-Known Member
So..... right after harvest I quick-dryed some buds(about 3 grams) due to excitement, and I was thinking, this ain't "that kill," that people talk about! So while I knew that some proper curing for the rest of the lot will yield some strong smoke, I was still a bit dissapointed though.

So, of the bud I quick-dryed, there was still a good amount of moisture in the stems initially. I have been burping it in a jar for the past week, and JUST NOW, by that I mean..... not the herb I had yesterday, nor am I talking about the herb I had 5 hours ago, I mean RIGHT NOW, it has jumped to the next level!!!

Oh man I can't wait to see what the slow dried, then properly cured herb will be like 2 months from now.

:leaf:
 

pelt1

Well-Known Member
Haha, I never knew how to get decent pics with the camera. I heard the "macro" setting mentioned in another thread, so I switched my camera to that and voila!!!

Now I can get pics that even show super nice close ups.

These pics aren't of anything in particular, just some random pics in closeup mode!

IMG_0008.jpg IMG_0015.jpg IMG_0016.jpg IMG_0004.jpg IMG_0011.jpg IMG_0005.jpg IMG_0014.jpg IMG_0013.jpg
 

pelt1

Well-Known Member
Here are some shots of the girl that started off with a rough life, and I kinda cut way too much of her leaves off.

IMG_0001.jpg IMG_0002.jpg
 

pelt1

Well-Known Member
Yo.

So today I gave the girls a good watering. The plants in flower got a nice dose of nutes as well.

In my vegging cab, I have Group C that started off very slowly with the growth as I explained in the last update. Recent growth however has been pretty good. The goal with the current plants in veg is to try to top these plants to keep height a bit shorter, and do less LST, only looking to tie down branches that are getting to close to the light.

So today I went ahead and topped Group C. The plant is very short and squat so far, and this thing has been vegging too long already imo, as I like to keep my plants spaced a certain distance apart.

I was a bit unsure of where to cut with the explanation about "cutting above/below this or that node." "Counting from top or bottom....." etc. So I figured I could see the bottom node, and there are two growths. And then right where I cut which will sprout two growths. So I think that should give me 4.

So here in this pic, you can see the plant as it sat before the cut.
IMG_0003.jpg

In this pic you can see the cut that was made.
IMG_0004.jpg

In this pic I tried to highlight the 4 areas where the growth will be.
IMG_0005.jpg

And here is what is left over. Nothing really there, but I stuck it in the dirt just to see if it sprouts roots. It was either that or throw it away :)
IMG_0006.jpg
 

crazytrain14

Well-Known Member
whats the difference in the pure and flip on the labels? looks very nice man can't wait til i build and start growing in a dresser. 2-3 plants at a time and at least 2 o's a harvest would be nice
 

pelt1

Well-Known Member
whats the difference in the pure and flip on the labels? looks very nice man can't wait til i build and start growing in a dresser. 2-3 plants at a time and at least 2 o's a harvest would be nice
They were just different plants. One grew straight up vertically, the other one I had wrapped in a bunch of different ways. So I can see what yeield I got from each.

When you do get a dresser, are you going to have more than one, or just grow 12/12 from seed?
 

crazytrain14

Well-Known Member
more than likely stay at 18/6 and run autos. that way i can add a plant anytime and have at least 2 in flower at all times
 

IXOYE

Active Member
Great build/grow friend I am so happy I found your journal. I used a small melamine cabinet for a clone/early veg stage chamber. I used some t5 strip lights (home depot has bulb, light, and plug-in all-in-oine fixtures for like $18 - awesome). I went with t5s 'cos they give you so much more headroom. But I needed light blocking ideas. The flaps you edged your door with was a brilliant idea that i am gon'na steal for my cabinet. When I create a cab for flowering I'll be usuing your light baffle idea also as I was wondering how I was gon'na keeo light from escaping out the fans. Great ideas.
 

pelt1

Well-Known Member
Cool Beans! So many of journals out there, I appreciate those journals that have information in them that I need or something I'm interested in trying out. So I'm glad you found something in this journal you like.

Since you mention headroom issue, that's one thing I regret about my cab, and that is how short it is. At the time, I initially was gonna go even smaller, like PC case size, but sort of last minute went a bit bigger. In hindsight, I wish I had gone taller. I don't need much in the way of more lateral space, but vertically. It really took quite a bit of work to keep the plants shorter throughout the grow.
 

pelt1

Well-Known Member

Group A(Northern Lights): COMPLETED Day 58 of Flower
Group B(Northern Lights): Currently Day 37 and 32 of Flower
Group C(Northern Lights): Currently Day 1 of Flower
Group D(Jock Horror): Currently Day 13 of Veg


I moved Group C into flowering. This was after topping her yesterday. She is directly under the HPS. I figure since she will be in this small 1/2 gallon bag for the entire grow, she won't be taking up much light.

Man I need more space!!! Summer's project will probably be setting up another space in the basement.

IMG_0002.jpg IMG_0007.jpg IMG_0001.jpg IMG_0009.jpg
 

pelt1

Well-Known Member
Tried the "make it rain" technique on the plants I have in flower right now. I didn't do a full 4 gallon flush of the two gallon pots, I did a 2 gallon flush on each pot though.

On another note, my two big plants from Group B.... the mutant plant's buds are tiny in comparison to the one that started out well. It was apparent today with the plants out of the cab. It almost makes me want to throw the mutant plant away. I'm sure it will be worth it to keep it in the end, but it is taking up a bit of space.

Also, the two plants in veg right now have grown the fastest of any plant Ive had this far. They are ready for topping already. I will do this one day this week.

I put the vegging cabinet on a 18/6 schedule last night as well. I'm gonna give this a try to see if I can save a bit of electricity.
 
Top