BB & SSH Hydro Grow
- Thread starter greenearth5
- Start date
Hash Lover
Well-Known Member
I'm going to try another way to get you those pics up for you guys. Maybe try to put it into my documents and then post. Any suggestions on how I could do it? Was talking to my buddy at work about it and he gave me a couple ideas to try. That's one of the best parts, we work together and have time to talk about the grow. Makes the day's more fun>
greenearth5
Well-Known Member
save the picture to your computer... then load the pictures by using the "manage attachments" option when you are posting a reply in the advanced mode
I'm going to try another way to get you those pics up for you guys. Maybe try to put it into my documents and then post. Any suggestions on how I could do it? Was talking to my buddy at work about it and he gave me a couple ideas to try. That's one of the best parts, we work together and have time to talk about the grow. Makes the day's more fun>
greenearth5
Well-Known Member
i started off having it either 6 in or closer but as the plants grew into 3 different heights i must have my light above the tallest plant... the tallest and second tallest (both in the back) are 4-6 inches away but the front small one is 1 foot away
how far away do you have your light from your plants
Hash Lover
Well-Known Member
I'll try again. Just a pic. Let me know if you can see it.
Attachments
-
 105 KB Views: 33
robotninja
Well-Known Member
I can see it, say that looks pretty nifty.
Hash Lover
Well-Known Member
Sweet!!! I'll repost it all tonight.
Hash Lover
Well-Known Member
Let's try this again. I'll do it in separate posts
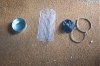
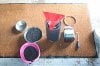
Pic 1- Here are all the supplies you need for this 4" carbon scrubber.
Pic 1- Here are all the supplies you need for this 4" carbon scrubber.
Attachments
-
 9.5 KB Views: 24
Hash Lover
Well-Known Member
Join Date: Aug-07-2006
Posts: 730


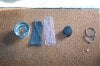
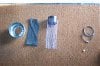
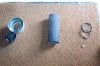
First thing to build is the inner chamber.
pic1 - supplies:
6"-4" reducer
4" cap
2 - 4.5" screw fasteners
10" length of Heavy duty chicken wire
2 - pannyhose legs
pic2 - Wrap the 10" length of chicken wire around the 4" end cap to form a cylinder. I used a bunch of zip ties to secure the cylinder's shape.
Pic3 - Slide the pannyhose legs over the cylinder to act as a screen for the carbon.
Pic4 - Secure the end cap on one end of the cylinder with one of the 4.5" screw fasteners.
Pic5 - Secure the 6"-4" reducer to the open end of the cylinder with the other 4.5" screw fastener.
That's it. The inner chamber is done. Set aside we'll need it in a bit.
Posts: 730
First thing to build is the inner chamber.
pic1 - supplies:
6"-4" reducer
4" cap
2 - 4.5" screw fasteners
10" length of Heavy duty chicken wire
2 - pannyhose legs
pic2 - Wrap the 10" length of chicken wire around the 4" end cap to form a cylinder. I used a bunch of zip ties to secure the cylinder's shape.
Pic3 - Slide the pannyhose legs over the cylinder to act as a screen for the carbon.
Pic4 - Secure the end cap on one end of the cylinder with one of the 4.5" screw fasteners.
Pic5 - Secure the 6"-4" reducer to the open end of the cylinder with the other 4.5" screw fastener.
That's it. The inner chamber is done. Set aside we'll need it in a bit.
Attachments
-
 7.5 KB Views: 21
 -
 7.6 KB Views: 16
 -
 8.5 KB Views: 13
 -
 8.2 KB Views: 18
 -
 7.1 KB Views: 24
Hash Lover
Well-Known Member
Join Date: Aug-07-2006
Posts: 730
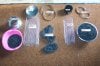
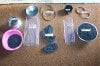
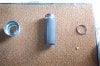
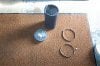
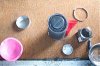
Next to build is the Outer Chamber.
Pic1-Supplies
6" cap
2 - 6.5" screw clamps/fasteners
12" length of Heavy duty chicken wire
3 - pannyhose legs
pic2 - Wrap the 12" length of chicken wire around the 6" end cap to form a cylinder. I used a bunch of zip ties to secure the cylinder's shape.
Pic3 - Slide the pannyhose legs over the cylinder to act as a screen for the carbon.
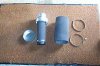
Pic4 - Now you should have all of these parts....almost done

Pic5- Now slide the 6" cylinder over the 6" section of the 6"-4" reducer (and the inner chamber) and secure with a 6.5" screw fastener
Posts: 730
Next to build is the Outer Chamber.
Pic1-Supplies
6" cap
2 - 6.5" screw clamps/fasteners
12" length of Heavy duty chicken wire
3 - pannyhose legs
pic2 - Wrap the 12" length of chicken wire around the 6" end cap to form a cylinder. I used a bunch of zip ties to secure the cylinder's shape.
Pic3 - Slide the pannyhose legs over the cylinder to act as a screen for the carbon.
Pic4 - Now you should have all of these parts....almost done
Pic5- Now slide the 6" cylinder over the 6" section of the 6"-4" reducer (and the inner chamber) and secure with a 6.5" screw fastener
Attachments
-
 7.5 KB Views: 9
 -
 6.9 KB Views: 8
 -
 8 KB Views: 8
 -
 7.8 KB Views: 8
 -
 6.4 KB Views: 7
Hash Lover
Well-Known Member
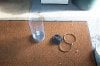
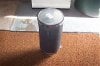
Filling with Activated carbon and finishing it.
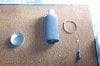
pic1 - Without the 6" end cap on the bottom, the filter should look like this....notice this space in between the chambers....this is where the activated carbon goes.
pic2 - I used an oil spout with the end cut off to more easily disperse the carbon into the filter.
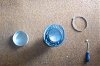
pic3 - Here is the filter filled with carbon.
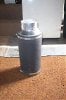
pic4 - Finally put the 6" end cap on the bottom and we're good to go.
Pic5 - Here is the finally product.
pic1 - Without the 6" end cap on the bottom, the filter should look like this....notice this space in between the chambers....this is where the activated carbon goes.
pic2 - I used an oil spout with the end cut off to more easily disperse the carbon into the filter.
pic3 - Here is the filter filled with carbon.
pic4 - Finally put the 6" end cap on the bottom and we're good to go.
Pic5 - Here is the finally product.
Attachments
-
 7.5 KB Views: 11
 -
 8.3 KB Views: 10
 -
 7.8 KB Views: 12
 -
 7 KB Views: 9
 -
 6.6 KB Views: 17
DukeOfBellSt
Active Member
]Filling with Activated carbon and finishing it.
pic1 - Without the 6" end cap on the bottom, the filter should look like this....notice this space in between the chambers....this is where the activated carbon goes.
pic2 - I used an oil spout with the end cut off to more easily disperse the carbon into the filter.
pic3 - Here is the filter filled with carbon.
pic4 - Finally put the 6" end cap on the bottom and we're good to go.
Pic5 - Here is the finally product.
Thats brillent, nice cheap alternative.
I'm going to try that for my next grow

Hash Lover
Well-Known Member
Ya, this is the best one I've seen for a round type. And to say again I copied this from a thread on cannabis.com site that was done by Bodom Children Of. I did mine with PVC for the out side and made it a 6" take off. It works very well, the PVC also makes the filter material a little thicker and should clean a little more.
greenearth5
Well-Known Member
alls i know is that it needs to be ACTIVATED CARBON
By the way what kind of carbon, not sure if theres different kinds? Ive heard people getting it from a pets store and how much, roughly, did you use? thanx
Hash Lover
Well-Known Member
f you use carbon it would be activated carbon. But that is expensive, probably 50- 60 bucks at least. I researched it when I did mine and went with Fresh Step Crystals cat litter. About $14 and had a lot left over. Like I said I have it vented from my closet to my living room and you can't smell a thing. Well starting to smell a little but it is time to change it. I read it is good for about ! flowering period and I'm just getting past that. I need to change it soon and will get pics when I do. If you had this filter and a computer fan about 80 cfm you should be able to mount it in your closet and just circulate the air in there and would do very well. Remember the slower the air goes through the filter the better it will clean.
greenearth5
Well-Known Member
I think it is time for me to go get a ventilation system!!! I can almost smell my plants when i come in the front door. I think ill go get it today.
robotninja
Well-Known Member
Sweet, +rep for the kitty litter filter. Gonna build one of these for sure.