• Here is a link to the full explanation: https://rollitup.org/t/welcome-back-did-you-try-turning-it-off-and-on-again.1104810/

Thermoelectric wine cooler drying and curing - DIY

ttystikk

Well-Known Member
I changed the Fan very easy without changing polarity. Now it blows away to the door. What do you mean with air flow director? Do you mean a small fan, that is blowing down on the cold block?
I was thinking like an angled duct or something but it sounds like you have it sorted. Sometimes I need pictures to follow along, which is why I like instruction manuals that look like illustrated children's books!
 
Last edited:
I changed the Fan very easy without changing polarity. Now it blows away to the door. understand..
You will need to be careful with that. If you change the flow of air for the dehumidifier it may not work the same. You need those fins to freeze, melt, repeat in order to collect the moisture from the air, convert it to water and drain it out of the cooler.
 
I was thinking like an angled duct or singing but it sounds like you have it sorted. Sometimes I need pictures to follow along, which is why I like instruction manuals that look like illustrated children's books!
Thank you very much. Now I understand what you mean.. I ll give it a try this airflow direction.. maybe it is a bit efficiency question.. my thought on the airstream was, that the coldest air is on the bottom. My modified my one, that i can swith the outside plastic casting 180°. Now the big outlet is not up rather down. Now it sucks the cold air from the downside and blows ist to the door (I did the twist because of the design of the fridge inside... make a photo later..

I have a Klarstein here in germany and have to figure out where to drill the hole.. my model has a blank wall inside with all the stuff behind. So i dont want to drill in the dark... i calibratet the ink and my sensor push.. tomorrow i will see.
 
You will need to be careful with that. If you change the flow of air for the dehumidifier it may not work the same. You need those fins to freeze, melt, repeat in order to collect the moisture from the air, convert it to water and drain it out of the cooler.
do your fan from the warm block blows INTO the warm block and the air goes up or how is it?
 
I just finished my fridge and wanted to share how I went about it. I Just started the fridge for the first time so can't say that it works so far but its the same principle as Hook Daddy's Koolatron.

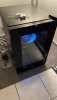
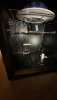
Thermoelectric wine fridge - Klarstein, Barolo 28 - it was on discount 229€
Peltier dehumidifier - Trotec - from Amazone It was like 29€
Controller - Elitech STC 1000 Pro TH, Its not wifi but I had it at home so it will due.

So I built a little stance for the fridge so I can have a bigger drain and move it around in my tight space.
First action was to try and find an entry point for the dehumidifier and sensor.

View attachment 5423807

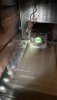
I was set on drilling a hole in the back, so started to remove the inner back plate.
As you can see this model has no internal fan. Only a big cold heatsink in the back.
On the right hand side you the thermometer for the fridge.
View attachment 5423809

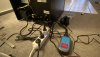
After removing the screws in the corners I stoped for a sec, and thought about the possible problems with thermal paste and other things I might need to deal with.
So changed my mind and just shoved the cables true the drainage hole.
Pored some water to see if it still goes true and 50ml went straight true, so no issues.
View attachment 5423810

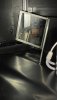
I had to cut the cable for my sensor thou, but that was an easy fix with some Wagu connectors.
I keep all connections outside the fridge so it won't come in contact with any moisture.
View attachment 5423812

I also mounted the sensor in the fridge using some foam thing from some packaging and double sided tape.
View attachment 5423820


Thank you Hook Daddy for sharing your Ideas and knowledge, and every one else that contributes to the Cannabis community.
Moinsen, ich hab den gleichen Klarstein. Läuft es bei dir aktuell? Hast du das differential für den Inkbird auf 1% ? Ich werde deine Idee mit dem Loch unter dem Barcode auch machen. War am überlegen ob ich seitlich eine Bohrung setze, aber wenn das so klappt, mach ich das auch so.
 
I was looking for a new cooler as im building a second unit and I found this funny.
Nice work @Hook Daddy! I don't see Amazon's algorithm picking those products together without all the work you put into this! I've been promoting it in a few FB groups. Its cool when you come across someone on groups that has already built one. I almost pulled the trigger on a new koolatron but last minute I found a Wine Enthusiast 28 bottle on CL I'm gonna try to use.
 

Hook Daddy

Well-Known Member
Nice work @Hook Daddy! I don't see Amazon's algorithm picking those products together without all the work you put into this! I've been promoting it in a few FB groups. Its cool when you come across someone on groups that has already built one. I almost pulled the trigger on a new koolatron but last minute I found a Wine Enthusiast 28 bottle on CL I'm gonna try to use.
Yeah I laughed when I saw that, makes me smile to know we all changed an algorithm.
 
So I picked up a 28 bottle fridge from criagslist. It is the style with the drain that is and inch or two above the bottom of the fridge on a small ledge. I need one fridge for drying/curing and one for long term storage. I had planned on using the larger one for drying but that would mean I would need to add a new drain. Has anyone tried that or should I just forget about the drain and use the big one for storage?
 
So I finally build my unit and test it with a wet towel :-) .. I dont know if it works, but for the first steps it is ok..
I modified the Klarstein 28 bottle unit like the user B2Y did with the drilling for the cables.

The dehumidifier I also did the same like him with the airflow to the doorside. Because of the lowered bottom of the unit, I hd to lift up the dehumidifier a bit and decided that way, to turn the dehumidifier. Now the air is soaked in from the bottom.. anyways, I have a second dehumidifier unit buildt without midifications to try if this does not work.. I just did it, because B2Y did it too afterwards I think.

Overnight the Temp settled to 55°F and round about 70%.. The dehumidifier works fine and water is coming out. But not that much. I begann from the high RLF down with 1%. It goes now on and off like it should. I do not know if this is correct with the amount.. but i mean, it is a soaked towel...

The diff. from the Inkbird is on 1%.. Do you have any recommendations for me? Dont mind the clear foliage in front of the fan.. just a tunnel for the air..but i think that is not worth it..
 

Attachments

So I finally build my unit and test it with a wet towel :-) .. I dont know if it works, but for the first steps it is ok..
I modified the Klarstein 28 bottle unit like the user B2Y did with the drilling for the cables.

The dehumidifier I also did the same like him with the airflow to the doorside. Because of the lowered bottom of the unit, I hd to lift up the dehumidifier a bit and decided that way, to turn the dehumidifier. Now the air is soaked in from the bottom.. anyways, I have a second dehumidifier unit buildt without midifications to try if this does not work.. I just did it, because B2Y did it too afterwards I think.

Overnight the Temp settled to 55°F and round about 70%.. The dehumidifier works fine and water is coming out. But not that much. I begann from the high RLF down with 1%. It goes now on and off like it should. I do not know if this is correct with the amount.. but i mean, it is a soaked towel...

The diff. from the Inkbird is on 1%.. Do you have any recommendations for me? Dont mind the clear foliage in front of the fan.. just a tunnel for the air..but i think that is not worth it..
Does this unit have an elevated drain? Trying to figure out what people are doing to solve for the elevated drain in these 28 bottle systems.
 
Does this unit have an elevated drain? Trying to figure out what people are doing to solve for the elevated drain in these 28 bottle systems.
yes, just put something under the unit to elevate it. so the fins are on the drain. otherwise i have at the moment turned the outer plastic cage, that the air ou/inlet is directed to the bottom. I dont know if its good or bad, but because of this i thought i ll give it a try.
 
yes, just put something under the unit to elevate it. so the fins are on the drain. otherwise i have at the moment turned the outer plastic cage, that the air ou/inlet is directed to the bottom. I dont know if its good or bad, but because of this i thought i ll give it a try.
Gotcha, just raise it up so the fins are positioned in that elevated drain channel. That seems to work? Water doesn't build up on the lower floor?
 
Gotcha, just raise it up so the fins are positioned in that elevated drain channel. That seems to work? Water doesn't build up on the lower floor?
No water on the lower floor at this time.. make a foto later.. but i need flower to test it better than with a towel.. I dont know if the fins has to have contact to the drain... or if this is important..
 

Attachments

by2

Well-Known Member
Moinsen, ich hab den gleichen Klarstein. Läuft es bei dir aktuell? Hast du das differential für den Inkbird auf 1% ? Ich werde deine Idee mit dem Loch unter dem Barcode auch machen. War am überlegen ob ich seitlich eine Bohrung setze, aber wenn das so klappt, mach ich das auch so.
I am using mine now and it is working out great this run. I had some problems when only using the inc bird humidity control. Temperature would spike randomly.
So I connected a smart plug in to the incbird controller that have set to 62% and the smart plug timer to cycle 2min on and 3 hour of. So the dehumidifier runs for 2 min every 3 hour until it gets to 62% humidity.
That dropped the humidity pretty quickly until I hit 70% and now it seems to drop 1% every day.

It was easy to drill, just make sure to use a metal when drilling true the back plate.
Interesting. I have not had any problems with Inc Bird or ACI. But I start at 75% RH with 1% buffer and reduce the RH setting by 1% each day. If I find the dehumidifier can't keep up I slow down and step it down 1% every two days until it can handle the 1% daily. I would love to do some research on home assistant to automate that step down though! Maybe my next project.
 

jcdws602

Well-Known Member
I bought this big wine refrigerator off of offer up for $300. All I did was add a humidifier and dehumidifier connected to an inkbird controller. Been working great. Dried a couple of plants already. I freeze most of my material for hash but still dry some flower for the wife. IMG_2997.jpegIMG_3016.jpeg
 
Top