Whats THIS plants problem then?....

2 plants
one was abit shit but now seems to have got through it,
6400K cfls
soil (recently repotted b&q MP)
ph 6.8-7.0 ish (unless i add feed its more 6.5-6.8 )
very little amount of tomorite for feed

but whys this one suddenly switched on me when the other one has sorted itself out?

check the pics & let me know what deficiency its got, coz this is DEFFO not right :evil:
its also VERY small compaired to its same age sister.
cheers
 

Attachments

jawbrodt

Well-Known Member
It looks like it could be heat stress(the curled edges), but I also think that it's a ph problem. I had problems like that, back when i wasn't checking the PH of my fert mix, and was feeding them with 5.0 fert. I'm still not sure if the PH is what caused the edges to curl like that, or if the PH made the plant weak, and less resisitant to heat that would otherwise be fine. Tough to say, being that your other plant is fine. Hmm......

Also looks like you have nute-lock going on, which could be caused by PH problems. IDK man, did you let it go dry while under the lights? That could give it heat stress too.
 

crazeehaze

Well-Known Member
that one is pretty obious and jawbrodt is right.

ph problem causing nutrient lockout. nitrogen deficiency is causing interveinal chlorosis. any veins and\or stems developed reddish\purple stems?

suggest fixing your ph first then do a good flushing with 1\5 strenght complete n-p-k.

if you do have red\purple stems nitrogen deficience has gone pretty bad and extra organic N ferts could be added as a tea or the likes. (seabird guano, fish emulsion, blood meal)

you are pretty helpless if the ph stay that high though..

edit: i read wrong there on your post... are you sure you dont have higher ph than 7? seeing that made my entire scenario less likely..
 
im kinda confused, my PH is what it should be for soil is it not? just checked now & its 6.8, i thought it was between 6.5 & 7.0 that was optimum for soil...?

also the CFL's are about an inch & a half above the plants

edit: nope, it doesnt go over 7, even when left without adding anything for few days
 

crazeehaze

Well-Known Member
ok im looked at so many deficiency pictures now its crazy.... i just simply cannot find a similar plant ...
 

crazeehaze

Well-Known Member
im kinda confused, my PH is what it should be for soil is it not? just checked now & its 6.8, i thought it was between 6.5 & 7.0 that was optimum for soil...?

also the CFL's are about an inch & a half above the plants

edit: nope, it doesnt go over 7, even when left without adding 7 anything for few days
optimal for soil is about 6.5 - 7.0. for some reason i thought it said 7.9 in your first post
 

jawbrodt

Well-Known Member
Hmm....I could be wrong, but I'm still thinking that it's PH-related. What PH do you use for your fert/water mixture? Water PH? What types of PH testers do you use?

Ventilation? Any air blowing across the plants? I just want to make sure the CFLs aren't cooking them. How many watt CFLs?
 
the tap waters ph seems to be 7.0, then mixed with feed makes it 6.5 ish
my ph tester is a dip in probe thing....this it stuck right in
DSC02497.jpg
(pic b4 feed)

250W CFL
& 4x 30W CFL's
fan extracting air
& recently a fan inside blowing over them

but other plant is in same conditions & is better (bar a few rust spots)
 

RedHairs

Active Member
This is a textbook picture of a plant in toxic soil. Flush with distilled water. We see you've tested the pH... but something isn't right here.
 

cannofbliss

Well-Known Member
Oh my God! had a really long intricate reply that had instructions to help, went to bathroom and back and hit post and it disappeared as RIU logged me out GRRRRRRRRRR....
 

cannofbliss

Well-Known Member
Ok here we go again.... your problems are systemic(affecting the entire plant). First as an introduction Hi everyone and to followthelight. new to cannabis here, however, have a plethora of experience in gardening and botany. So now thats out of the way :)

You have a chance to fix your plants so that is at least a good thing.
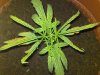
It is agreed with what a couple others said on here....1.) Interveinal Chlorosis....2.) Toxic Soil..... but there are several causes for it which flushing will not cure.

So we can all see you are running about 6.8 pH which is okay, however, something is still preventing nutrients from your plants.

There are several causes for chlorosis, like nitrogen and mineral(iron) deficiency. Also consider root issues such as swamped roots and or root damage such as root rot.

What is strongly suggested is to do an immediate transplant into good soil, with perlite for best drainage and an organic one that is less prone to toxicity.

Or what will be the best, healthiest, and quickest way to help your plants recover if there is root damage caused by root rot, is whats personally called "transplant surgery"

Here are the steps....

1.) Purchase Soil, your budget's choice here but if you are looking to start your plants off in the healthiest direction get Fox Farm Ocean Forest. About $18 per 1.5 cubic ft.
2.) Purchase Deer Park Natural Spring water in gallon jugs (Why Deer Park Spring Water?) Because, it is usually around 6.6 pH and has good minerals in it.
3.) Purchase Superthrive. Because it has vitamin B which will help your plants through any shock they have gone through and or transplant shock. About $10 at Walmart.
you could use a dissolved mixture of cloning gel or powder but it is way more expensive for about the same result.

Transplant Surgery-

Step 1....Tap sides of pot to loosen up soil then hold stem firmly between one of your fingers as you palm the top of the soil then flip pot upside down and tap on bottom of pot to get rootball and soil to release from the pot.

Step 2....Set up about a wide enough platform of sterile papertowels in sterile bathtub, so as a rinsing platform. Set the potted shape clump of soil+rootball on the papertowels.

Step 3....Get your gallon jug of water and add 4 drops or 1/4 teaspoon of superthrive to the gallon of water then shake to mix thoroughly. Then while holding the stem in one hand very gently rinse off soil from roots a little bit at a time from the outer edge and work your way in. If you notice any rotting roots get rid of them by cutting them off with scissors.(Roots should be white to lightly grey, if they're black and slimy (not from the soil) then they're dead already and you don't want them to continue to rot the rest of the other roots and eventually kill your plant.)

Step 4....Once the roots are clear of any of the old soil, lay the plant out on some more sterile papertowels and mist the roots with a very diluted solution of Hydrogen Peroxide and your bottled water(1 tablespoon in a 20oz sprayer shaken to mix thoroughly), just enough to wet them down, and sanitize any other healthy roots that may have come in contact with the other rotted roots and soil.

Step 5....Having also prepared a much much larger pot to transplant in(the one you'll use to complete flowering, also having rinsed hands off in rubbing alcohol as to not cross contaminate new soil) layer about 8-12 inches of new (DRY)soil on bottom then create a bowl shape to the soil.

Step 6....Take your plant by the stem in one hand and have the tips of the bottom of the roots touch the top of the layer of soil in step 5 and hold stem still by using your forearm as a resting point to keep the level of height and where the bottom of the stem should be sitting about an inch below the top of the pot.(Why your forearm? Cause its gonna take a while and it will get tiring trying to hold your plant still the entire time you fill the roots in with soil.)

Step 7....Handful by handful keep sprinkling soil till you have reached the base of the stem.(Reason behind this is to make sure you have filled in your root system without tangling roots all together and keeps them spread out for better water and nutrient absorption.)

Step 8....Now while still holding the stem in place tap the pot down with your other hand gently about 4 times to loosely compact the soil around the roots to give them a better foundation and more stability in the soil. (Add more soil at this point if necessary.) Then see if the plant can stand on its own,( if it is still a bit shakey then still hold on with hand,(DO NOT USE a stake to tie to the stem to hold plant up this could damage your roots or worse your taproot.)

Step 9....Take sprayer used previously to mist roots and spray onto top of soil till moist, and sterilized. (DO NOT SOAK IT remember it has diluted H2O2 and you only need so much of it) (BTW spraying the top of the soil with water will help better evenly distribute water to the soil so when you water your plant in this situation, the water doesn't just float all across and get absorbed by the soil unevenly and may not get to all of the roots.)

Step 10.... Take your gallon jug of water + 3 drops of superthrive(Mix/shake up) and starting from the outside in start slowly pouring around the edges of the pot and work your way in (SLOWLY). Again, the reason for this is so that your roots will get watered evenly and also that they get settled in firmly for a good foundation to support your plant.

Step 11....After about 5 days (or until the plant has wicked most of the water out of the soil) then you can start to water again. Until then keep your lighting schedule 20/4 or 24/0 so the plant can start to recover and start to use chlorophyll and photosynthesize itself blah blah techno babble etc... LOL


And that's about it... Yes, very painstakingly a long process and if you do have the patience and you want to have the best chance for your plants to survive and recover then take the time to do it right. Otherwise, if you let your plants continue like this they're going to die for sure, so why not give them a fighting chance.

Sorry if any headaches were a result of having to read such a long post LOL ;), but trying to help as much as possible.

GOOD LUCK....
 

cannofbliss

Well-Known Member
Oh and one last thing DONT GIVE THEM ANY NUTES FOR AT LEAST A MONTH AFTER YOU PUT INTO NEW SOIL such as FFOForest cause it has plenty of nutes for around a month or two.
 

The*Mad*Hatter

Well-Known Member
let me be the second to +rep....even if thats dosent fix the problem, nice job on taking the time to go through all the details.
 

KlosetKing

Well-Known Member
is it just me or is the plant yellowing from the bottom up? and severe upwards clawing? sounds like a Mg def to me, not to say pH isnt a problem, maybe its helping the issue. if you want a good case of what hotspots in soil can do to pH levels AND your plant, hop on over to my journal, its quite sad.
 
thanks for the looooooooong reply lol

but that all seems very US & im UK lol

& also havent got any of that stuff & cant find that FFOF anywhere here :(
just see how it goes with the few adjustments iv done tho

thanks again - rep+
 

cannofbliss

Well-Known Member
is it just me or is the plant yellowing from the bottom up? and severe upwards clawing? sounds like a Mg def to me, not to say pH isnt a problem, maybe its helping the issue. if you want a good case of what hotspots in soil can do to pH levels AND your plant, hop on over to my journal, its quite sad.
this is a possibility as well so here are the scenarios for the Mg deficiency as we didnt have much info on the stages of the sickness of the plant which is imperatively crucial to giving an accurate diagnosis. (alot of conditions mimic each other by the way they look, but not in the way the condition progresses).......Either way a transplant is still IMO very necessary.

The deficiency will start at the tip of the leaf then will take over the entire outer left and right sides of the leaves. The inner part will be yellow and or brownish in colour, followed by leaves falling without withering. The tips can also twist and turn as well as curving upwards as if you curl your tongues.

If yes to all of this then yes to a Mg deficiency. (there didnt seem to be any missing leaves(yet that is) and hopefully not ever at all :neutral:

On the opposite end of the spectrum of excessive levels of magnesium in your plants will exhibit a buildup of toxic salts that will kill the leaves and lock out other nutrients like Calcium (Ca). Mg can get locked out by having too much Calcium, Chlorine or ammonium in your soil/water.

One of the worst problems a person can have is a magnesium def caused by a ph lockout. By giving it more magnesium in the soil to cure the problem when you are thinking you are doing good, but actually you are doing more harm than good. When the plants can’t take in a nutrient because of the ph being off for that element, the plant will not absorb it but it will be in the soil… therefore causing a buildup. A buildup will be noticed by the outer parts of the plant becoming whitish and or a yellowish colour. The tips and part way in on the inner leaves will die and feel like glass. Parts affected by Magnesium deficiency are: space between the veins (Interveinal) of older leaves; may begin around interior perimeter of the leaf.

Finally, if it is a possibility that you have overused a fertiliser with copious amounts of potassium then you can definitely block out Mg from your plant.

So to solve your plants issue if Mg is the case then TRANSPLANT to NEW SOIL with perlite or even little pebbles in your soil will do, and yes perlite is on the other side of the Atlantic as well as Great Britain ;) and then add Epsom salts aka (hydrated magnesium sulfate) (diluted at a rate of 200g per 10 litres of water) and feed it to the plant via spraying the leaves versus adding it to the soil which in turn could possibly lead to further toxicity to your soil, which you obviously dont want. Typical feeding regiments are fortnightly or as they say in the states (every two weeks bro) lol ;)

There. Again sorry for the longwinded post just trying to give as much info as possible, as some have great deal of passion to save these plants lives ;) so it is almost as if one is saving a life :) :peace:
 
Top