Santos L Halper
Member
Hi All,
Long time lurker, first time poster. I thought I'd post this project I'm working on. Hopefully it can help others, and hopefully the people reading this can help me") I've documented most everything so far, used cad-type software to build everything, and will try to elaborate on all the details. I am currently 7 days into flowering on my first cycle (I have 3 new plants every two weeks), so hopefully this will be fun for everyone
I've documented most everything so far, used cad-type software to build everything, and will try to elaborate on all the details. I am currently 7 days into flowering on my first cycle (I have 3 new plants every two weeks), so hopefully this will be fun for everyone  If this works it should be very easy to emulate as I try to KISS (keep it simple stupid), and use standard stuff for lighting/exhaust like Homeboxes, Cool tubes, and have exhaust specs. I also plan to make threads to the DIY stuff, i.e. my aerocloner and hydro setup.
This project was largely inspired by Al B. Fuct's Two Pounds in Two Weeks Thread, my Aerocloner was inspired by StinkBud's Design, and my hydro setup was inspired by the two-liter bottle setups. I saw someone who made a two station setup with 2x 3.5 Gallon buckets. I just made three stations with 2 Gallon Buckets. I'll try and find the original link.
I am growing Sensi Seeds White Label NL#5 (I can post a pic of the packaging later) from Seedbay that I grew originally from seeds. After finding two potentially good mothers for this, I successful cloned one of each and grew them to mums (pics below).
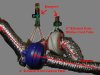
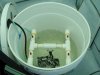
My Setup is three Homeboxes. The first one is an XS (~23.5"x23.5") with a 110w CFL for cloning, and a 4" Carbon Filter connected to an external 4" 200 cfm Exhaust Fan (I can post pics of lighting later). Temp is 74F, no dome. The cloner is an 8 gallon fermentation bucket (I'll post plans later), with a 1/2" pvc manifold using a 320 GPH pump and four EZ-Cloner 360 degree misters (they are $1 a piece, I'll try and make a thread with plans and link it here). It has a rubber ring inside so it seals, no water leaks without the need for tape or weather stripping. Check StinkBud's Design.
I cut clones with a fresh razor every two weeks (next Sunday I make cuttings so I can take pics and document). I put in 4 gallons of 6.4 or so ph'd water. 1 tsp of Clonex, dip the clones in some rotting gel for good measure and put them in a neoprene disk. Plug in the air pump and stone and leave them running the entire time. I run an air stone line in through the fermentation grommet on the bucket.
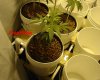
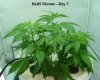
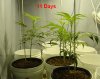
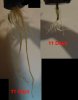
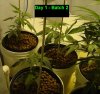
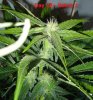
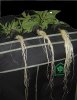
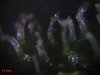
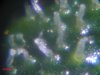
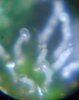
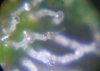
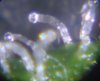
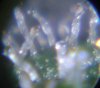
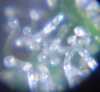
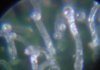
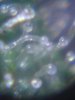
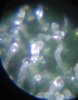
I know people who have gotten 19 sites on their cloner with an 8 gallon bucket, mine has 11 lazily placed clone sites using a 1 3/4" bit for EzCloner Neoprene disks (I get 45 for like $15 or so from the hydro store). Here is a pick of my clones after 7 days (taken tonight 5/3/09). I only need three good ones for flowering, can use the others for potential mums. I love this method of cloning and it has been 100% successful the three attempt I've made so far. As you can see, there is zero loss of tugor pressure without the need for a humidty dome:

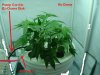
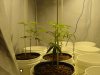
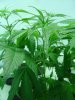
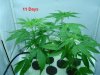
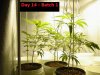
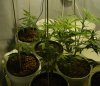
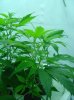
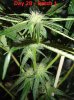
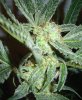
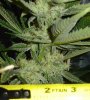
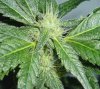
For mums, I use a Normal Homebox (~30"x30") with a 250w MH Cool tube with an external ballast (in another room, helps cut down on the heat) running 18/6. I run Carbon Filter -> Cool Tube -> External Fantech FR150 243 cfm 6" Exhaust (see pic). Temps stay at 74F like the cloning chamber. I use FoxFarm Soil (~75/25 - 2 bags of Ocean Forrest/1 bag of Light Warrior), with FoxFarm Liquid Ferts (Big Bloom/Grow Big) that I water with every other watering. I might try a DWC mother in the future. I take cuttings every two weeks. I have two mums atm and am growing two more so I can have four total, one every two weeks. I top em every now and then, I only need three clones every 8 weeks when all four are fully grown... Here is a picture of my mums (I have 3 smaller ones that were clones last week):

and a pic of my Mother Light and Carbon Filter (the fan hangs outside the box):

For my flowering chamber I use a Homebox Large (~39.5"x39.5") with a 6" Carbon Filter to a 600w hps Cool Tube running 12/12 (8pm-8am) with an external magnetic ballast, to a 6" 409 cfm Exhaust (see pic). I used to use a 400w and it would stay at 74F like the other boxes, but with a 600w it gets up to 78F tops and hangs around 76-77. I think it is worth if since with 600w I'm getting about 10k Lumens per sq. foot, whereas a 400w is half that.
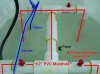
For medium I use four, three-pot, DIY PVC ebb and flo stations (I'll post my layout) suspended on a pvc/2x6 rack and run by 396 gph eco pumps. Res are 18 gallon Rubbermaid Roughneck totes. I have a 100 gallon air pump outside on top of the homebox (you can see the air lines in the pics) and run air stones to each res.
I use Hydroton medium and General Hyodroponic nutes. I currently run the pump for 3 minutes 5x a day, starting an an hour before lights on, 7:00pm, 11:00pm, 3:00am, 7:00am, 1:00pm. Each timer control two pumps, so I plan on staggering the second timer by about 20-30 minutes to lower the amount of stress on the rack (only two sets of pots will be full at a time).
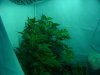
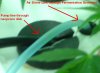
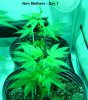
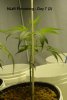
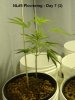
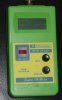
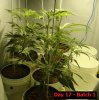
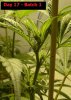
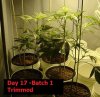
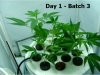
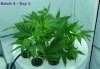
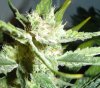
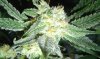
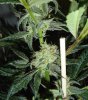
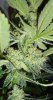
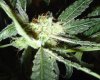
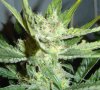
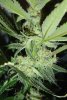
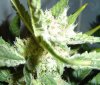
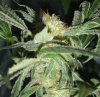
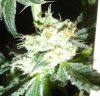
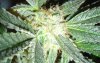
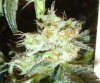
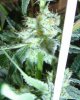
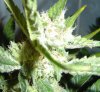
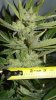
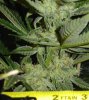
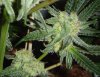
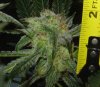
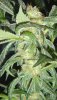
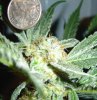
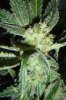
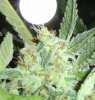
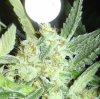
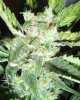
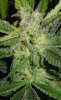
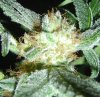
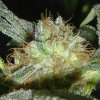
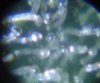
For this first run I mixed 2 parts each at 1.6 EC. Water is ~68F (pic). I mixed 15 gallons of water and think it was way too much, going to try either 10 or 12 gallons next time. I'll make threads with all the plans and layouts later. Clones go from two weeks in the cloner straight to the flowering chamber. Here is a pic of my first 3 clones to go into the flowering chamber at 1 week (pics taken 5/3/09, 7 days flowering):

Here is the lighting setup (exhaust is internal on this one):

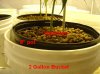
Here is the medium I use:

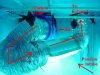
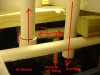
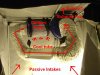
Here are some pics of the hydro setup I built. It has twelve pots total, three every two weeks:

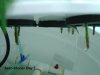
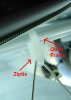
The overflow valve that controls flood water height:

Water Temp (~20C = ~68F):

I'll post more pics of tools I use and what not as we go!
Long time lurker, first time poster. I thought I'd post this project I'm working on. Hopefully it can help others, and hopefully the people reading this can help me
This project was largely inspired by Al B. Fuct's Two Pounds in Two Weeks Thread, my Aerocloner was inspired by StinkBud's Design, and my hydro setup was inspired by the two-liter bottle setups. I saw someone who made a two station setup with 2x 3.5 Gallon buckets. I just made three stations with 2 Gallon Buckets. I'll try and find the original link.
I am growing Sensi Seeds White Label NL#5 (I can post a pic of the packaging later) from Seedbay that I grew originally from seeds. After finding two potentially good mothers for this, I successful cloned one of each and grew them to mums (pics below).
My Setup is three Homeboxes. The first one is an XS (~23.5"x23.5") with a 110w CFL for cloning, and a 4" Carbon Filter connected to an external 4" 200 cfm Exhaust Fan (I can post pics of lighting later). Temp is 74F, no dome. The cloner is an 8 gallon fermentation bucket (I'll post plans later), with a 1/2" pvc manifold using a 320 GPH pump and four EZ-Cloner 360 degree misters (they are $1 a piece, I'll try and make a thread with plans and link it here). It has a rubber ring inside so it seals, no water leaks without the need for tape or weather stripping. Check StinkBud's Design.
I cut clones with a fresh razor every two weeks (next Sunday I make cuttings so I can take pics and document). I put in 4 gallons of 6.4 or so ph'd water. 1 tsp of Clonex, dip the clones in some rotting gel for good measure and put them in a neoprene disk. Plug in the air pump and stone and leave them running the entire time. I run an air stone line in through the fermentation grommet on the bucket.
I know people who have gotten 19 sites on their cloner with an 8 gallon bucket, mine has 11 lazily placed clone sites using a 1 3/4" bit for EzCloner Neoprene disks (I get 45 for like $15 or so from the hydro store). Here is a pick of my clones after 7 days (taken tonight 5/3/09). I only need three good ones for flowering, can use the others for potential mums. I love this method of cloning and it has been 100% successful the three attempt I've made so far. As you can see, there is zero loss of tugor pressure without the need for a humidty dome:
For mums, I use a Normal Homebox (~30"x30") with a 250w MH Cool tube with an external ballast (in another room, helps cut down on the heat) running 18/6. I run Carbon Filter -> Cool Tube -> External Fantech FR150 243 cfm 6" Exhaust (see pic). Temps stay at 74F like the cloning chamber. I use FoxFarm Soil (~75/25 - 2 bags of Ocean Forrest/1 bag of Light Warrior), with FoxFarm Liquid Ferts (Big Bloom/Grow Big) that I water with every other watering. I might try a DWC mother in the future. I take cuttings every two weeks. I have two mums atm and am growing two more so I can have four total, one every two weeks. I top em every now and then, I only need three clones every 8 weeks when all four are fully grown... Here is a picture of my mums (I have 3 smaller ones that were clones last week):
and a pic of my Mother Light and Carbon Filter (the fan hangs outside the box):
For my flowering chamber I use a Homebox Large (~39.5"x39.5") with a 6" Carbon Filter to a 600w hps Cool Tube running 12/12 (8pm-8am) with an external magnetic ballast, to a 6" 409 cfm Exhaust (see pic). I used to use a 400w and it would stay at 74F like the other boxes, but with a 600w it gets up to 78F tops and hangs around 76-77. I think it is worth if since with 600w I'm getting about 10k Lumens per sq. foot, whereas a 400w is half that.
For medium I use four, three-pot, DIY PVC ebb and flo stations (I'll post my layout) suspended on a pvc/2x6 rack and run by 396 gph eco pumps. Res are 18 gallon Rubbermaid Roughneck totes. I have a 100 gallon air pump outside on top of the homebox (you can see the air lines in the pics) and run air stones to each res.
I use Hydroton medium and General Hyodroponic nutes. I currently run the pump for 3 minutes 5x a day, starting an an hour before lights on, 7:00pm, 11:00pm, 3:00am, 7:00am, 1:00pm. Each timer control two pumps, so I plan on staggering the second timer by about 20-30 minutes to lower the amount of stress on the rack (only two sets of pots will be full at a time).
For this first run I mixed 2 parts each at 1.6 EC. Water is ~68F (pic). I mixed 15 gallons of water and think it was way too much, going to try either 10 or 12 gallons next time. I'll make threads with all the plans and layouts later. Clones go from two weeks in the cloner straight to the flowering chamber. Here is a pic of my first 3 clones to go into the flowering chamber at 1 week (pics taken 5/3/09, 7 days flowering):
Here is the lighting setup (exhaust is internal on this one):
Here is the medium I use:
Here are some pics of the hydro setup I built. It has twelve pots total, three every two weeks:
The overflow valve that controls flood water height:
Water Temp (~20C = ~68F):
I'll post more pics of tools I use and what not as we go!