Room within a Room

matatan

Well-Known Member
i will constructing a room within a room using 2x4's as frames and plywood as the floor and ceiling. panda film stapled to 2x4's to create seal.

my questions, will creating a Velcro entrance with the panda filmbe enough to prevent light leaks?
also should i plywood the walls also?

area will be 5'l x7'w x 7'h with 2 600whps, vented hoods with glass to keep lights lowest as possible.
 

hoagtech

Well-Known Member
i wouldnt install a floor because ply wood holds condensation and you be better off putting panda on the floor. I would also suggest building walls around your room in a room.
As for velcro you can buy zipper kits for tarps. They sell them at hydro stores too their called "tarp zip ups", and they do a good job sealing the light and allowing you entrance
 

thegrouch34

Active Member
After its built just make sure you test for light leaks. If you cant see your hand infront of your face your good. Make a good seal and good luck brother.
 

TJefferson

Member
Jorge Cervantes does pretty much this exact thing in his grow DVD, just bigger. Bet you could find the section on YouTube..
I just sketched out one using fire rated drywall, 2x4's, panda film, and plywood (for the floor, covered in panda and/or vinyl). Then I was like "maybe I should add the veg/mom chamber to the structure...lol. I'll have to check that out.
 

08GSXR600

Well-Known Member
Just built the same thing today out of 2x4. 4'x6'x6' . Poly walls with 1 wall plywood to mount equipment and a fan. Plywood roof so I can hang light and fan . Going to try the velcro door because I couldn't find zipper local.
 

TJefferson

Member
Just built the same thing today out of 2x4. 4'x6'x6' . Poly walls with 1 wall plywood to mount equipment and a fan. Plywood roof so I can hang light and fan . Going to try the velcro door because I couldn't find zipper local.
Do you have a link on that velcro door set up? I have an idea on how I'd do it but I'm sure it's been tried and tested before.
 

08GSXR600

Well-Known Member
i just got two velcro tabs from home depot.. definitely looking at it after i hung poly, i think a zipper d00r will be the only way to go.
 

08GSXR600

Well-Known Member
ill post what i built today when i finish it up tomorrow.. was very easy and i like the idea more than the prefab tents..

side note, am i the only one amazed carson daly is still on tv?
 

TJefferson

Member
side note, am i the only one amazed carson daly is still on tv?
Isn't he on between 3 and 4 am or something? Haha

-------

Does anyone use drywall in their "custom rooms"? Seems like it would be a good idea for fire prevention, especially if you leave your plants unattended for a day or two here and there. Any reason not to, aside from the additional expense?
 

WeeGogs

Active Member
i built one, wood needs to be 2" thick to be even slightly soundproof, plasterboard (drywall) is best. two layers one each side of the 2" by 2" frame.
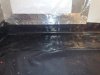
i built one here have a look at the door, it is larger than the door frame, it is made from 2 layers of 3/4" mdf and 1 layer of drywall in between, and taped at the sides with 2" aluminium tape. i kept the bottom frame 8" above the floor and sealed the entire floor with thick black plastic in case of hydroponic water leaks (downstairs neighbour), sealed the walls with white megalux plastic and totally sealed all joints. i laid two layers of drywall on top of each other on the floor and sealed my fans too, and filled every gap on the inside,
here is a handy sound guide check out section 5 and 6,
http://www.odg.org.uk/pdf/leaflet_6.pdf

some pictures :
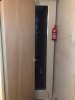
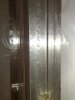
1 the original bedroom door.
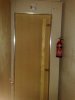
2 the inside room door.
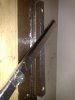
3 the door larger than the frame.
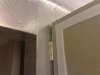
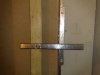
4 the weather seal strip (tripled)
5 a normal cabinet hinge x 4
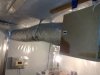
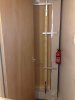
6 the acoustic fan ducting and home made fan box.
7 fan box.
8 8" rise above floor can be seen at the bottom.
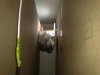
9 gap between old room and new.
10 gap between sealed window box on left and room on right (wire can be seen leading to internal small 20w lamp inside window box).
11 gap between window box on right and room on left with duct leading from sealed window box to internal room,
12 outlet duct.
13 inlet duct.
14 fan before internal soundproofing stuffed in.

the locks on the door were a complete waste of time.
i had to design home made ones designed to pull the door tight against the seal when you lock it.
i will take pics later and post them here.
 

Attachments

WeeGogs

Active Member
.....Continued My Sealed Door.
ok here are the pics of the sealable door.
the latches are bolted on and work on the same principle as the hands of a clock, and can be turned full circle when the door is open, the stays are shaped like a door wedge, or a slice of cake, when the door is PULLED closed you turn the latches toward the stay and when it touches the stay it gets tighter as you keep turning it because the stay gets thicker and the door gets pulled really hard against the weather seals.

the 3 top latches turn clockwise to lock.
the bottom one turns anticlockwise to lock.

pic 1, shows the latch bolted through the huge handle attached to the door, you can see the nut and locking nut, this can be spun 360 degrees.
pic 2, shows the latch turned 90 degrees to the stay and has pulled the door tightly outward.
pic 3, shows the third latch and bottom latch in the closed position, you can see the wedge shape of the bottom stay.
pic 4, shows where i ripped the tape back to show you the door make up, 2 layers of 3/4 mdf and middle layer of 1/2" drywall all screwed together.
pic 5, shows the door closed and locked with a single bathroom lock from the inside.
pic 6, shows the door closed at the bottom and the floor plastic rising up behind to keep water spillages in, the floor will hold up to 1200 litres of spilled water.
pic 7, shows as above with door open.
pic 8, shows the latch quarter turned and ready to pull down in to the tight horizontal position, you can clearly see the wedge shape.
pic 9, shows the sealed visqueen floor plastic at the other end of the room.
pic 10, shows the door closed from the inside and the gap is clearly visible between the wall and door, there is a difference in the gap distance hence the need for weather seals.
pic 11, shows the door in the locked position, if you try and push the door it will not budge even a fraction of an inch as the pressure of the latches pulling on it are so great that the latches are bending.
all the components except the screws bolts etc, are made of timber and covered with aluminium tape.
this room is pitch black inside when the door is closed and the lights are off. it is totally sealed except for inlet and outlet ducts.
there is also an eerie silence due to the sound proofing.
 

Attachments

matatan

Well-Known Member
i wouldnt install a floor because ply wood holds condensation and you be better off putting panda on the floor. I would also suggest building walls around your room in a room.
As for velcro you can buy zipper kits for tarps. They sell them at hydro stores too their called "tarp zip ups", and they do a good job sealing the light and allowing you entrance
i should of been more specific, this is not in my home that i own. this will be in my apartment that i rent, so 1 i dont want to ruin the carpet with my spills which is why i want to do the plywood floor, 2 i want to be able to take everything apart and reuse when i eventually buy my home (ny credit is fucking horrible... 547.....!) and 3. i dont want to go overboard on the plywood on both the interior and exterior walls when it really isnt neccesary. ill save that detail for when its my home and i will be there for years, this setup is for about 1 year 2yrs tops. (my credit should be straighten out by then... hopefully lol)
*will the panda film on covered on the plywood floor stop that condensation?

After its built just make sure you test for light leaks. If you cant see your hand infront of your face your good. Make a good seal and good luck brother.
thank you sir!

I was thinking about doing something similar. Would be interested to see the construction.
i will post pics on this same thread this weekend. from start to finish, this bitch will be built by sunday! i got a blueberry thats been vegging for 2 months thats getting waaaay to tall, she must be flowered!!! she needs her room!!!!
 

matatan

Well-Known Member
this room will have one 600w to begin, and a month into i will add the other 600 as the new seedlings become ready. i was looking into portable ac units with built in dehumidifiers like this
http://www.newegg.com/Product/Product.aspx?Item=N82E16896808070&cm_re=portable_air_conditioner-_-96-808-070-_-Product
and my only worry with that is the fucking 935watts. thats crazy. like i said before this is for my apartment and i cant (unless someone can tell me how to) create an additional breaker for dedicated equipment. what i plan to do is spread the load out throught 2-3 breakers so that no circuits past there respective limits, 1460w for 15amp or 1940w for 20amp.(numbers maybe off i dont have my book in front of me).
but still i think i would save myself money (electrical bill) by just buying another inline fan for an intake. what you guys think?? will i be happier i have my temps nice and steady with a reliable means yet more expensive unit like an ac OR will the intake fan be enough to keep things good enough..... i think i just answered my own question....... i dont want 'good enough'

also i will be exhausting hot air from the light(s) into same bedroom where this built room is, as far away as possible on the opposite side. i cant exhast out of the window again cause im in an apartment and have kids playing around outside.
 
Top