Hello all and welcome to my Cabinet Build Journal. My goal is to run through everything I've done to date specifically with the cabinet and get everyone caught up quick. So pull up your favorite chair and roll up a fatty
Please take to heart Al B. Fuct's notion of "Fail to plan, then plan to fail". I've been reading through this forum for almost two months trying to put it all together. My goal? Plan to succeed, expect to fail (miserably) and anything beyond failure is success! First, the objectives of the grow (ya I'm a IT Project Manager...ya got to have a vision):
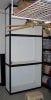
OK the boring part is over. Here's what we are working with:

It's a standard 6' Costco shelving unit for $59. To the right is one that I just set up for more storage (see story in a later post) and while I was building it I became inspired joint
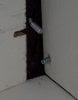
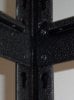
joint") . I have been looking at all sorts of different cabinets which would best utilize my space and I was just about ready to build one from lumber. But 2x4's, 1x2's and at least 1/2" plywood for sheer was going to be heavy! With this setup, I only need to attach 1/4" plywood panels using 5/16" nut's and bolts as so:
. I have been looking at all sorts of different cabinets which would best utilize my space and I was just about ready to build one from lumber. But 2x4's, 1x2's and at least 1/2" plywood for sheer was going to be heavy! With this setup, I only need to attach 1/4" plywood panels using 5/16" nut's and bolts as so:


This is so much better as I am able to still move the cabinet around while I work on it. Once it's all together, I will be strapping this bad boy to the wall...I'm in SoCal and need to worry about the shakers.
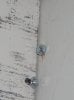
So how did a 6' shelf become 9'? I bought two more! Put one 3' section on top and turned the other 3' section into another storage shelf and work bench (this made the wife real happy!). Next pic is how the 3' sections are connected.

So wanna see?

Time for a quick break...my poor hands are aching!!

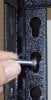
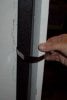
What about doors? The plan is to build a door frame out of 1"x2" and then use hose clamps to cinch them to the front of the shelf unit frame. I will sandwich a piece of 1/2" foam strip between the unit and the wood frame to eliminate light leaks. I have the materials, just haven't gotten to that point yet. Here's a trial fit...dammit, the hose clamp is too small (yet another trip to the home center):

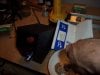
All interior surfaces have a coat primer and will be finished with exterior flat white paint and then covered in space blanket. The paint will help protect the wood from humidity and make it easier to keep clean.
So that's where the cabinet stands. I'll finish this post off for now since it's pretty late.
Tomorrow I'll put up pics of the electrical situation in the garage and what I did to prepare. I have 3 separate circuits pulled to the cabinet for a total of 50 amps, 1 already GFCI). We still have to think about ventilation so at some point need to get into that.
I've also drawn everything up in Google SketchUp (in 3d) and will show you some of my preliminary space plan idea's.
Lastly, I've been shopping for supplies so more on that as well with pics.
Once the cabinet is built, I will be moving over to the Hydro/DWC folder and starting a separate grow journal.
This is a work/design in progress. I have lot's of questions to pose so everyone feel free to comment.
Thanks for stopping by!
Please take to heart Al B. Fuct's notion of "Fail to plan, then plan to fail". I've been reading through this forum for almost two months trying to put it all together. My goal? Plan to succeed, expect to fail (miserably) and anything beyond failure is success! First, the objectives of the grow (ya I'm a IT Project Manager...ya got to have a vision):
- Perpetual grow with a harvest every 2 - 3 weeks enough for personal use.
- Multi-strain "Mother Farm" to move different strains in to the cycle.
- Practice each stage until each stage is successful (I may be harvesting lots of trim for hash while learning how to grow clones and "Mums".
- Stay within budget and only buy as you need (I'm just going to start with the MH bulb setup...eventually adding two HPS as things progress (this objective was added by my wife)
")
- Easy to modify and easy to disassemble (in case we move).
OK the boring part is over. Here's what we are working with:
It's a standard 6' Costco shelving unit for $59. To the right is one that I just set up for more storage (see story in a later post) and while I was building it I became inspired
jointThis is so much better as I am able to still move the cabinet around while I work on it. Once it's all together, I will be strapping this bad boy to the wall...I'm in SoCal and need to worry about the shakers.
So how did a 6' shelf become 9'? I bought two more! Put one 3' section on top and turned the other 3' section into another storage shelf and work bench (this made the wife real happy!). Next pic is how the 3' sections are connected.
So wanna see?
Time for a quick break...my poor hands are aching!!
What about doors? The plan is to build a door frame out of 1"x2" and then use hose clamps to cinch them to the front of the shelf unit frame. I will sandwich a piece of 1/2" foam strip between the unit and the wood frame to eliminate light leaks. I have the materials, just haven't gotten to that point yet. Here's a trial fit...dammit, the hose clamp is too small (yet another trip to the home center):
All interior surfaces have a coat primer and will be finished with exterior flat white paint and then covered in space blanket. The paint will help protect the wood from humidity and make it easier to keep clean.
So that's where the cabinet stands. I'll finish this post off for now since it's pretty late.
Tomorrow I'll put up pics of the electrical situation in the garage and what I did to prepare. I have 3 separate circuits pulled to the cabinet for a total of 50 amps, 1 already GFCI). We still have to think about ventilation so at some point need to get into that.
I've also drawn everything up in Google SketchUp (in 3d) and will show you some of my preliminary space plan idea's.
Lastly, I've been shopping for supplies so more on that as well with pics.
Once the cabinet is built, I will be moving over to the Hydro/DWC folder and starting a separate grow journal.
This is a work/design in progress. I have lot's of questions to pose so everyone feel free to comment.
Thanks for stopping by!
Attachments
-
 106.8 KB Views: 13
 -
 55.5 KB Views: 11
 -
 63.4 KB Views: 11
 -
 55.9 KB Views: 11
 -
 86.5 KB Views: 11
 -
 90 KB Views: 12
 -
 57 KB Views: 12