First Ever Grow - Stealth PC Easy Ryder Bubbleponics

aggreenvln

Active Member
Hi guys,

I've been lurking quite a bit in the grow journals and hydro forum, but this is my first attempt at posting anything. I'll give you a bit of an introduction and then get on with discussing my setup!

I'm a 20-something-year-old college student majoring in Physics/Maths at my state University. I live in a house apartment about a mile away from campus in a residential-ish neighborhood (maybe half students, half homeowners). I've been smoking off and on since my junior year of high school, and I've always been interested in the science of marijuana. During my freshman year of college I spent a lot of time learning pretty much everything I would need to know to get started growing, but I wasn't able to do so safely seeing as I lived in the dorms. I was in the dorms for one more year, then I moved into a house in my present neighborhood with my cousin and another friend. Now it is a couple years later and a few weeks ago the thought finally hit me that I could probably pull off some sort of micro/small grow operation.

I spent a few days researching potential grow-box designs and then stumbled upon the slightly niche community of PC-case growers. The journals of the likes of secretforestgarden and others really inspired me to take my plans in this direction. It seemed as though PC grows were feasible, relatively low-cost, stealthy and generally yield the amount of product I'd consume between consecutive grows and maybe a little extra if I could really perfect my system. Just my cup of tea! I looked at a few pre-made PC grow boxes being sold on the interwebs and after doing a bit of research opted for the DIY method. I spent the next couple days picking out parts (mostly from Amazon, free 2-day shipping for students, woo!) and trying to decide if I would use soil or a small bubble-hydro setup. I settled on bubbleponics (the hardest part was finding decent-volume reservoir that would fit in the case!) and placed orders for all of the hardware I would need as well as for five feminized Easy Ryder (a.k.a. Lowryder #2 x AK47) seeds from sensibleseeds.com.

Below is a mostly complete parts list:

Hardware:

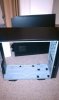
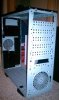
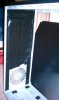
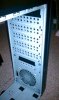
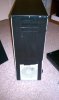
Broadway Com R910 Full Tower Case (8.1"W x 21.3"H x 23.2"D)
Cooler Master 120mm Green LED Case Fan - (R4-L2R-20CG-GP) (x2)
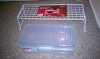
Bionaire A1260C Carbon Replacement Filters
Pass & Seymour S752WCC10 Electric Bulb White Medium Cleat Socket (x5)
Earthmate EP3052AE 30-Watt Spiral CFL 2700K Bulb (x5)
Feliz 125 Watt CFL Grow Light 6500K
Sunleaves Poly Film in Black / White
Coleman Cable 09404 SPT-2 Triple Tap Extension Cord, 2-Conductor, 15'
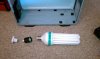
12v DC Power Supply
Intermatic TN311C 120 Volt Heavy Duty Grounded Timer
Honeywell TM005X Wireless Indoor/Outdoor Thermo-Hygrometer

Bubbleponics:

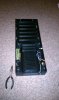
Rubbermaid 228100-CLR Snap Case (14" x 7.7" x 4.5", approx. 2.2gal)
Rockwool Starter Cubes (x10)
Round Net Pots 3"
pH Control Kit - General Hydroponics
Hydroton 10 Liter Bag (2.2 Ga)
General Hydroponics Flora Kit 1 Pint each
Flexible Airline Tubing
Bubble Disk Airstone 5", round
Elite A800 Air Pump

Misc. and assembly:

Velcro Sticky-Back Fastener Tape, 0.75" x 5', White
Black Duct Tape
Scotch Permanent Double-sided tape

I'll continue below with some notes on initial assembly and a few things I still need to pick up.
 

aggreenvln

Active Member
In this post I'll first cover a couple items I still need to buy, then go over my general concept for the case and the grow, and then I'll get to construction with some pictures.

To-buy:

Mogul Socket for Feliz 125W 6500K CFL
Either an LST shelf or some type of ScrOG grid (input and ideas welcome?)

Here is a general step-by-step case prep procedure:

1. Strip the case
2. Make any holes light-tight with black duct tape
3. Cover inside of case with Panda Film
4. Install fans, carbon filters - wire fans and case LEDs together onto 12VDC adapter line.
5. Use velcro and/or screws to attach light fixtures to inside of case - wire light fixtures together onto heavy 2-conductor extension cord
6. Assemble and place bubbleponic system.
7. Power on
8. ???
9. Profit

I chose hydro over soil because it seemed much cleaner, stealthier and easier to deal with than soil in a carpeted apartment. In addition, I've heard of people getting great results with bubbleponics systems. I've yet to see a really complete PC bubbleponics grow journal. Hopefully my experience can be a bit of a reference as to the viability of the system and how to go about it from start to finish.

Now, on to construction.

Sorry I don't have any pictures from before I started to rip up the case (it was brand new when I got it, I swear!). Keeping a journal of my experience was a sort of last-minute thing that just hit me a few hours ago.

Stripping the inside of the case involved tearing out a bunch of punch rivets in order to dislodge the hard-drive rack and motherboard mounting panel. Here is what I took out:


After I had the inside all cleared out, it was time to start covering holes with duct tape in order to get some type of functional light seal.

Back Panel (inside):


Back Panel (outside):


Inside of case, barebones:


Front Panel (inside, front cover on):


Inside of front plastic panel -- all I left wired were the HDD and Reset LEDs:


Front panel before light-proofing (outside, front plastic panel off):


Front panel after light-proofing (outside):


(inside):


Now that the case is light-proof, I can start covering the inside with Panda Film. Side panel (access door, inside):


Side panel ventilation holes, duct tape inside under panda film (access door, outside):


Side panel (back, inside), notice the horizontal strip of velcro -- this is where my 2700K CFLs will go (I may add another strip of velcro to increase the security of the light fixtures):


I'm at a bit of a stand-still in construction at the moment because I ran out of double-sided tape and my CFL fixtures haven't come in the mail yet (expected Monday or Tuesday, 23 or 24 August). Tomorrow I'll go to the store to pick up a mogul fixture for my larger Felix 125W CFL. I plan borrowing a drill and mounting the socket with screws on the exposed metal section at the top of the inside of the back panel.

Hopefully by tomorrow night I'll have the entire inside of the case covered in Panda Film, my fans and carbon filters mounted, and have a mounting/wiring point for my 125W CFL. After that, it will just be a matter of waiting for the last few parts to arrive in the mail (30W CFL fixtures, reservoir container, SEEDS!) and I'll be good to start germinating and getting my first grow on the road!

One thing about my grow I haven't decided yet is whether to go ScrOG or LST, and how to mount the necessary hardware for one or the other. Honestly if I could find a nice LST shelf (like the ones used in http://www.pcgrowbox.com/flower-box-lst-hydro.html) I'd probably go with that but I can't think of what I can use. A tie rack? Some sort of pet bird ladder? If ScrOG seems like the best option, I'd hate to be limited to chicken wire. Does anyone have any other solid grid ideas they can offer up? I'd like something pre-fab and metal, preferably. Whichever method I decide to use, I'll most likely figure out a semi-movable mounting system on the inside of the back wall using velcro strips.

Thanks for reading this far everyone. Feel free to pipe in with any suggestions, ideas, comments, concerns, et cetera.

Happy Growing!
 

Attachments

aggreenvln

Active Member
Quick update before I head to the store: I have decided to go with ScrOG. It seems like it will be easier to set up and provide greater plant coverage for my grow configuration. At the store I'll be on the lookout for a rigid, large-holed chicken wire or a square wire grid solution.

Expect more later.
 

aggreenvln

Active Member
Hey everyone,

I'm taking a little break while sparking up a bowl and watching some TV with my dog, so I thought I'd upload what I've done so far today.

I went to the store and got six things:

Twist-on wire connectors
A mountable light outlet for Feliz 125W (actually very similar to the ones I ordered for the other CFLs)
Necessary hardware for mounting
A medium-to-mogul socket adapter
More double-sided tape
A ScrOG rack

I ended up having to go with the socket + adapter method because I couldn't find a store that carried a mogul socket (went to Home Depot, Menards, Ace Hardware). This method should work just as well. I got home and drilled some mounting holes in the case.

In the attached pictures you will see an excellent vinyl-coated rack I can mount above my plants. It is nearly a perfect size for my case, so I should be able to use a couple velcro strips. The holes are square, roughly 1" and the structure is rigid.

You'll also see a clear rubbermaid snap-case. That came in the mail today -- it's what I'll be using as my reservoir. It is only 4.5" deep, so I may figure out a way to raise my net pots a little bit to increase my nutrient solution volume to 1 gallon.

I wanted to use one long strip of Panda Film to cover the inside of my case. In order to achieve this I needed to make some cuts to accomodate for the unusual shape of the back panel. In hindsight I probably could have just stretched the strip over the unusual contours, but having it secured to the structure of the case gives me greater confidence that it won't become punctured. Anyway, I finished going around the case once and then patched up some rough spots. My Panda Film covering is complete!

I then planned how I was going to wire the fans and attach the carbon filters. I decided to just wedge the carbon filter in between the fan and the wall of the case. There are struts on the correct side of the fan so the blades don't snag on the filter.

Well, my cake is done and I'm out of recaps. Also I need to refill this bowl.

More updates later!
 

Attachments

aggreenvln

Active Member
Hey guys,

Quick update with some pictures here. I finished detailing the interior of the case, installed the fans and carbon filters, put the front panel back on (front panel contains wire bundle for fan power), installed the light fixture and 125W vegging CFL and powered on! Wow is she bright. I can't wait until I can get all five 30W flowering CFLs in, then I'll be completely finished wiring.

I took a few pictures of it all put together. One with the case open with the system running, one with the light off so you can see my tiny green fan LEDs :P 
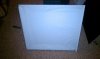
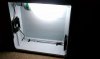
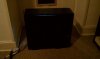
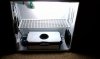
and one with the system completely closed and the ambient light dimmed. As you can see, there is only one small light leak across the top seam. I can cover that up with a strip magnet or something if I really want, but I don't think it'll be necessary.

Next up on the list is reservoir preparation. I'll need to cover it completely in Panda Film, then cut a 3" hole for the net cup and a small hole in the corner for pump tubing.

After that I'll figure out a reliable mounting solution for my rack, and then it's just a wait for the seeds to get here! In the mean time I'll try leaving my system on for a couple days with a temperature monitor in it to make sure I'm getting enough ventilation.

Thanks for tuning in folks. As always, feel free to pipe in with comments, criticisms, ideas, suggestions, et cetera.
 

Attachments

aggreenvln

Active Member
Thanks for the kind words, all :). Electropyro I noticed you are doing a PC bubbleponics grow as well. We'll have to keep each other posted.

There isn't a whole lot left to do before my seeds get here, so I may be lacking in content for the next couple days unless I just feel like posting random crap. Feel free to stay tuned anyway!

Anyway, here is what I've gotten done today:

I light-proofed my reservoir by first covering it in a layer of black duct tape, then wrapping it in Panda Film and taping over seams. I cut two holes in the top; one three inch hole for my net pot, and one small hole in the corner through which the airline tube is routed. I have two questions that hopefully someone can help me answer:

1. My reservoir is the perfect size for my case and should be able to hold at least 1.5 gallons when full, however it is only 4.5" high so my net pot extends about half of its depth. Currently I have it filled with .75Gal tap water and the level is between .125" and .25" above the bottom of the net pot. With .5Gal tap water, the level is ~.25-.5" below the net pot. Are either of these two volumes enough water? If it is feasible I'll use .5Gal in order to provide a small aeroponic buffer zone. If .5Gal is not enough, could I get by with .75Gal and my net pot very slightly submerged? Or should I raise my net pot slightly to maintain a good water level and net pot position?

2. Attached is a picture of my airstone with the pump going. In reading about other bubbleponics setups I imagined a furiously bubbling stone creating a misty section on the surface directly above it. As you can see, I'm not getting very furious bubbling (not even the full surface of the stone is bubbling) and definitely no above-water mistiness. Is this a result of using a pump (Elite A800, 1500cc/min, 2.5PSI) that is too small for my airstone, a faulty airstone or something else? Would it be smart to order a smaller airstone from a different company?

I also left the system running for an hour or so while I was out and it stabilized at 91.4 degrees Fahrenheit. I realize this is way too hot, but before you yell at me bear in mind my room temperature is 84 degrees right now. No AC in a heat wave sucks :(. So overall at 7 degrees above room temperature I'm happy. I'll keep my room at 65-70 degrees when it cools down and expect an internal temperature of 70-75 degrees. In the mean time I'll probably pick up a window AC unit if this heat stays for much longer.

That's about it so far today. I'll research a bit more about my two problems, and then get to figuring out a mounting solution for my ScrOG rack.

More later!
 

Attachments

electropyro

Active Member
Thanks for the kind words, all :). Electropyro I noticed you are doing a PC bubbleponics grow as well. We'll have to keep each other posted.

There isn't a whole lot left to do before my seeds get here, so I may be lacking in content for the next couple days unless I just feel like posting random crap. Feel free to stay tuned anyway!

Anyway, here is what I've gotten done today:

I light-proofed my reservoir by first covering it in a layer of black duct tape, then wrapping it in Panda Film and taping over seams. I cut two holes in the top; one three inch hole for my net pot, and one small hole in the corner through which the airline tube is routed. I have two questions that hopefully someone can help me answer:

1. My reservoir is the perfect size for my case and should be able to hold at least 1.5 gallons when full, however it is only 4.5" high so my net pot extends about half of its depth. Currently I have it filled with .75Gal tap water and the level is between .125" and .25" above the bottom of the net pot. With .5Gal tap water, the level is ~.25-.5" below the net pot. Are either of these two volumes enough water? If it is feasible I'll use .5Gal in order to provide a small aeroponic buffer zone. If .5Gal is not enough, could I get by with .75Gal and my net pot very slightly submerged? Or should I raise my net pot slightly to maintain a good water level and net pot position?

2. Attached is a picture of my airstone with the pump going. In reading about other bubbleponics setups I imagined a furiously bubbling stone creating a misty section on the surface directly above it. As you can see, I'm not getting very furious bubbling (not even the full surface of the stone is bubbling) and definitely no above-water mistiness. Is this a result of using a pump (Elite A800, 1500cc/min, 2.5PSI) that is too small for my airstone, a faulty airstone or something else? Would it be smart to order a smaller airstone from a different company?

I also left the system running for an hour or so while I was out and it stabilized at 91.4 degrees Fahrenheit. I realize this is way too hot, but before you yell at me bear in mind my room temperature is 84 degrees right now. No AC in a heat wave sucks :(. So overall at 7 degrees above room temperature I'm happy. I'll keep my room at 65-70 degrees when it cools down and expect an internal temperature of 70-75 degrees. In the mean time I'll probably pick up a window AC unit if this heat stays for much longer.

That's about it so far today. I'll research a bit more about my two problems, and then get to figuring out a mounting solution for my ScrOG rack.

More later!
too sorta answer your questions.
1. You might want to get a bigger resorvoir.. i have read on a few threads that not all the roots should be submerged.. try to get one atleast 3 inches bigger..
2. you might need a new air pump.. i reccomend active air pumps and try to get 2 airstones in their. the more O2 pushed through their the better.
3. yep i was doing a pc but my plant got tremendous grouwth and didnt fit in their anymore. even if i lst it would not have helped so i moved her to a small dresser..
 

electropyro

Active Member
but in your case you wont have to worry too much about growth because their autoflowers right.. they tend not too grow too big.. my autoflowers turned into midgets
 

aggreenvln

Active Member
Electro, thanks for the response. I can try to be on the lookout for a bigger reservoir, but I can't really afford too many more inches of vertical rise. Plus *any* reservoir-type case that would fit well in my setup was pretty hard to find. If anyone knows of any reservoirs or containers that are 15"±1"L * 7.5"±.5"W * 5.5"±1"H please let me know!

I'll take your pump comments into account. I definitely plan on hitting up a pet store and getting a different airstone to try out -- if that doesn't fix the problem I'll try a new pump and have another airstone to boot!

Honestly though, this airstone is either getting a bit better with a longer soak time or my opinion on effective bubbling changed. After running for a while (10-15min) there was a significant amount of splatter visible, even if it isn't easy to see or feel. Considering the size of my reservoir and the rate at which my single small plant is likely to eat up nutes, I think this setup could work if I can't figure out a simple solution/improvement.

I also put an extra strip of velcro on the back panel below the original, and put a three-strip velcro mount on the side panels for my ScrOG rack. Attached is a picture of the mostly complete system in all its glory including fans, carbon filters, 125W CFL, ScrOG rack and a DIY bubbleponic system. All it's missing is five fixtures on the back panel and appropriate wiring, and most importantly a PLANT!

Also Electro, yes -- I'm using an autoflower strain. Its vertical height should be manageable in my case with no problems.

Thanks for reading!
 

Attachments

aggreenvln

Active Member
Gah... slight setback -- I was double checking my tracking number for the light fixtures I have coming in the mail and realized that for some reason I only submitted an order for one instead of five. Oops! I could have sworn I had all five in my Amazon cart when I checked out, but I guess something odd must have happened. Anyway, they are similar enough to the one I bought at the store for my 125W (perhaps identical) that I'll probably just head on down to Ace Hardware and pick up four more. I am also contemplating putting another 80mm exhaust fan directly above the 120mm exhaust fan on the back of the case. There isn't a fan mount there, but there is a hole in the case that is just the right size. All I'll really have to do is cut away some duct tape and Panda Film. I think adding another 30-40CFM exhaust right below my lights will help a bit with heat control, especially near the top of the plant.

Anyway, with the exception of the possible fan addition, the case should be fully assembled tonight.
 

electropyro

Active Member
Gah... slight setback -- I was double checking my tracking number for the light fixtures I have coming in the mail and realized that for some reason I only submitted an order for one instead of five. Oops! I could have sworn I had all five in my Amazon cart when I checked out, but I guess something odd must have happened. Anyway, they are similar enough to the one I bought at the store for my 125W (perhaps identical) that I'll probably just head on down to Ace Hardware and pick up four more. I am also contemplating putting another 80mm exhaust fan directly above the 120mm exhaust fan on the back of the case. There isn't a fan mount there, but there is a hole in the case that is just the right size. All I'll really have to do is cut away some duct tape and Panda Film. I think adding another 30-40CFM exhaust right below my lights will help a bit with heat control, especially near the top of the plant.

Anyway, with the exception of the possible fan addition, the case should be fully assembled tonight.
Lighting: I dont think 4 more may fit lol. just stick with one 125watt 6500k cfl for veg use it for about 2 weeks and switch it to a 125watt 2700k for flowering after 2 weeks of vegging.. autoflowers have a "veg" period of about 1.5-2 weeks..

Airstone= dont get airstones from a pet store.. go to your local hydro shop and get airstones from their. their the same price(give or take $1)you will notice the big difference in quality right away..

Fans= the more air flow you get in their the better. use 3 or 4 120mm fans. like 3 intake and 1 outake.. check out how i started with my pc.. i had 5 fans in their.. plants love fresh air... also what will help you alot is adding CO2
 

aggreenvln

Active Member
Hey thanks again Electro.

I suppose I should be clear ... I don't plan on putting five additional CFLs in at while the large 125W is in there, I just plan on using different smaller CFLs for flowering. I'll take out the 125W 6500k and put in five 30W 2700k CFLs on the other fixtures on the back wall. Both types would definitely not fit together :).

Your second comment could be where I went wrong with the first airstone... I ordered from an aquarium supplier instead of a hydro supplier. I'll see if there are any hydro suppliers in my area and check them out. Thanks!

Regarding ventilation... I was under the impression that one of the top concerns when designing grow room ventilation is in making sure CFM out > CFM in otherwise stinky air will leak out of every nook and cranny (in other words, we want to maintain a negative pressure environment). That is why I plan on installing the new fan as exhaust instead of intake. On top of that, I don't think I could add any many more fans without significantly modifying my case. I may add some CO2 from yeast as I also dabble in homebrewing. We'll see -- I need to do some more research in that respect!

Thanks for tuning in Joker250! I hope we're able to learn together.
 

aggreenvln

Active Member
how will you cal the ppm for your fretz?
Good question... I don't have a PPM/EC meter yet, but I'm thinking about getting a decent digital one. For now I'll be using the recommended proportions on the back of the nute bottles and flushing every few days (more due to the small size of my reservoir).
 
Top