Eagle Eyes
Active Member
Here some shots of my first grow set up. After seeing an article for the BC Bloom Box, I decided I could do the same. I figured Id try to go on the cheap so went with CFLs. All the parts were bought new, except the box, and fan. Im sure it could have been even cheaper had I taken the time to hunt the second hand shops, or garage sales for the parts
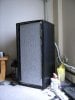
Grow box I went to a local second hand store and found an
old stereo cabinet that had a door figured I needed about 3-4
height, and enough space for 3-4 plants. I got a box about 2x2x4
($9.99 Value Village)
(SEE Image 1 "Cabinet front"
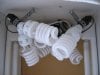
Lights from the local hardware store I bought 4 standard light sockets, I decided for the extra $1.00 Id get the ones that were already wired with plugs. (4 x $4.99 Home Depot)) For each of the sockets, I also got a porcelain y splitter. This allows me to use two bulbs per socket. (4 x $3.49 Home Depot)
(SEE Image 2 "Sockets"
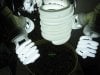
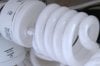
The bulbs (as always) were the most expensive pieces of the build.
For Vegging - 8 x 42 watt Daylight spectrum (about 6500K per) (8x $9.99)
For flowering - 6 x 42 watt Soft White spectrum bulbs (about 3500k per) (6x $9.99)
2 x 42watt cool White Spectrum bulbs (about 2700K per) (2x $9.99)
(SEE Image 3 "Cfl Used"
I also added 2 x 24 fluorescent tubes (1 per side wall) that used flower and aquarium bulbs. (2 x $12.99) (I already had them, so what the hell)
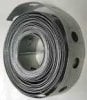
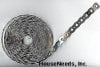
Mounting supplies - From the hardware store I bought a small role of plumbers
Strapping. ($5.25)
4 eyelets ($3.00 for a box of 10)
8 15 2 nuts/bolts ($3.00 for a box of 10
(SEE Image 4/5/6 "Plumbers tape a, plumbers tape b, eyelet screws""
I cut 4 lengths of the plumbers strapping into about 8-10 inch lengths (one for each socket to mount), and 3 about 5 inches long (for strapping the cords together.)
Airflow / Venting 1 large roll of black duck tape to seal up any light leaks.
Finally, I bought a small (8 diameter) exhaust fan, and a small
length of dryer vent hose.. Best bet is a bathroom fan from an
RV. I got mine used at the local RV dealer, but any small fan
will do.
Paint the inside of the cabinet for reflection, I painted all sides, bottom, and top. Once the paint is dry, I was ready to build.
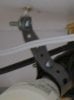
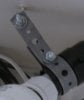
Assemble the four sockets for mounting. Fist take 1 x 8-10 length of the plumbers strapping, rap one end around the socket. Align any two holes in the strapping to make a tight fit and bolt closed. Insert the porcelain Y, and add two bulbs to each.
With one of the sockets assembled, and with two bulbs in, I flipped the box upside down to make it easier to work on the inside top. First I aligned the socket so the 4 units could all be fitted. Each end opposite the socket will hang from one of the eyelets. Once you have the first socket set, mark the location, and screw in an eye socket. Move the assembled unit to the next spot making sure that it fits next to the first. Repeat until each of the eyelets is in.
Once all four eye lets are in, remove to bulbs from the sockets, and mount each by bolting the end opposite the socket to eyelets. Flip the unit upright, and (hand tighten all fittings, Once the bulbs are in you will need to make some slight adjustments to their angles so it may be easier to fully tighten after your happy.
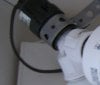
Venting - Mount the fan high up the back of the cabinet, try to get in level or above the
area of the lights (heat rises). Once mounted I make sure it is sucking air out
(NOT blowing in) and then use some duct tape to attach my dryer hose. ( I only
use the hose as the cabinet sits beside my balcony, and hey why not vent
outside)
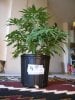
It took me about 4 hours to put it together and paint. My babies seem very happy.
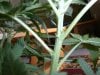
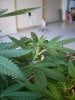
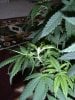
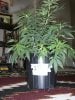
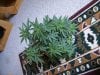
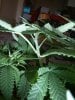
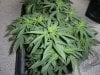
Germinated 4, all came up within 48hrs. All grew very well in a CFL cabinet set-up(8 x42 watt bulbs in 2x2x4 box. After vegging for about 5/6 weeks just entered the flowering stage (5/6 days ago.) So far, looks good 3 definite females, 1 with possibility. Id love to hear some feedback!!
Grow box I went to a local second hand store and found an
old stereo cabinet that had a door figured I needed about 3-4
height, and enough space for 3-4 plants. I got a box about 2x2x4
($9.99 Value Village)
(SEE Image 1 "Cabinet front"
Lights from the local hardware store I bought 4 standard light sockets, I decided for the extra $1.00 Id get the ones that were already wired with plugs. (4 x $4.99 Home Depot)) For each of the sockets, I also got a porcelain y splitter. This allows me to use two bulbs per socket. (4 x $3.49 Home Depot)
(SEE Image 2 "Sockets"
The bulbs (as always) were the most expensive pieces of the build.
For Vegging - 8 x 42 watt Daylight spectrum (about 6500K per) (8x $9.99)
For flowering - 6 x 42 watt Soft White spectrum bulbs (about 3500k per) (6x $9.99)
2 x 42watt cool White Spectrum bulbs (about 2700K per) (2x $9.99)
(SEE Image 3 "Cfl Used"
I also added 2 x 24 fluorescent tubes (1 per side wall) that used flower and aquarium bulbs. (2 x $12.99) (I already had them, so what the hell)
Mounting supplies - From the hardware store I bought a small role of plumbers
Strapping. ($5.25)
4 eyelets ($3.00 for a box of 10)
8 15 2 nuts/bolts ($3.00 for a box of 10
(SEE Image 4/5/6 "Plumbers tape a, plumbers tape b, eyelet screws""
I cut 4 lengths of the plumbers strapping into about 8-10 inch lengths (one for each socket to mount), and 3 about 5 inches long (for strapping the cords together.)
Airflow / Venting 1 large roll of black duck tape to seal up any light leaks.
Finally, I bought a small (8 diameter) exhaust fan, and a small
length of dryer vent hose.. Best bet is a bathroom fan from an
RV. I got mine used at the local RV dealer, but any small fan
will do.
Paint the inside of the cabinet for reflection, I painted all sides, bottom, and top. Once the paint is dry, I was ready to build.
Assemble the four sockets for mounting. Fist take 1 x 8-10 length of the plumbers strapping, rap one end around the socket. Align any two holes in the strapping to make a tight fit and bolt closed. Insert the porcelain Y, and add two bulbs to each.
With one of the sockets assembled, and with two bulbs in, I flipped the box upside down to make it easier to work on the inside top. First I aligned the socket so the 4 units could all be fitted. Each end opposite the socket will hang from one of the eyelets. Once you have the first socket set, mark the location, and screw in an eye socket. Move the assembled unit to the next spot making sure that it fits next to the first. Repeat until each of the eyelets is in.
Once all four eye lets are in, remove to bulbs from the sockets, and mount each by bolting the end opposite the socket to eyelets. Flip the unit upright, and (hand tighten all fittings, Once the bulbs are in you will need to make some slight adjustments to their angles so it may be easier to fully tighten after your happy.
Venting - Mount the fan high up the back of the cabinet, try to get in level or above the
area of the lights (heat rises). Once mounted I make sure it is sucking air out
(NOT blowing in) and then use some duct tape to attach my dryer hose. ( I only
use the hose as the cabinet sits beside my balcony, and hey why not vent
outside)
It took me about 4 hours to put it together and paint. My babies seem very happy.
Germinated 4, all came up within 48hrs. All grew very well in a CFL cabinet set-up(8 x42 watt bulbs in 2x2x4 box. After vegging for about 5/6 weeks just entered the flowering stage (5/6 days ago.) So far, looks good 3 definite females, 1 with possibility. Id love to hear some feedback!!
Attachments
-
 50.5 KB Views: 127
 -
 23.2 KB Views: 25
 -
 24.7 KB Views: 17
 -
 4 KB Views: 13
 -
 11.2 KB Views: 9
 -
 28.4 KB Views: 12
 -
 41.2 KB Views: 11
 -
 37.6 KB Views: 79