BilboBag
Member
This is a guide for converting High Bay HID fixtures for indoor use. The idea is to replicate the setup of commercial grow lights.
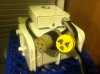
I've purchased a couple of 400watt MH/MV ballasts from a second hand store. Inspect them for any signs of over-heating, yellowing around the socket or discolored wiring.
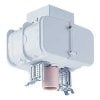
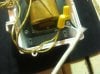
First remove the auxiliary mounting hardware and wiring covers. Next separate the socket from the casing. The socket will still be wired to the inside of the casing but free from the exterior. Now remove the case bolts and open the casing.
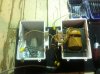
Now cut the wires connecting the socket to the capacitor and common line. Its best to cut these wires at half the overall length. You will be adding wire to both of these and want to leave yourself as much as possible to work with.
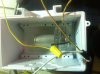
Inside you casing locate your power supply lines. Identify the correct voltage and connect your power cord with plug to these lines.
The magnetic ballast has a line running to the capacitor. This is the black line for your socket. The magnetic ballast also has a white or common line coming from it. It is the white line for your socket. Connect the wires to another length of cord with a female plug on the end. Mark your wires and use grounded plugs so there is only one possible way to connect the lamp. White to white, black to black.
You should now have two cords coming from your casing. One to plug into the wall and one to receive a plug from the socket.
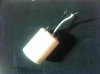
Now wire your socket as though you were going to plug it into the wall. Be sure to wire your socket to match the wiring of your ballast plug. Again, white to white, black to black, and use grounded plugs to prevent any chance of a backwards connection.

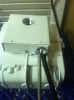
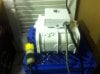
Ive used some galvanized sheet metal to build a reflector, and mounted my socket to the hood. Remember when designing this that the bulb will generate heat that you will have to deal with. I have plenty of space so Ive choose to use a large reflector with a fan mounted inside.
When youre finished you should have a reflector with the socket mounted inside and a power cord running from it with a wall style plug connected to it. A ballast with two cords coming from the casing. One to plug into the wall and the other to receive the plug from your socket.
Youre now able to disconnect your reflector and socket from the ballast to make moving easier. This also allows you to wire a second HPS ballast the same way and without moving your reflector, change the bulb and plug into the next ballast for the second phase.
I've purchased a couple of 400watt MH/MV ballasts from a second hand store. Inspect them for any signs of over-heating, yellowing around the socket or discolored wiring.
First remove the auxiliary mounting hardware and wiring covers. Next separate the socket from the casing. The socket will still be wired to the inside of the casing but free from the exterior. Now remove the case bolts and open the casing.
Now cut the wires connecting the socket to the capacitor and common line. Its best to cut these wires at half the overall length. You will be adding wire to both of these and want to leave yourself as much as possible to work with.
Inside you casing locate your power supply lines. Identify the correct voltage and connect your power cord with plug to these lines.
The magnetic ballast has a line running to the capacitor. This is the black line for your socket. The magnetic ballast also has a white or common line coming from it. It is the white line for your socket. Connect the wires to another length of cord with a female plug on the end. Mark your wires and use grounded plugs so there is only one possible way to connect the lamp. White to white, black to black.
You should now have two cords coming from your casing. One to plug into the wall and one to receive a plug from the socket.
Now wire your socket as though you were going to plug it into the wall. Be sure to wire your socket to match the wiring of your ballast plug. Again, white to white, black to black, and use grounded plugs to prevent any chance of a backwards connection.
Ive used some galvanized sheet metal to build a reflector, and mounted my socket to the hood. Remember when designing this that the bulb will generate heat that you will have to deal with. I have plenty of space so Ive choose to use a large reflector with a fan mounted inside.
When youre finished you should have a reflector with the socket mounted inside and a power cord running from it with a wall style plug connected to it. A ballast with two cords coming from the casing. One to plug into the wall and the other to receive the plug from your socket.
Youre now able to disconnect your reflector and socket from the ballast to make moving easier. This also allows you to wire a second HPS ballast the same way and without moving your reflector, change the bulb and plug into the next ballast for the second phase.