palebock
Active Member
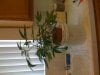
I'm pretty new to growing, but I think that I'm onto a pretty good closet system. I thought that it may help some other newbies to post what I've done.
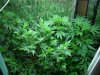
To start, you'll need lighting. I bought a T-5 high output fluorescent light. I figured that it kicks out a lot of light and it won't heat up my closet. It cost around $100. Also, I'm using blue spectrum bulbs since they're better for vegetative growth.
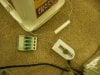
I decided to go hydroponic since it's an indoor garden. I first started with a pre-made setup, but I think that I've improved on that. Basically, my setup is based on a bubbler system. That is, I get a 2 gallon bucket with lid ($5), a 6" plastic pot ($2), aquarium airline tubing ($5), aquarium air pump ($10), aquarium air stones ($3), rock wool cubes ($10 for a bunch of them), aquarium gang valve ($") , expanded clay pellets ($15 for a big bag of them), zip ties (I already had those), and a fishing weight (I already had that too). Beyond that, I'm using GH Flora Nova Grow for my nutrients ($20).
, expanded clay pellets ($15 for a big bag of them), zip ties (I already had those), and a fishing weight (I already had that too). Beyond that, I'm using GH Flora Nova Grow for my nutrients ($20).
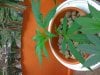
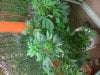
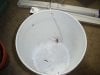
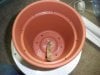
I took the bucket and drilled a small hole in the top of the side. This is where the airline tubing comes into the bucket. I place an air stone at the end of the tubing and add a fishing weight to hold it down. Then, on the lid to the bucket, I trace the shape of the plastic pot. I cut that out and jam the pot into the hole in the lid. You'll see from the pictures that I have a small piece of a wick going from the pot down into the bucket. An old piece of a shirt or towel will also work for a wick.
More to come in "Step 2"...
To start, you'll need lighting. I bought a T-5 high output fluorescent light. I figured that it kicks out a lot of light and it won't heat up my closet. It cost around $100. Also, I'm using blue spectrum bulbs since they're better for vegetative growth.
I decided to go hydroponic since it's an indoor garden. I first started with a pre-made setup, but I think that I've improved on that. Basically, my setup is based on a bubbler system. That is, I get a 2 gallon bucket with lid ($5), a 6" plastic pot ($2), aquarium airline tubing ($5), aquarium air pump ($10), aquarium air stones ($3), rock wool cubes ($10 for a bunch of them), aquarium gang valve ($
I took the bucket and drilled a small hole in the top of the side. This is where the airline tubing comes into the bucket. I place an air stone at the end of the tubing and add a fishing weight to hold it down. Then, on the lid to the bucket, I trace the shape of the plastic pot. I cut that out and jam the pot into the hole in the lid. You'll see from the pictures that I have a small piece of a wick going from the pot down into the bucket. An old piece of a shirt or towel will also work for a wick.
More to come in "Step 2"...
Attachments
-
 226.6 KB Views: 7
 -
 185.7 KB Views: 8
 -
 221 KB Views: 8
 -
 215.8 KB Views: 10
 -
 239.3 KB Views: 9