building my own stealth cabinet

ginjawarrior

Well-Known Member
after years of waiting and planning im finaly at the stage where im about to build my stealth cab. i'll try to post pics as i go show you what i done. unfortunately i spent all last night tripping and as nice as the afterglow feels my head is still very spangled and feels like mush. hopefully procrastinating on here will help me keep on track.

first some music to get settled in [youtube]0_L4rDpaTNU[/youtube]

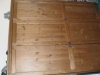
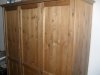
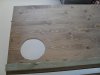
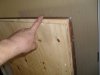
im using a pine wardrobe as the base of the box.

i will be pretty heavily reinforcing it, rehanging doors for added security and to fix light leeks, fitting cool tube and stuff as well.

materials.
1 wardrobe
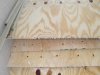
sheets of plywood 1/2" and 3/4"
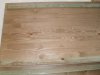
lengths of 1 1/2"x3/4" tile batton
circular saw
jigsaw
drill
screws
drill bits and other such

right i guess that enough messing about i better start on it

feel free to post if you want but please be patient as im gonna be going slow on this today ;)
 

Attachments

ginjawarrior

Well-Known Member
hello again [youtube]8Q0V2RFRpaU[/youtube]

slowly getting there. i have taken apart the wardrobe removed hinges and fiitings and saved them. i have screwed batton down the walls front and back to give extra strength. i have also screwed a peice of plywood onto the base of the wardrobe to give it extra strength. and i have cut the hole for vent.

unfortunately i havent got enough lengths of wood to put along top and bottom but as i have the verticals i can put them in later and screw box together

forgot to say everything had to be pre drilled before screwing together as the pine is dry/ brittle and very prone to splitting
 

Attachments

miztaj

Well-Known Member
looking like its going to come together nicely.
I wish i had that much width to work with. Oh man prdrilling everything is a pain but a must with that pine.
Putting the finishing touches on mine tonight.
 

Attachments

ginjawarrior

Well-Known Member
hello all thanks for stopping by :)

last night i reassembled the walls of the cupboard sealing the joints as i went with silicone. i then put cupboard onto its front and screwed the 3/4" plywood onto the back to strengthen and replace the crappy hardboard originally on there. (i then removed most the plywood again too heavy to lift)
this morning i turned the cabinet over onto its front cut a large piece of 1/2 inch ply wood to go inside/behind where the original doors hung. i then took the hinges off 2 of the doors and attached them to the plywood/ cupboard.
it hasnt worked out quite as nice as i wanted it but it works
next i was going to just screw the old doors straight onto the plywood but i think im only going to beable to screw oneside down and that i'll have to buy a small set of hinges for the other side to stop the corners binding on opening

oh i nearly forget lets have some music

[youtube]dyvlf9v0s8A[/youtube]

unfortunatly its not letting me put pictures up will try to put picks of doors up in a bit
 

ginjawarrior

Well-Known Member
i have finished the doors. 2 of them are screwed to a large pice of plywood to make a double opener. and the single has got a plywood liner.
its not quite as stealth as i had hoped as i has to bucter the inside of one of the doors becuase of how the hinges are but you can only notice it if your looking at cupboard from far side and your close up

hmm i got a bunch of photo's but its not letting me post them :(

now i'm waiting for my mate to bring a staple gun and i'll beable to put my diamond mylar up
 

eric.cartman

Well-Known Member
looks good man cant wait to see how it looks when its finished keep on buildin
what if you used double sided tape you think it il work?
my room is gonna be something like that :)
 
Top