Hello,
Hold up let me rip a fatty.
So, lets start with what I do for a living. I build fuel management systems for high performing cars. Now high performing can mean more then just high horse power. What I do includes high fuel efficiency, high reliability, making a turbocharger respond to the engine as efficient as possible. Oh god it goes on forever. Anyhow, Ill stop wasting your time.
Basically, I use computers to do all my heavy work. The computer I use in these cars is called Megasquirt. You order this ECU (car computer) and in the mail comes a box of all sorts of basic electrical components. IE resistors, a single processor pre-programmed, capacitors and open circuit boards. You must then follow a strict set of instructions and spend about four hours building a computer to your needs.
Anyhow I am going to try not to ramble anymore. This ecu runs off of sensors. Well engines run on factors based on air, and temperature.
My plan with this is to implement one into my newly built FIRST grow cabinet. Utilizing air temp sensors, water temp sensors, and air pressure sensors I can monitor and regulate my temps from my nearby laptop PC. Everything is data-log able. The ECU will control relays for all the fans so hot spots in the cab can be singled out. High and low speeds can be used. All of the parameters get set inside of software designed for use on an engine. These sensors are very precise, my main reason for doing this. I will have the flexibility for precision that even the best thermostat setups cannot give you.
I have all of the major parts for the job already but I need lots of minor things like connectors and wire. All of the hardware is already in my hands. I am trying to reassure my readers that this is not a pipe dream.
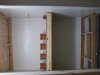
This is my very first grow ever where I don't rip them up at some point. I was never ready until now. So my grow cab consist of this.
55.5" wide
25.5" deep
7' tall
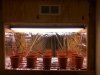
The interior is coated with mylar. the doors to the cab set into a seam at the bottom and latch at the top. With a backing all the way around. I can open the bottom door 1 foot open to reach in(its storage atm). Or I can take each door out and set them outside the closet with ease.
Now I will explain my venting.
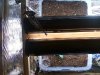
Please do not get your panties up in a bunch before you see my entire build through. The venting will consist of 4 80mm computer fans. Thew blow out of 12"x5" vents on the front of the cab. In between the vents and the cab and the fans is the flat filters you see people use in DIY carbon filter setups. They are relatively cheap and easy to implement and replace. The intake is vent placed three inches from the bottom of the cab doors. At the moment I have 2 fans on 1 vent, and 1 intake and the temps are steady (78-85*F) with half of my light setup currently at 232w of florescent T8 and T5HO tubes. So I will be adding at least double the setup when my lights double.
If I cannot control temps I will add a water cooled radiator in the top of each cab. I would not like to increase air exchange at that point. I already have a heater core that would work perfect!
My lighting is simple but should be effective for my level of grow skill.
Its a H frame with the lights going across it. I have right now
Two Lowes T8 2 bulb 4' fixtures.
Attached in between the 2 T8 bulbs is a T5HO.
I have a nice quality weather proof outlet timer.
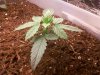
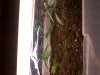
Right now I have 8 plants growing in 2x27liter tubs.
Expert Gardener grow soil and I only have bat guano right this second but I plan to get more within the week. My plants are 3 weeks old and got a real slow start when i realized I was under watering them a large amount. Now they are taking off and the lights are on 20/4.
Sorry I cannot type anymore tonight. But I shall update with more of this in the near future. Perhaps tomorrow night?
Please help with suggestions. I understand your concerns for my venting but its working as we speak. Also remember that my main goal is to make everything as efficient as possible while remaining simple and low cost. Hell if it only takes me 4 cheap 80mm PC fans to cool my 450 watt floro setup then hell yeah!
Thanks for reading,
Goodnight,
Slim Joe
Hold up let me rip a fatty.
So, lets start with what I do for a living. I build fuel management systems for high performing cars. Now high performing can mean more then just high horse power. What I do includes high fuel efficiency, high reliability, making a turbocharger respond to the engine as efficient as possible. Oh god it goes on forever. Anyhow, Ill stop wasting your time.
Basically, I use computers to do all my heavy work. The computer I use in these cars is called Megasquirt. You order this ECU (car computer) and in the mail comes a box of all sorts of basic electrical components. IE resistors, a single processor pre-programmed, capacitors and open circuit boards. You must then follow a strict set of instructions and spend about four hours building a computer to your needs.
Anyhow I am going to try not to ramble anymore. This ecu runs off of sensors. Well engines run on factors based on air, and temperature.
My plan with this is to implement one into my newly built FIRST grow cabinet. Utilizing air temp sensors, water temp sensors, and air pressure sensors I can monitor and regulate my temps from my nearby laptop PC. Everything is data-log able. The ECU will control relays for all the fans so hot spots in the cab can be singled out. High and low speeds can be used. All of the parameters get set inside of software designed for use on an engine. These sensors are very precise, my main reason for doing this. I will have the flexibility for precision that even the best thermostat setups cannot give you.
I have all of the major parts for the job already but I need lots of minor things like connectors and wire. All of the hardware is already in my hands. I am trying to reassure my readers that this is not a pipe dream.
This is my very first grow ever where I don't rip them up at some point. I was never ready until now. So my grow cab consist of this.
55.5" wide
25.5" deep
7' tall
The interior is coated with mylar. the doors to the cab set into a seam at the bottom and latch at the top. With a backing all the way around. I can open the bottom door 1 foot open to reach in(its storage atm). Or I can take each door out and set them outside the closet with ease.
Now I will explain my venting.
Please do not get your panties up in a bunch before you see my entire build through. The venting will consist of 4 80mm computer fans. Thew blow out of 12"x5" vents on the front of the cab. In between the vents and the cab and the fans is the flat filters you see people use in DIY carbon filter setups. They are relatively cheap and easy to implement and replace. The intake is vent placed three inches from the bottom of the cab doors. At the moment I have 2 fans on 1 vent, and 1 intake and the temps are steady (78-85*F) with half of my light setup currently at 232w of florescent T8 and T5HO tubes. So I will be adding at least double the setup when my lights double.
If I cannot control temps I will add a water cooled radiator in the top of each cab. I would not like to increase air exchange at that point. I already have a heater core that would work perfect!
My lighting is simple but should be effective for my level of grow skill.
Its a H frame with the lights going across it. I have right now
Two Lowes T8 2 bulb 4' fixtures.
Attached in between the 2 T8 bulbs is a T5HO.
I have a nice quality weather proof outlet timer.
Right now I have 8 plants growing in 2x27liter tubs.
Expert Gardener grow soil and I only have bat guano right this second but I plan to get more within the week. My plants are 3 weeks old and got a real slow start when i realized I was under watering them a large amount. Now they are taking off and the lights are on 20/4.
Sorry I cannot type anymore tonight. But I shall update with more of this in the near future. Perhaps tomorrow night?
Please help with suggestions. I understand your concerns for my venting but its working as we speak. Also remember that my main goal is to make everything as efficient as possible while remaining simple and low cost. Hell if it only takes me 4 cheap 80mm PC fans to cool my 450 watt floro setup then hell yeah!
Thanks for reading,
Goodnight,
Slim Joe
Attachments
-
 building it.jpg31.1 KB · Views: 27
 -
 exhaust box.jpg30.7 KB · Views: 25
 -
 exhaust outside.jpg59.8 KB · Views: 20
 -
 outsideclosed.jpg45.8 KB · Views: 22
 -
 berta.jpg81 KB · Views: 20
 -
 SprintPhoto_byb54o.jpg58.3 KB · Views: 21
 -
 filter.jpg39.1 KB · Views: 18
 -
 right tray.jpg51.9 KB · Views: 17
 -
 left tray front.jpg67 KB · Views: 20
 -
 top down.jpg81 KB · Views: 23
 -
 SprintPhoto_beiynd.jpg47.7 KB · Views: 29