1st Grow - Closet w/ CFLs

206

Well-Known Member
This weekend I started my first grow! I decided to carefully document everything so I can hopefully gain some insight about what works and what doesn't work for me and apply that to future grows. And of course I also wanted to solicit feedback and advice from my brethren!

5/5 (Day 1):
Started germination using folded wet paper towel + cup method.

5/6 (Day 2): Grow closet is 47x34x82. Bought the following:
• 8 Pots (Terra Pot 6" OD x 5.5" H)
• Miracle-Gro moisture control potting mix
• 2 27W 6500K nvision bulbs
• y-splitter
• 24 hour on/off timer
• White latex paint
• Weather stripping (to make sure the door seals perfectly)

I also ordered several 65W 6500K Fluorex flood lights (4450 lumens each) but they will not be here until next week.

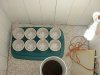
5/7 (Day 3): Using mylar is not an option for me unfortunately, so I painted the (previously unfinished) closet white. I took a quick peek at the seeds and 4 of them already had roots out! Can't wait to plant them tomorrow.
 

Attachments

206

Well-Known Member
5/8 (Day 4):

Only 4 out of my 11 seeds germinated (so far?) which was kind of disappointing. Those that did germinate had nice long roots so I went ahead and planted them.

I was going to build an elaborate platform for stationing/raising the lights but decided to jury rig an extension cord around metal pipes for now. I'm happy with it at least for now.


I found out my flood lights will be here thursday, about 5 days earlier than I expected! Thats about it for today.
 

206

Well-Known Member
5/10 (Day 6): Progress!

I picked up this basic shelving today and it kicks ass! It is so basic but at the same time so perfect for my needs and space. At the top you can see my new 65w CFL flood lights that got here today! I'm embarassed to say I thought they would accept standard electrical plugins and not require wiring into a junction box, but oh well...Home Depot is probably missing me anyways.


All four seeds sprouted! My old school 2 megapix camera is terrible, but squint and you might be able to see ;)


206

Well-Known Member
@GSTATUS: Thanks man! I picked up the Y-Splitter at Home Depot, but I had to ask a guy for help because they were nowhere near the lighting department. I could have looked around for days and never found the dusty little box they had them in, lol.

@reeffermadness: Thanks bro!

5/11 (Day 7): Woo!

All four are looking good:


I ran into a problem with two other seeds sprouting right next to eachother, but decided that needed its own thread: https://www.rollitup.org/newbie-central/13508-help-two-seeds-sprouted-together.html
 

midgradeindasouth

Well-Known Member
Welcome to the site..
Cool set up 206. Is that an area code?

I like the y splitter.
I went with the cheaper ones that requires a socket.

Looks like you could put about 8-10 pairs of those 65w cfl's up top if you wanted to.

Nice start

happy growing..
 

206

Well-Known Member
@midgradeindasouth: Thanks bro, yeah 206 is the Seattle area.

I spent an hour tonight wondering where to mount the new flood lights and got nowhere...so frustrating. Mount them under the shelving? But then I would have to constantly adjust that rack or the plant rack (both of which required unscrewing shit).

So I did what I always do...smoked a couple blunt roaches and cleared the mental plate.

*boom*

I went to home depot and bought an extension cord.
I went to the drug store and bought beer and mike & ikes.
I came home and cut the new 6ft extension cord down to one foot. Then I took the giant tupperware lid out from under my plants and created a MONSTER:


YARRRRRRRRR!

Here is a close up of the wiring before I splice it and put on caps:


Tomorrow I'm going to go pick up two more of the same extension cords and also an extension cord that has 3 female outlets. Then I'll mount the one with 3 outlets to the lid and plug all 3 lamps in.
 

206

Well-Known Member
I love it when a plan comes together...


Total output: 13,650 photopic lumens
Total cost: $104
 

ilikeblazin

Well-Known Member
you should get a reflector for that light.
or atleast make sum hanging ones.
because it looks like the ones on the left arnt getting as much light as the ones on the right.
 

206

Well-Known Member
@ilikeblazin: Yeah I was being lazy...kept meaning to pick one up but then I was like "nah, I'll have the big lights in any day". I finally figured out a way to mount the new lights though so no more worries.

5/13 (Day 9):


Spittn4cash

Well-Known Member
wonderful job making that hood it looks really professional and I bet it will do a great job.. is it possibly to move the lights closer?

I hope you caught my post in the other thread you made about the two plants you got..you should be able to seperate them now without doing any harm to them. just gently dig one of them up and put it in its own pot, then you should be fine.
:peace:
 

206

Well-Known Member
@Spittn4cash: Thanks on both points bro. I lowered the lights and split the other two plants into separate pots. I made deeper holes for them and buried about half an inch of the stems so they don't fall over. They are the two on the far left in this pic:


Here are some shots that show the three new guys I just put in:


206

Well-Known Member
Its been 48 hours since I hooked up my new lights. Picture from Sunday is on the left, Tuesday on the right:


Note: The two on the left sprouted a couple days later than the other four. I also had to transplant them into separate pots so I'm glad they're doing ok.


alex9009

Active Member
Hey man, that is looking really great. I love the hood rig you set up, looks like it will work perfectly. Question: Are you planning on doing the entire grow indoors, right up until harvest?
 

206

Well-Known Member
alex9009: Thanks for the kind words. My plan is to do this 100% indoors, but I'm not ruling out transplanting one or two outside down the road. I will probably remove the middle shelf from my setup once the plants are taller and cram.
 

bchbum

Active Member
alex9009: Thanks for the kind words. My plan is to do this 100% indoors, but I'm not ruling out transplanting one or two outside down the road. I will probably remove the middle shelf from my setup once the plants are taller and cram.
Props on the grow closet! Your instructions are awesome! I'm hoping I can learn from what you did and convert a spare closet into a similar setup.

Are you using seeds from an old batch? Any more details on how you did the wiring would be cool.

Happy growing!
 

206

Well-Known Member
wipemedown: No, lol...far from it.

bchbum: Thanks bro, the seeds are from a bag I picked up last month. I wanted to get my feet wet with a low-pressure grow before I start in with the good stuff next time.

The wiring is actually very simple believe it or not. First off, I highly recommend picking up a quality utility knife. Not only do they cut right through hard plastic lids, they also splice wires like butter. They can be had for around $15 at Home Depot. This is the kind I use: Amazon.com: SMART EDGE UTILITY KNIFE: Home Improvement

You will want to buy 3 of the shortest 16ga extension cords you can find. Unless you are really pressed for cash, spend the extra $1-2 and get "outdoor" cords because they are much safer. In my case I chose HUSKY brand 8-foot cords which ran me $6.47/ea.

Now bust out the utility knife and literally cut the extension cord in half about one foot from the male end. Note the length of the extension cord here:


Next you will need to carefully splice back the main cord insulation about one inch, being very careful not to splice into the insulation of the inner cords. You should then have either white & black wires exposed (if you bought an ungrounded extension cord) or most likely white, black and green wires exposed (if you bought a grounded extension cord). Because the lights only draw 65 watts they do not require a ground, so cut the green wire off back where you began splicing the insulation, then splice the white and black wires but don't go down as far:


Just match up the white & black wires from the light with the white & black wires from the extension cord and twist on the electrical caps:


(Although the caps safely overlap the exposed wires, I usually add some duct tape or electrical tape between them to be safe)

The lights should now look something like this:


Now you need to add an extension cord with three female outlets (I call them gangbang cords :hump:). I chose a HUSKY 9-foot cord because although I'm using a closet now, I might be using a larger space in the future and thus be further away from a socket. Here is a pic after plugging the lamps into the gangbang cord:


Finally, to secure/route some of the cords I used (yellow) plastic zip ties looped between each lamp and the cords:


Hope this helps!
:peace:
 
Top