1800 Watt Chemdawg-D Vertical Tree Grow à la Heath Robinson

crotch monger

Active Member
Introduction:

First off, limitless thanks goes out to Heath Robinson for the inspiration on this grow. Any credit or congratulations goes solely to him for designing this amazing system, for graciously offering up this golden information and taking the time to instruct others on how to capitalize on its capabilities. Having studied (and drooled over) his threads on the now-defunct HG420 site, I, like many others, have been in awe of the man's ability to get 4 lbs.+ out of his Vertical Bush/Tree-style grows. I am only taking his design and trying to replicated his results. Many of his old grows are still catalogued over at http://www.strainguide.org/grow-archives-2. These include the original HG420 threads for the Aquafarm Mods and some great threads by other growers.

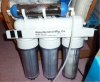
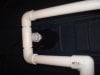
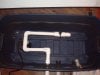
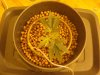
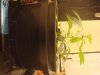
Certainly grower's skill and superb genetics are among the key elements of his success, but most importantly, it would not be possible to maintain healthy plants of this size without the means to provide increased levels of Dissolved Oxygen to a massive root system, which is done by recirculating large volumes of water through the entire system at at rate of roughly 1000 Gallons/ 4000L per hour.

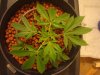
Plant numbers still being an issue where I live, this system affords myself and others with that concern, the ability to run plant numbers in misdemeanor territory (5 or under where I'm at) and still run perpetual harvests with superb yields. You can flower two trees, while simultaneously vegging two new clones and one mother. Just start vegging the new clones 6 weeks prior to harvest and they will be ready to move into the flower room and so on in a cycle.

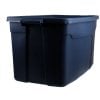
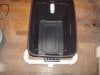
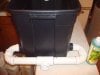
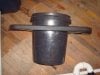
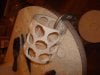
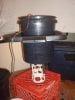
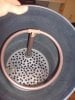
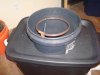
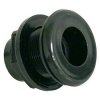
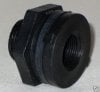
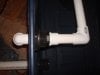
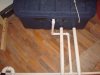
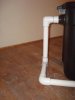
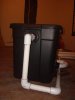
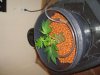
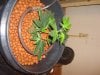
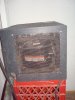
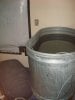
This will be a DIY journal/tutorial because, unlike Heath, I will not be using modified Aquafarms. Instead, I will show you how to build essentially the same system out things you can mostly pick up at your local big box store, with a few exceptions. This was mainly due to the fact that the containers he uses are only made in the UK and I did not want to pay the extreme shipping cost or bother with the hassle. However, it also benefits anyone stateside interested in using this system as you will also not need to bother with fussing over ordering the expensive version of these tubs. The mechanism is all the same and so, it will make no difference.

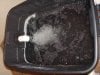
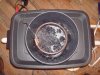
I have plenty of pictures to illustrate, but I will gladly take more of anything specific that you might want to see. I will also try to provide a comprehensive parts list, but again, if something doesn't add up, just ask, and I will do my best to answer. So, without anymore rambling, lets start this thing.
 

crotch monger

Active Member
Strain: For this grow I will be using clones of the Chemdawg-D phenotype. Many of you will no doubt have heard stories/legends regarding this strains lineage. I can't verify any of the claims I have read on the net, but do know that my copy is legit and I can say for sure that regardless of where this strain comes from, it is deserving of its reputation.

It's a 60/40 Sativa-Indica mix with a powerful high and incredible yields. I've seen foot-long, softball-sized buds when this stuff is done right (props to my friend crotch sniffer). It flowers in seventy days +/- and stretches to nearly three times the veg size. Which is why is it perfect for vertical growing.

I should also mention that if you plan on doing this system, full-blown Indicas and full-blown Sativas are a big no-no. The Indicas will not give you the height you want and the Sativas will be to sparsely budded and will probably over-stretch on you. It's best to go with a 50/50 or 60/40 Sativa to Indica mix.

Lighting: This grow will be 1800 watts. There will be three (3) 600 watt Lumatek Switchable Digital Ballasts w/ vertically-hung Hortilux Super HPS bulbs and Sunleaves cord sets. The key here is to hang the bulbs in a XOXOX pattern, where the X represents the bulbs and the O represents the plants. Notice how the X's and O's illustrates the efficiency of the the light usage. Imagine each of the four lines coming out the center of the X as beams of light. They surround the O's or plants.

A vertically hung bulb reflects light equally in all directions, so that the center bulb essentially acts as two bulbs, lighting both plants on either side of it. Add to that a highly reflective surface closely surrounding the entire setup and you can see how all light is used in the most efficient manner and how no light is allowed to escape. The plants receive high intensity lighting on virtually every surface and you only use the energy of three lights, not four. Everybody wins.

During the veg cycle, however, plants are lit with a single, centrally-hung 400 watt HPS. Naturally, this will hang as high as possible after initially transplanting the clones to avoid shock, but it is important to remember that once the plants are established and begin to increase vertical growth that they will need to be "pounded," as it were, with light from the 400 watt bulb by gradually lowering it as close as possible. This is done in order to keep the plants from stretching out in the veg stage.

Growing Method- This hydroponic system is based off the original design by Heath that used two (2) individual drip-fed Aquafarm systems, which he had modified and connected together with a large reservoir via pvc piping. The system relies on a high-powered water pump (his was 4000L/hour) to constantly recirculate the water throughout the entire system at very fast rate. The reason he gives for the success of this system in sustaining healthy, tree-sized plants is that the high rate of recirculation consistently provides the root zone with the increased levels of Dissolved Oxygen (DO) that plants of that size require.

As stated before, this journal/tutorial will go into greater detail as to the construction and operation of the system. This opening is more along the lines of an abstract, as an outline for what will come later.

Nutrients- The clones, since first being transplanted, are currently on a regimen of 1/4 tsp/gal Floranova Bloom, 1/2 tsp/gal Cal-Mag, 1 tsp/40 gal Super Thrive, 1 tsp/gal Liquid Karma, 2 tsp/ gal Aquashield (formerly Hydroguard) 1/4 tsp/gal Pro-Tekt, 1 tsp/ 40 gal Root 66. This is ph'd to 5.5 and the EC is .70 or 350 ppm by the NaCl scale that G.H. uses.

Later on I plan to switch to the G.H three-part once transitioning to flowering, because even though the Flora Nova Bloom is an excellent all-around formula for starting cuttings and vegging, this particular plant is rumored to respond especially well to synthetic nutrients and having finished her out with the nova last time around, I figure it is time to test that theory for once. Specific regimen will be posted later and changes noted.

Other Things I Should Mention- There a few things that I feel should be mentioned at the outset that may not, hitherto, have made themselves explicitly known. I may do a few things differently than Heath. For one, I don't ever here he make mention of using an R.O. Unit. I use this with all of the hydro setups I have done and consider them essential to the system, so that is an added startup cost to this method. I like the RD-102 from Water General. It is a 6-stage unit and it will get me down in the 5 ppm range.

Also, I understand he often doesn't need use of a chiller. I have found it nearly impossible to maintain the proper res. temps without use of a chiller and therefore, I consider that also to be a critical part of any hydro system. A good chiller will run you around a $1000 or more, so that is also something to consider when choosing this method for growing hydro. I'm using an Aqua Logic Cyclone 1/5 HP and its been in good working order about 6 years with about 3 years of total use.

Also, I make use of a secondary reservoir and float valve to maintain water level in the system, which is absolutely crucial. Heath, as I understand it, has his water mains connected directly to his res, also regulated by a float valve. Both methods assure that the water level is maintained at a constant level so as to maintain the level in the pots, but as I used RO water, I need a place to store large volumes of RO filtered water so that I am not constantly running my unit and producing waste water. This is why I use a 100 gal galvanized stock tank to store water and maintain the main res level. Both methods also have the added benefit of allowing to the grower to set ppm and ph at every res change and then leave the system alone, if necessary, for up to seven days. Of course, this should only be done when absolutely necessary, as it is best gardening practice to check your grows as often as needed to maintain healthy plants.


Attachments

crotch monger

Active Member
Determining Dimensions- The first part of the construction will be to determine the dimensions of your setup. Since we are all using different sized grow spaces, it would be pointless and even detrimental for anyone to follow my dimensions exactly, but I will give round estimations because it important that you allow for enough room for the plants to grow without getting the lights too far away.

Though it may be obvious, it should be stated that, if you are not concerned with plant numbers or perpetual harvests, you may choose to add more lights and plants. You can even get creative with the layout, so long as it follows the above-mentioned lighting schema.

The target plant size for this system is that of a large tree that stands about 6'6" from the ground and about 5.5' to 6' in diameter. This means you will want roughly 7.5' to 8' of space between bulbs, with the intention of positioning the plant the very center between two bulbs.

You can tie back plants that eventually grow too close to the bulb, but you don't to crowd plants either by tying a bunch of unnecessary growth back. You will, however, need to tie these branches up anyway to support the massive buds that will weigh them down and potentially break them.

Shape- I have only ran this system in the narrow XOXOX format and as such, I think it is easy think of the system as a long, narrow hallway, about 16' long and 6 feet wide. If you draw a rectangle around the perimeter of the top- down view of the XOXOX then you will have an idea of where the "walls" of the reflective material should be located.

It is likely that you will have a room that is not exactly those dimensions, but I've an easy workaround for that. It is easiest if you have, say, a room that is 16' L x 10' W x 8' H in order to make use of the two walls you already have and either paint them white or cover them with reflective material of your choosing. Then, you may construct movable reflective "walls" much like that of a set for a play.

I chose FRP (Fiberglass Reinforced Plastic) board like that commonly used in restaurants and shower rooms as a non-porous, anti-bacterial, white surface. It is textured, so no hotspots occur and very reflective, like visqueen or black/white. It comes in 8' x 4' sheets at any lumber yard and mounts nicely to two simple wooden frames, longways. Two of these together allow you to make a perfect-sized room while also allowing for lateral expansion of the system should your plants over grow the space and you need to move the system and walls out a little.

With my situation at the moment, I am actually running the system from corner to corner, as the length of the room is too short otherwise. I will be utilizing two of these "walls," one on either side of the grow, and the corners provide the extra reflective surface, as you will see in the photo below. In this photo, the res sits in one corner of the room, just below the reflective wall. You can see the feet of the supports on the either side of the res. This wall stands just about 6' tall and 8' feet wide, with the reflective material being even with the top portion of the frame. This leaves enough room to crawl under wuite freely, whilst also ensuring that the material covers the whole plant and allows heat to escape at the top.
 

Attachments

crotch monger

Active Member
Parts Required For This Section:

Two (2) Black 18 gal. Totes
Four (4) 1 1/2" Slip PVC Bulkhead Fittings
Two (2) 1" Threaded Polyethylene Bulkhead Fittings
Two (2) 1" Threaded Nipples - 2" Long
Two (2) 1" Threaded PVC Elbows
Eight {8} 1 1/2" Slip PVC Elbows
Two (2) 1 1/2" Slip PVC Tees
Two (2) Black 5 gallon Buckets
A 4' section of 1 1/2" PVC Pipe
A 3' section of 4" PVC Pipe
Two (2) General Hydroponics Waterfarm Plumbing Kits
Two (2) 1" Diameter Rubber Grommets

Tools Required For This Section:

Decent-sized, variable-speed drill
Drill bits (around a 3/8 to 1/2 inch)
Hole Saw Kit (Invest in a full kit, these are indispensable tools and you'll need many varying sizes)
Large Adjustable Channel Locks or an equivalent
PVC Cement
Sandpaper
Chop Saw or Hand Saw
Sharpie Marker
Utility Knife
Zip Ties
C-Clamp
Gorilla Tape or Equivalent (Though i know of none)


The individual tubs that serve as reservoirs to the pots are to made out of the highest quality black storage totes you can find. Rubbermaid Roughneck totes are good for this application, though I used an off brand in this instance. They need to be around 18 gallon capacity and shaped roughly like the ones I am using in the picture.


You start by drilling the holes for each of the three bulkhead fittings for the tub. The two 1 1/2" fittings for the drain may require a slightly larger hole than the 1" threaded fitting, though they are of comparable size. Just match up the fitting to the right size hole saw attachment and well, its pretty straight forward. Just try to emulate the picture, making sure that each tub is a mirror image of the other (i.e. all holes in the same place, height, ect.) The bottle is a quart (32 oz.) bottle of G.H. Flora Grow. I thought it a pretty ubiquitous reference for size/proportion.
 

Attachments

crotch monger

Active Member
Next, install the fittings as shown. Some of these photos are after other fittings have been installed, but are shown here to illustrate positioning.

DSC07260.jpgDSC07256.jpgDSC07259.jpgDSC07257.jpg

Install the 1" diameter, 2" long threaded nipples into the the 1" threaded bulkhead fittings and then attach threaded 1" PVC elbows as shown, one for each tub. Also, be sure to install the drain bulkheads with the flange on the inside of the tub and the stem outside the tub.

Next, cut sections, relative to your tub size, of the 1 1/2" PVC pipe and glue together the configuration shown in the photos here. I shy away from giving precise measurements, as your needs will likely differ from mine, but the concept is easily visible in the photo.

DSC07253.jpgDSC07258.jpgDSC07255.jpgDSC07254.jpgDSC07287.jpg

Now it is time to construct the actual pots. These will act as giant net pots for to hold your media, in this case, hydroton pebbles.
Take two black five gallon buckets and drill many holes, slightly smaller than your hydroton pebbles like so.

DSC07288.jpg

Also, use your hole saw kit to drill an appropriate size hole in each bucket for the 1" rubber grommet and install as shown. This will hold your drip system in place.

Now it is time to cut the hole in the tote lid to allow your bucket to sit snugly inside of it.
All I can say is that you must be very careful not to over size the hole here and not damage your lid whilst cutting it. Slow and gradual reduction will pay off here with an appropriate sized hole. Any gaps can and should be sealed with Gorilla tape afterwards. In fact, I seal all around my bucket with the stuff to ensure no light leaks.

DSC07283.jpgDSC07282.jpgDSC07284.jpg

Now you must cut the sections of 4" PVC pipe to make the stands that will support your pots of hydroton as well as dictate the amount of the pot that will reside below the water line in the tub. In Heath's thread, he stressed that the bottom of his pots sat up to 3" inches under water and this was necessary in order to prevent the formation of cord roots, those thick supportive roots that form when a gap exists between bottom of the pot and the water level. This is typical of standalone DWC, for example. If you've ever seen HR's roots, they are a glorious, thick white masses, densely shaped in the square form of the Aquafarm, having filled the entire space in the bottom res and having filled the medium in the pot, sacrificing none to cord roots.

Having cut it to the necessary length to satisfy the parameters above, use the hole saw kit along with the c-clamp to make a pattern of holes in the PVC pipe, thus creating a honey comb structure, still capable of supporting the weight of the pot, but taking up very little space in the res, otherwise. Zip tie this to the bottom of the bucket as shown. Also, assemble the waterfarm dripper systems and install as shown. Now is also a good time to add the water level indicators included with the kit to each of the tubs.
 

Attachments

crotch monger

Active Member
Parts Required For This Section:

One (1) 50 gallon "rectangular" tote. Around 4' L x 2' W x 2' H
Two (2) 1 1/2" Slip PVC Bulkhead Fittings
One (1) 1" Threaded Polypropylene Bulkhead Fitting
One (1) Float Valve
One Water Pump - 1500GPH or higher (within reason) preferred
(#?) 1" PVC fittings
One (1) 4' section of 1" PVC pipe
PVC Primer and Cement
One (1) 1" PVC Ball Valve

Tools Required For This Section:

Variable Speed Drill
Hole Saw Kit
Large Channel Locks
Pliers/ Wrenches
Sharpie Marker
Hammer

The reservoir for this project needs to hold at least 40 gal, but you will want to buy the 50 gal or a little higher so that you have some room inside for piping, a float valve and an aerator valve. The res I am using in the pics had been used on a recent incarnation of this design, so that is why it appears dirty. It was cleaned before the initial startup.

Also, it is imperative that you use a lower profile tote, because the water level in the pots is equal to the level you set in the main res by how high you position the float valve, which dictates when it shuts off the inflow of water. If you tried to use a tall, cylindrical barrel, for example, the water level in the barrel. when full, would overflow the pots as the water established its equilibrium.

The res will house a Wayne RUP160 Sump pump. It is rated for 3000 GPH, but I seriously doubt it hits that mark. It is, however, more than sufficient for the job, and its pressure can be modulated with the use of the aerator valve. This pump has a 1 1/4" output that has been adapted down to 1" pipe. The pump shown in MY pictures are not of the Wayne pump. Those were taken before I realized that the pump I was using was oil-filled and not suitable for hydro. Be wary of this when buying a pump and use only those that explicitly say they are safe for aquatic life. Also, the pump in the stock photo is shown with an adapter. This is a 3/4 inch garden hose adapter and is to be rmoved before installing the 1" adapter. This pipe, as shown in the photos, comes off of the adapter vertically, at which point, it tees. One half of the tee leads to a ball valve, with an elbow connected on the other side, which opens pointing downward and serves to aerate the nutrient solution.

The other end of the tee is routed to a bulkhead fitting located at the upper most part of the res. It then passes out of the res, via 1" threaded x slip adapters on opposite sides of the threaded bulkhead, thus reducing the chance for leakage to virtually nil. I've tried grommets and barbed fittings. Trust me on this and go with the bulkhead fittings, on the res and the tubs. You will save yourself a lot of trouble and headache. They are all over ebay if you cant locate them at your local farm supply or hardware store.

Again, I assume anyone undertaking this project can get the gist from the photos and your situation may call for alterations, so I wont go through each individual step or tell you exactly how to glue your pvc together, but I will answer any questions, of course. I would just emulate the photos and use your imagination.


tub.jpgScreen shot 2011-01-18 at 3.18.38 AM.pngbulkhead-lg.jpgf59a_35.JPG

Plan your holes well before using the hole saw kit. You only get one shot or you'll be buying a new res. Cut the holes for the drains nearest the bottom and cut the hole for the outlet. Then install as shown. Do not install the float valve just yet.

DSC07267.jpgDSC07268.jpg
DSC07266.jpgDSC07269.jpgDSC07265.jpgDSC07273.jpgDSC07264.jpgDSC07271.jpg
 

crotch monger

Active Member
The final stage of this setup is to position your tubs properly, connect the drains and and inlets and then glue the pvc together.

Tub position, as mentioned earlier, is somewhat subjective and should be determined before moving forward. Remember that trees this size can reach 5.5' to 6' in diameter and so this tells you that you need your plant to be in the center of two bulbs that allow the plant 3' of clearance on either side from the center of the pot, plus 6" to a 1' of clearance from the bulb, so roughly 8' between bulbs.

With the middle bulb as a point of reference, we know that each plant should be positioned 4' from the center bulb and 4' from the bulb on its other side. However, here is where it becomes subjective. Not everyone will have exactly that much space, so with that as a guide, you may shrink or expand that a few inches up to a foot if need be. Plants may be tied back or vegged longer to compensate.

Once the system is cemented together and allowed time to cure, it should be rinsed and cleaned of any dirt or pvc remnants. Also, now is a good time to notch out a place for the chiller apparatus to extend into the res. This is done by using a utility knife on the lip of the tub and lid where needed, not by cutting another hole in the side.

Also, its time to set the water level and place the float valve. This is also a great time to make note of the exactly volume of water that your system holds, as this is necessary for mixing precise nutrient formulas. This is done by using a 5 gallon bucket and a gallon jug. Fill the 5 gallon bucket up with 5 precisely measured gallons of water using the 1 gallon jug. Then, mark that level in the 5 gallon bucket.

With the stands that you made earlier for the pots in place and in the tubs, turn the lids sideways so you may still observe the water level. Those stands should be about 12". Begin filling the res with water, making note of how many five gallon buckets you empty into it.

The water will automatically level itself in the tubs. Do this until the water level is about 2-3 inches above the bottom of the pots. Once you get close to filling it, use the gallon jug to get a more precise measurement. Once this is done, simply mount the float valve such that it shuts off at this level.


DSC07302.jpgDSC07275.jpgDSC07272.jpgDSC07270.jpgView attachment 1393974View attachment 1393975DSC07306.jpgDSC07277.jpgDSC07303.jpg
 

crotch monger

Active Member
These were some pretty healthy clones and so they have experienced little shock so far. They were rooted in 1" Grodan Rockwool cubes under 40 watt household fluorescents with a heat mat.


DSC07328.jpgDSC07325.jpgDSC07315.jpgDSC07317.jpgDSC07324.jpgDSC07316.jpgDSC07326.jpgDSC07323.jpgDSC07319.jpgDSC07327.jpgDSC07329.jpgDSC07322.jpgDSC07321.jpgDSC07318.jpgDSC07320.jpg


Here were are the Jan. 21 2011. The clones were transplanted on the 15th, so we are 6 days in on the first of 6 weeks of veg. Here are a few more pics with the 400 HPS off and better pictures of the movable reflect-o-walls of which i wrote earlier. I'll keep you posted.


DSC07335.jpgDSC07336.jpgDSC07333.jpgDSC07332.jpgDSC07342.jpgDSC07344.jpgDSC07345.jpgDSC07334.jpgDSC07343.jpgDSC07337.jpg
 

crotch monger

Active Member
Here are a few loose photos that didn't find their way into the previous postings, but are also relevant. Plus, I wanted to try out my signature.

resize.jpegDSC07310.jpgDSC07309.jpgDSC07308.jpgScreen shot 2011-01-18 at 3.24.42 AM.pngDSC07311.jpg
 

ddftre

Member
crotch monger great info. i was looking for a way on how to build this, I know your and heaths are not exactly the same , doesn't heath just use a 1/2 dripper to feed the top of the buckets and thats it, and I am not sure but does heath use a airpump.

thanks
 

crotch monger

Active Member
ddftre,
That's a good point you make about the top feed. You are right. I believe he did switch to the top 1/2 inch top feed. I can't remember just now why that was. I do know, however, that in an earlier system he was using the drip system that came with the farms and then shut it off after the roots went through the bottom of the buckets. I think he shuts the1/2 inch top feed off the same way.

As far as I know, it didn't affect his yield, maybe just easier to clean and less chance of clogging. I use the air pump only to run the drip rings in veg, then shut it off when the roots are down to the bottom.
 

crotch monger

Active Member
Last night was the first of weekly reservoir changes. I drained out the previous mix of flora nova bloom and rinsed/dried the res out to remove most of the organic matter residue from the FN.

The new mix is a mild veg formula of G.H. Flora Series at a 1:1:1: ratio. I'm using R.O. water with near 0 ppm at the start. So, that put my base nutrient ppm at 550 or 1.1 EC. Also, because I am using R.O. water, I am supplementing with Cal-Mag Plus in order to prevent Mg deficiency.

In addition to this "base," I am also using 5ml/50gal of Super Thrive (B Vitamin supplement) , 5ml/50gal of Root 66 (Kelp-based Rooting Agent), 5ml/gal of Liquid Karma, 1/4 tsp/gal of Pro-Tekt (Silicon supplement) and 5ml/gal AquaShield (Beneficial Bacteria)

Total ppm after the adding the rest is 700 ppm or 1.4 EC.

(Note: Heath uses a much simpler nute regimen than me and with superb results. If you are trying to emulate his results, I would suggest using his recommendations of 1.2 EC in Veg and 1.4 EC in Flower. He also uses no supplements that I know of, with the exception of a bloom booster (pk 13/14) in the 4th week of flower and silicablast to prevent budrot in flower. I have had good results with the LK, although it does contain some organic matter and the Aquashield is to prevent root rot.)
 

crotch monger

Active Member
It's been about 8 days since the last res change. Normally these would happen every 7 days, but I neglected to turn on my R.O. unit the night before and I was short on water in the stock tank.

Last weeks nute regimen was a little higher than it should be, though it did green the plants up as I had hoped. They were looking a bit pale from a bit of shock and I over-compensated with an EC of 1.4 when it should have been around 1.0 to 1.2. No worries. It wasn't extreme by any means and the damage, if any, was negligible. This is just a testament to how important it is to watch your plants closely, especially in the establishment phase.

This week and for the rest of the veg cycle, I've switched to the Flora Nova Grow. I already had some left over from the last grow and I wanted to use it up. It also has a lot of chelated micros and trace elements so I thought the plants might respond better to it since I over did it last week.

I will, nonetheless, definitely be switching BACK to the 3-part Flora Series for flowering as I want to test that theory about the ChemDawg responding better to the non-organics. Besides, I am only concerned about the effects with regard to the bud quality, not the veg cycle.

Anyway, the mix went like this:

Starting EC - 0.04
2.5 ml/ gal Flora Nova Grow, EC - 0.75
2.5 ml/ gal Liquid Karma
5 ml/ 45 gal Super Thrive
5 ml/ gal Cal-Mag Plus
2.5 ml/ gal Pro-Tekt
5 ml/ gal Aquashield

Final EC - 1.26
Net EC - 1.22
pH - 5.8

And here are a few pics of each plant, with top down shots and profiles to show height. They are both about 12" at this point. Also, theres a pic of the Thermometer/Hygrometer to show temp/ humidity levels. I apologize for not pre-rotating the pics. I didn't realize that the uploader had auto-oriented them. I'll fix that next time. The soil plants are my mothers of the same strain, just hanging out in the room to save on light use until the flip to 12/12.

DSC07377.jpgDSC07376.jpgDSC07375.jpgDSC07374.jpgDSC07368.jpgDSC07380.jpgDSC07378.jpgDSC07379.jpgDSC07367.jpgDSC07366.jpg

CM
 

ddftre

Member
great info, i was wondering since this is your first time with this system, how do you like the veg in this system, do you noitce any problems since your not using a airpump.
what lights are you using to veg with, are they hung vertical.

thanks
 

crotch monger

Active Member
ddftre,

Thanks. Actually this is my third run with this type of system. This is rather like the third prototype, as the first two used smaller components (Pots, piping and pumps) and therefore was not able to grow a large enough root mass to grow a huge tree. I've fixed all of those problems now by using much larger pots and piping and also by tripling the power of the pump from 950 gph up to around 3000 gph (these are rated values I'm sure, not actual). I also added a second drain outlet to each pot that the previous two systems did not have. This helps prevent clogging of the drains which can lead to overflow of the system.

As far as the lights in veg, it's a 400 watt HPS, hung vertically in the middle of the two plants. I just turn them each day to even out the growth.

Funny you should mention problems, though. A rather nasty incarnation of root rot has infested my system over this past week and a half, but I'm sure I have tracked the source down. It isn't a a lack of dissolved oxygen, as the high pressure action of the inlets in each pot provide more aeration than any reasonable number of air stones could in that space, not to mention the res is also aerated by the valve that tees off of the pump.

I'm pretty embarrassed to admit it, but I made a careless mistake and did not properly disinfect my R.O. holding tank that auto-tops my res. Well, I couldn't tell just by looking at it, but after draining it during a res change, I scraped out some gooey sludge from the bottom and realized that a nasty bacteria had taken over in there and was feeding that shit into my main res. I used some Pythoff to sterilize the system and since having rinsed that out, I've been re-innoculating with Aquashield, a fungicide and pro-biotic solution. Things went haywire for a second there, but the ladies are back to looking good and I just popped roots through one bucket. Expecting the other with in a few days. I'll post some more pics tomorrow.


melazapura ,

Thanks for stopping in and thanks for the rep man. I'll be checking your thread out.

CM
 

ddftre

Member
sorry, I thought this was your first time with this system. So you ran it before do you think you could tell me what you yielded before or if you hit 1gram per watt.
 

kuhdoffi

Well-Known Member

crotch monger

Active Member
hey do u use a metal res??jsut for plain water ? i thought that locks out nuts or someting of the sort,. have u noticed anything?
Yeah, the metal res is just for storing the R.O. filtered water. It's a 100 gal. galvanized livestock tank, so it came pre-fitted with a threaded bung that is located on one side, about three inches up from the bottom. You just remove the threaded plug and insert a threaded elbow fitting with a barb. Then connect that, via a hose, to the float valve on the main res. It maintains a constant water level in the res which is very key to the stability of the system.

The main res, as with the pots are all made of plastic.
 
Top