Grow cabinet build log with pics

<stealthgrowing>

Active Member
Welcome to my build log! I'm in the process of building a small grow cab and I wanted to show off the design and specs for anyone that might want to do the same thing. All of the pieces can be found at a hardware store with the exception of a few things, and I will explain this shortly.

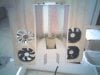
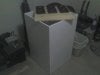
Dimensions: The box is 3 feet tall and 20x20 inches square. Enough room for a couple of small plants or a larger one.

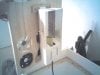
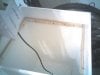
Material: The walls are constructed from a single sheet of DVM fiber board. DVM has a very smooth surface texture and very uniform edges when cut; it is very dense also, which makes putting in small screws on edges no prob. Its about 12 dollars a sheet if I recall. The bottom and top as well as some internal peices are good'ole 3/4 plywood. I choose this for the top and bottom so I could attach casters to the bottom and put a TV or appliance on the top to disguise the purpose of this cabinet.

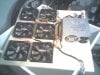
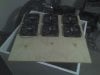
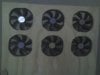
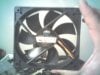
Accessories: For drawing in cool air and expelling hot air I have choosen to use a bank of six mounted 120mm DC computer fans. The are hooked up to a DC power supply which has its own on/off switch.

Light: I'm going with a Sun Systems 150 watt HPS unit with self contained ballast. This unit will be mounted in the top of the box internally and will not be visible from the outside. The fans will draw cool air over the lamp, cooling it and eliminating heat it produces.

Its pretty straight forward and easy to build something like this. the required tools are a jigsaw, circular saw and drill. the addition of a carpentars square is also helpful to making clean lines and edges.

I'll continue to post pics as I move along from start to finished product. your comments and questions are welcome.
 

Attachments

<stealthgrowing>

Active Member
wot are u using the fans for? intake or outake?

you didnt really need 6 for a 150w hps

At the bottom of the box there is a small 1 inch slot across the back to let in fresh air. the fans are mounted at the top and they create a vacuum pulling in air from the bottom and expelling it out the top and back of the box. the fan bank sits down inside right above the light. As far as the matter of the number of fans, I will determine the right number of fans for the right temp once I experiment with having the light on for several hours. However, I am not sure that having too much ventilation is all that bad. The plant needs fresh air continuously to thrive. I want temps between 75-80F so I am thinking more is better than too few fans.

These fans are the "quiet" kind spinning at only 1200rpm and produce 44cfm. More pics to come tomorrow so check back.
 

poutineeh

Well-Known Member
shit is beautiful, and inspiring. i think i might do this. just go to home depot, buy some wood, use their tool rental service, and build a custom box.

question for ya. where did you buy your computer fans? i want to do the same, but have it be cheap. i was thinking about ordering off of newegg.com, but im sure there are cheaper places, like ebay. what did you do? and how are you powering them? i would ideally like to power all of them by 1 DC power supply, but im do not know how to have their voltages/amperages match. say i have fans that require 12 V (do you need to know the amperage?), and i have 5 of them, how big of a DC power supply do I need?

i am by no means a carpenter. i have essentially 0 skills with wood. that being said, how hard do you think it would be to make one of the sides "swing" open, like a door? i think that would make adjusting things inside much easier, including the plant and lights. my concerns are
A) botching up the hinge and having the edges interfere with each other when trying to swing the door open
B) and the other concern is keeping a tight seal. how crucial is a tight seal? if the side's edges were say, about 1/4" away from being flush (due to a hinge), is this enough to ruin the vacuum? could something like this be remedied with a piece of duct tape?

finally, are you concerned about light escaping through the top? are you trying to be discrete, or just house the plant and keep it cool? you also mention putting a TV or something on top. won't that obstruct the fans?

thanks for answering my questions. you built a quality box there
 

<stealthgrowing>

Active Member
The fans were bought from Newegg.com and they come 4 to a pack. They are Thermaltake fans and I bought 2 packs of them. It cost me about 30 bucks after shipping. I have only mounted 6 currently just to see if that is enough. If 6 is enough I will leave it alone, if not, then I will cut two more holes with the jigsaw and mount the last 2 fans.

The Fans are powerd by a DC power supply, the kind used in computers. Its not a regular PC power supply though. This unit has a on/off switch wired into the unit because it was meant to power an external enclosure for hard drives. Most PC power supplies require a motherboard connection to power on, but you could also wire them with a switch of some kind; its just harder this way. Almost all PC fans are low wattage devices, operating on 5 watts or less. With just a 100 watt DC power supply, you could wire up at least 10 of these 120mm fans without problem. The power supply I have is 300 watts, which is overkill for the application, but its all I had. I actually would love to have a smaller unit because this one takes up space inside my box, which lowers the ceiling height in the box. Small DC power supplies with connections for bare wires can be purchased at radioshack and are quite numerous on Ebay. Just search "DC power supply."

These fans are all 12 volt fans and no the amperage is not your main concern. Wattage is main concern, but not really because any DC power supply that can generate 100 watts is more than enough to power 5 or more fans. If you look at a computer plug, the type for a hard drive, u will notice that it has 4 wires: 1 red, 1 yellow, and 2 blacks. The red is your 5 volt connection and the yellow is the 12 volt connection. If you do any wiring, the power needs to come from the yellow 12 volt connection. If you run them on the red wire they will turn slower because of undervoltage condition.

As far as building the box is concerned, it can be done a number of ways. here is how I did it.

1) I built a square box out of 4 equal sides. I predrilled all holes then added sheetrock screws ( they grab wood quite well).

2) I choose which side would be the back of my box and I used the jigsaw to cut a 1 inch tall slit all the way acros the bottom. When I add the floor of the box I will have a 1 inch gap at the bottom in the back to let air in.

3) I added the floor or bottom of my box. I used 3/4 inch regular plywood because the extra thickness will allow me to ad casters if I want this bitch to be mobile. Making precise cuts is important... If you do not make precise cuts then adding peices later may be difficult. I reccomend making the cuts for the 4 sides on a table saw to insure regularity. Don't use a jigsaw for long cuts... Jigsaws move around and do not produce straight cuts.

4) I have left the top of my box open so I can add the light, and my fans. This is the tricky part. My design may seem complicated to you or someone else; so, use your imagination and what works best for you. I leave the top open because the assembly that my light is mounted to also holds the fans and the DC power supply. Its just a half inch square cut peice of plywood. the light is mount on the bottom on 2 risers and the fans are mounted on the top of the board with the power supply mounted next to them. The purpose of doing it this way is multifold. It means that I can take it apart more easily if I need to because box, light and cooling are a modular design. Thus, when I take it apart, I pull the light, fans and power supply out all at once. secondly, the fans are mounted right on top of the light, which means they immediately displace heat produced by the light instead of heat from the light building up in the box.

5) The fans are at the top of the box because 1) they cool the light better this way 2) they creat a vacuum inside the box which draws in cool air from the bottom and expells hot air out the top. Hot air rises naturally so u would vent hot air from the top.

6) Once the light and fan assembly is seated properly I will add a bead of latex painters caulk around the edges to make sure I create a vacuum inside the box. I don't want to draw ai from anywhere else except the small 1 inch gap I cut at the bottom of the box.

7) Next I cut a gap in the back of the box at the same level the fans are. This gap is the hot air outlet. Make the gap for expelling air twice as large as the gap for pulling air in. Reason: you don't want the air outlet to be a bottleneck in the flow of air through your box. Now I put the top of the box on. Everything is self contained inside the box. Having an inner partition with the light below it means that light escapes out the top less easily and is hard to notice.

8) I Painted the whole thing with Behr ultra white semigloss paint, inside and out. Ultra white paint is highly reflective and semigloss is water resistant and easier to clean.

9) Placing the door: Now I take the jigsaw and cut a rectangular hole on the front of the box. Measure first and give yourself room to work inside the box. The door will be 2 inches larger on all sides to create overlap and help with light proofing. I can install weatherstripping to create a light proof seal if I want. I havn't got this far yet so its still on the drawing board.

I think making one of the sides of the box swing out might create problems with light leaking out, unless you weather strip it and create a tight seal. I made the box this way so it is very sturdy and rigid. I could set something heavy on this and it will not hurt anything. It looks like a small hommade cabinet that's been painted white. Nobody will ever see the back of the box and the gaps for air because it will be against a wall.

Put a lock of some kind on the door and bada bing you are done. I'll write more tomorrow on how to wire the inside of the box with power for the light and timers, etc. I'll also post pictures of the latest work I have done with it. I plan on buying some feminized AK48 from Nirvana for my first grow in the box. I'll start a grow journal for that also.

Smoke On :joint:
 

poutineeh

Well-Known Member
wow thanks for the very generous write up. im going to be doing some traveling soon so will have a lot of time to think about this sort of thing.

i think i will try to replicate what you have as much as i can, but i think i will put a door in there just because on my first grow, i was taking the plant out of its grow "cab" atleast once every two weeks, it it was such a pain in the ass with my setup and branches would accidentally get ripped off.

i figure no matter what i do, it will be better than my last setup, and where i fail, like failing to make the design light proof, thats where the duct tape comes in ;)
 

poutineeh

Well-Known Member
after you suggestion, I think I am just going to make a solid box, and then create something to water it so that I dont need to shift things around and move the box.

And for the lights, I think I am going to mount power strips to some plywood and keep them at the sides of the plants and make the height adjustable to solve my problem of keeping the light position adjustable. What do you think, good idea?

As for the partition blocking the light from escaping, can you show me what you're talking about? Its hard to see from your photos unless you havent done it yet.
 

<stealthgrowing>

Active Member
Well, inside, at the top of my box, beneath true top I have installed another piece of plywood. So, this partition of sorts is a like a shelf inside the box that seals off the very top 4 or 5 inches of the box. T he fans are mounted on the top of the partition and the light is mounted on the bottom of it. Here is some pics. I've been delayed in finishing it because of some classes I am taking and work, but I will have it done by my next day off on Monday of next week.

Don't be hasty in your design. If you design the box well, it will serve you well. Its important not to drill any holes that poke through to the outside without caulking them in the end. Your corners need to be good and clean. A jigsaw is a necessity for doing something like this well. If you don't have one, then pick up one for $25 at walmart.
 

Attachments

Minnestoner

New Member
Looks good man, imin the planning stage of my grow area, i have a nice temporary one set up right now and am waiting on getting some weed to start in on my permanent grow area.
 

<stealthgrowing>

Active Member
Many people would have done all this in a much simpler way. This design is somewhat complicated, but it needs to be for where I am putting the box, which is in a closet that might have the door open from time to time during the day.
 

<stealthgrowing>

Active Member
Sadly, It will be a little while... I'm ordering the seeds in advance - feminized White Widow 5 pack - from Nirvana and I will be finishing up the box. I'll be adding a small set of T5s to two corners of the box just to add the higher spectrum light and help out my 150 watt HPS. I'm moving out of this place at the end of September and it makes no sense to start something here. At my new place I'll start the grow and do a log for it. Anything good is worth waiting for, so I wait, sober as hell.
 

mobone

Well-Known Member
Damn. Oh well. before you know it, October will be here.

Could you fire it up and see what the temps are.
 

<stealthgrowing>

Active Member
I will definately be testing it out very soon, so stay posted here. The temps inside the box will be largely determined by the ambient room temperature. I am guessing that is the room is around 75 most of the time than temps in the box should not top 80, but I could be wrong
 

mobone

Well-Known Member
Yea ambient is key. My room never gets below 80, I have a 150w in a little bit larger box than you in a closet and it reaches 90 with ease. I'm currently dealing with the issue. I do only have two fans, and one in the box, but the problem is it just heats up the closet and eventually the intake is the same temp as the exhaust. I'm going to get a "exo terra fogger" to generate humidity, as this is the only thing I've found to bring the temps down. It'll be like the freakin rain forest in there.
 
Top