100W Stealth Ikea Cabinet

Entusia

Well-Known Member
Hey everybody!

I've started building this cabinet (and growing my first plants) around 6 months ago, during the second wave of the pandemic, so i'm still very new to this!

Cab
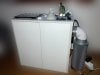
The cabinet itself is 70cm (2.3 ft) wide, 70cm (2.3 ft) high and 35cm (2.3 ft) long, so 0.245 m² (2.64 ft²) is the total grow area.
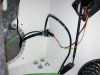
Sawed a couple holes in the back panel and fitted them with PC dust filters = passive air intakes.
Sawed another bigger hole in the side panel to use for air extraction.
The interior of the cab was already white and i haven't sourced mylar yet.
Weather stripping was used to prevent light and noise leaks at the doors and holes.

Light
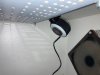
The light is a Spider Farmer SF1000 (100W "full-spectrum" LED) fixed on the upper panel with steel bolts.

Environment
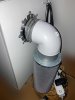
Very powerful air extraction with 140mm Noctua industrial PC fan + 140-125mm adapter + 125mm 90° bend + 125mm carbon filter (max 400+ m³/h) + multiple PC dust filters.
I've also built a couple small DIY ultrasonic humidifiers to help keep high RH% during germination and veg.
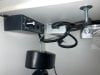
Using 2 fans to improve internal air flow (an oscillating USB fan + small 12v PC leftover fan)

Monitoring
Smart temperature + humidity sensor with dashboard to track environmental parameters + webcam to make timelapses and see the plants when lights are off.

Here it is a few weeks ago, with my last plant to day, also my first "successful" plant (which is now flowering):

IMG_4098[1].jpg
 

Entusia

Well-Known Member
As i said this is my first successful plant, which is now at the end of the 5th week of flowering.

It is a random bagseed found in a friends' bud (unknown strain).

11L fabric pot, volcanic lapilli mulch cover and drain bedding, peat-based organic soil amended with volcanic lapilli.
Biobizz nutes (Biogrow, Biobloom, Bioheaven, Topmax, Calmag) and pH down (Biodown).

These are some progress photos of the grow:

Day 3

5.JPG

Day 11

5.jpg

Day 14

5.jpg

Day 24

5.JPG

Day 26 (topping + LST)

top.JPG

Day 30

top.JPG

Day 36

canopy.jpg

Day 43 (switch to flowering)

defoliation.jpg

Day 52

cabinet.jpg

Day 78

overall-opt.jpg
 
Last edited:

Entusia

Well-Known Member
Very cool cabinet. Interesting that the Noctua fan is enough to keep temperatures down.
I'm sure a proper inline fan/blower would do a better job. The Noctua fan i had laying around though happened to be the one with highest static pressure rating in the entire Noctua range, so i decided to try it. Definitely extracts a ton of air and pushes it comfortably through the oversized carbon filter, but during the Summer the temps have been somewhat crazy (at one point it reached 34-35 °C) so i guess it's more of a winter box :D
 

MrFlatbush

Well-Known Member
Excellent use of a small space!

I run a small space as well, probably half the size of yours. There are a couple of things you can do if you want to further bring temps down. First, you can mount the driver externally rather than inside. Second, if you cut a perfectly-sized, square hole on top you could mount your light externally as well. This way the heatsink would be outside of your awesome box while the light itself would be shining inside of your box. Just a thought....

Super job! Best of luck with your future grows
 

Entusia

Well-Known Member
Excellent use of a small space!

I run a small space as well, probably half the size of yours. There are a couple of things you can do if you want to further bring temps down. First, you can mount the driver externally rather than inside. Second, if you cut a perfectly-sized, square hole on top you could mount your light externally as well. This way the heatsink would be outside of your awesome box while the light itself would be shining inside of your box. Just a thought....

Super job! Best of luck with your future grows
These are great ideas!

I thought about mounting the driver on the back panel but i don't think it's quite sturdy enough.

Bear in mind it's an Ikea cabinet, so it's almost impossible to disassemble without running the risk of breaking it. Since i only have this piece, and it's around 80€, i'm very cautios about radical modifications or straight up overhauls.

Mounting the light on top (like you would also do in a spacebucket, for example) would be very cool and practical and would free up around 3cm to 4cm vertically, and i'm sure it'd run much cooler. At the moment it isn't doable unfortunately since there's a couple magnetic push lock spring mechanisms that overlap with the footprint of the grow light (they're on top, sitting between the light and the upper side of the cabinet).

It's also true i could just straight up replace those with a couple magnets and a couple handles on the outer surfaces of the doors.

These modifications would also unstealth the whole shebang which is very very very stealth when i slightly tune it down (remotely via app) and camouflage it by:
- sliding another custom white cabinet above the carbon filter assembly (which has even real succulents, picture frames and other ornaments straight up glued on it)
- putting a small "table carpet" above the grow cabinet to hide the bolts' heads (and obviously storing elsewhere all the not very stealth shit that is sitting on top of it)
 
Last edited:

Entusia

Well-Known Member
Hello everyone!
What do you say, is she almost there?

thricomes2.jpg thricomes2-zoom-opt.jpg

I would like to avoid letting buds mature too much, as I prefer a more euphoric high over the classic "couch-lock" stone that sends you straight to bed, but I wouldn't want to anticipate the times too much and end up with poor quality flowers.

Can you give me your opinion? How much time left?
Thanks a lot to everyone!
 

ComputerSaysNo

Well-Known Member
From what I know this is picture perfect textbook peak ripeness.

Love your grow setup. Well done!

What did you pay in total for materials?
 

Entusia

Well-Known Member
From what I know this is picture perfect textbook peak ripeness.

Love your grow setup. Well done!

What did you pay in total for materials?
Later yesterday i did end up harvesting because, after reading some more about the subject, it definitely looked like textbook peak ripeness to me as well, so we're definitely agreeing on that growmie!

The whole setup would cost just over 800€, all available from Amazon except the light, bought from AliExpress, and the cabinet, bought from the IKEA store. I really had no budget, so i went way overkill with most things to accomodate potential future upgrades towards a full-fledged tent (unlikely since i use very very little weed... think around 1-2 grams / week) or to avoid ugly solutions. Also, by buying almost everything from Amazon you do end up paying 10-20% more than buying elsewhere, must always keep it in mind.

To actually grow (Total 660€):
120€ - 100W led light (Spider Farmer, definitely not the cheapest one)
80€ - Eket cabinet
50€ - 300+ CFM carbon filter (way overkill, i wanted to be very stealth)
50€ - Noctua NF-A14 iPPC-3000 heavy duty fan + manual controller
30€ - Ducting (90° bend + 3D printed adapter)
100€ - Hardware, sawing tools, duct tape, aluminum tape, weather strips, cabinet wheels and various other things like antidust mesh screens, fan power supply, cables and adapters
20€ - Programmable wifi smart plugs (as timers)
30€ - Programmable wifi temp+RH smart sensor (for data logging)
20€ - USB oscillating fan + additional 3-pin PC fan
30€ - Fabric pots (2x11L and 2x9L) + runoff pans
30€ - Organic soil and various amendments
100€ - Biobizz nutrients (Rootjuice, Biogrow, Biobloom, Bioheaven, Topmax, Calmag), Biobizz pH+ and pH-, neem oil, sticky traps and mosquito dunks

I actually spent just 580€ in total, because i already had the Noctua fan, manual controller and soil.

To harvest and cure (Total 90€):
20€ - Smartphone 60x macro microscope lens
10€ - Beautiful huge IKEA mason jar (the one i keep visible)
10€ - 2x ugly storage mason jars (these i keep hidden)
40€ - Temp+RH station + 3x remote temp+RH radio sensors (to monitor drying boxes / jars)
10€ - 10x Boveda 62% packs

To improve stealth (Total 80€):
50€ - Homemade empty white cabinet
20€ - Succulents + pots + glue
10€ - Table "carpet"

Add countless hours of overtime studying and more countless hours of loving care :bigjoint:

Overall it looks like 10€/g ROI on my first successful run, which is less than what i paid regular-looking weed on the street before starting to grow it myself.
Everything else that i'll be harvesting in the future is basically free :weed:
 

ComputerSaysNo

Well-Known Member
From how your setup looks, to how to wrote it up here, and looking at your meticulous list, it is obvious that you are a very methodical and thorough character.

You did the homework and there are the results. It's really not that difficult with the right attitude.

I guess you could have spent less on nutrients and supplements. Maybe try a grow with a coco/perlite mix, and just use a good hydroponic fertilizer (GHE TriPart is good) and pH-, that works really well and is super simple. I find the BioBizz stuff quite inconvenient, especially the "Grow" which is worse than soy sauce from a cleanliness perspective...

The SpiderFarmer light is one of the best, definitely not too expensive for €120. The carbon filter should last a long time, and you can refill them very cheaply with active coal pellets. I don't think the larger filter will be more stealthy than a smaller one, but the larger ones allow for a little more airflow which should be good because of the small vent fan. The filter will also last much longer overall before you have to refill it.

Overall it looks like 10€/g ROI on my first successful run, which is less than what i paid regular-looking weed on the street before starting to grow it myself.
Well, technically that's not ROI, but anyways, it shows how even an expensive setup pays for itself immediately with the ridiculous BM prices in our region... just have to front the money once and not be scared of doing a little growity-grow.
 

Mak'er Grow

Well-Known Member
Nice build.
The only thing I noticed was the driver mounted flat to the top panel...if you feel any warmth on the other side of this panel you may want to put in standoffs or create some space between the driver and panel...it will also slightly help with the driver staying cooler.
 

ComputerSaysNo

Well-Known Member
Thinking about your setup, it's possible that you would be very happy with an AutoPot (or two).

Hand watering must be quite inconvenient in such a small space, and you also have to deal with run-off water etc. That all goes away with an AutoPot.

The tank (reservoir) would have to go inside the addon-cabinet (with the air filter), so their smallest tank (47 litre) would not fit.
However, there's nothing special about the tank, one can use anything that holds water, for example a 20 litre bucket with a lid; or something tall and narrow. The tank has to sit ~20 cm higher than the AutoPots, because the water is gravity fed.

All the parts of the AutoPot system are available separately, so it is easy to pick-and-choose for an optimal setup. In your case you would need the pot/tray/valve plus some plumbing (a little tubing, ball valve, t-pieces, grommet for the tank). Available either on Amazon, directly from the manufacturer or online in hydroponics "specialty" stores.

The system is passive, no electrical parts, makes no sound. The risk of water damage (flooding) is minimal to non-existent, because the water is fed through a float valve at very low pressure, so even if that fails it would overflow only very gradually. I don't see it happening to be honest.

There is no over- or under-watering, the plant will get what it needs and not more. There is no drain-to-waste to deal with.

You can leave the system unattended for weeks, depending on plant size and reservoir volume. I use an AutoPot for a plant that I can only maintain every 2-3 weeks, and it works like a charm, had no problems at all.
You would have to open the cabinet a lot less, because there would be no hand watering, so less smell in the apartment in general.

BioBizz nutrient solution does not last very long though, so you would have to feed the nutrients manually and use the pot only for watering. I use hydroponic mineral fertilizer (and coco coir), there you can put a complete nutrient solution in the tank, which will be good for at least two weeks, and that is usually longer than the refill schedule anyway.
In that case it truly becomes a hands-off system, very convenient and controlled.
 
Top