Passive Intake Size and powerful fan (Cooling 600w to lows 70s even high 60s)

lmnop5092

Active Member
So I keep looking stuff up and am very confused on the subject, especially with peoples conversions
So my box/ frame i made is a 5 ft by 3'6" by 6'6" high with black and white poly covering it
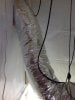
I've got a 600w air cooled with a 6in Phresh filter and 6in vortex fan
filter>fan>>>ducting>>air cooled>>>ducting>>>exhausting out the top
I've got 2 4in ducting elbows in the 2 opposite corners of the tent as passive intakes

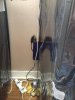
All the polly is sucking into the box and is super tight, so I'm quite sure there isnt enough intake
vortex fan is 449 CFM and filter is 400
the ducting (insulated) has some bends so obviously its less cfm but still sucking all the poly super tight and since its been cold temps are a little low, which will be awesome when it heats up outside but not so much now ha

Can someone make a simple equation or conversion please and if i should be concerned?
God damn jet engine vortex fan haha
 

Slipon

Well-Known Member
erm .. it should be filter-ducting-coolhood-ducting-vortexfan and out

vent.jpg

like in the picture, cool hood or tube should be placed between the filter and ventilation, with the ventilation pulling hot smelly air trough the filter, pass the bulb and out

you really don't need intake ventilations as long as you keep enough passive intake for the size of your ventilation (CMF) normally 2-3x the size (etc. a 6" vent need 12-18" passive hole/s)

a bit of negative/under pressure is desirable as it ensure that all air going out is pass the filter

IMO intake ventilations is for big scale growths, in tents and similar its not necessary as physics will take care of it, as long as air is removed it have to be replaced with some thing, after all we are still on Earth, s

I run a 6" in my 3x6x7 grow room and I keep 3x4" opening`s, two is wide open, last one I keep a disc over so I can control the negative pressure, I want to see my zipper door being pulled in just a nice or two when I close it up
 

Ou8aCracker2

Well-Known Member
erm .. it should be filter-ducting-coolhood-ducting-vortexfan and out

View attachment 3031049

like in the picture, cool hood or tube should be placed between the filter and ventilation, with the ventilation pulling hot smelly air trough the filter, pass the bulb and out

you really don't need intake ventilations as long as you keep enough passive intake for the size of your ventilation (CMF) normally 2-3x the size (etc. a 6" vent need 12-18" passive hole/s)

a bit of negative/under pressure is desirable as it ensure that all air going out is pass the filter

IMO intake ventilations is for big scale growths, in tents and similar its not necessary as physics will take care of it, as long as air is removed it have to be replaced with some thing, after all we are still on Earth, s

I run a 6" in my 3x6x7 grow room and I keep 3x4" opening`s, two is wide open, last one I keep a disc over so I can control the negative pressure, I want to see my zipper door being pulled in just a nice or two when I close it up
Actually,the fan.should be before the hood because if there are any leaks at all in the hood,the fan will be pulling unflitered stinky air through those leaks and expelling them outside.

PUSH OR PULL AIR-COOLED HID SYSTEM
Monday December 17, 2012
736580_Hurricane -8-angle

Setting Up an Air-Cooled Grow Light-The Right Way!
Air-cooled grow lights open up some really interesting parts of the plant world to the indoor gardener. But there's also a lot of confusion about how to set them up right.
Air-cooled grow lights are all about offering maximum light intensity without all the associated heat issues. Some plants such as those native to high altitudes in the sub-tropics only really thrive in lots of light and relatively cool temperatures these conditions are more challenging to recreate efficiently indoors. They also allow year-round indoor gardening with less need for additional air-conditioning during the warmer months. It's more efficient to tackle the heat when it's concentrated at its source rather than waiting until it has entered the room. This makes it easier to regulate the temperature of your indoor garden without over-ventilating and running the risk of reducing relative humidity levels or sucking out supplemental CO2 before it's had a chance to be utilized by your plants.
The high intensity discharge (or HID) lamp is housed within a special air-cooled reflector.
Air-cooled reflectors work by allowing cool air to be passed across the lamp during operation. The most common designs feature a horizontally mounted lamp with flanges either side to allow cool air to be ducted in and warm air out ducted out. Some designs are based on a vertically mounted lamp. In both cases the central principle is the same: use a constant flow of air to move heat from the lamp and reflector and get it out of your indoor garden.
To get the air moving you're going to need to connect an inline extraction fan to the reflector. Many growers ask whether they should place their extractor fan before the reflector so that it pushes cool air over the lamp, or after the reflector so that itpulls the warm air out? Others ask if it makes any difference at all?
Cooler air is better at cooling!
Common sense should tell you that the cooler the air you use, the more effective the cooling. Ideally you should take your air from a dedicated input either a cool adjacent room or from a shady outdoor wall and duct directly to your air-cooled reflector. Use a flange, ducting and jubilee clips to create an air-tight seal. While it's important to have your ducting as straight as possible, remember to give yourself enough slack so that you can move your grow lights up and down. The expelled air from the air-cooled reflector should be ducted straight out of your indoor garden, preferably via insulated ducting for maximum efficiency after all, we want to whisk that heat away before it gets a chance to warm up your garden. The key thing here is to think of your air-cooled lighting ventilation as a separate system from your garden's ventilation. Don't take short cuts and attempt to combine your garden's ventilation with your air-cooled grow light's ventilation. Simply drawing the air from your garden through your reflectors may give you less ducting to worry about but it will give you markedly less efficient cooling because this air is probably already in the high 70s Fahrenheit.
Push or Pull?
Growers use inline fans to create the air-flow over the lamp. Using an inline air filter will protect your reflector and lamp from dust and other particulates, so it's really best practice to use them. Inline extraction fans are commonly designed to be positioned close to exit vents so that they extract (or suck) air from a room. However, when used as part of an air-cooled lighting system, it's preferable to push air over your lamps that is, your inline fan is positioned before your air-cooled reflectors. Not only does blowing cool air create less wear and tear on your fan's motor than sucking warm air all the while, but you will enjoy more control over air movement in and around your garden. Blowing creates a positive pressure inside your air-cooled lighting ventilation system. If there are any leaks then air will spill into your garden and be dealt with by your garden's ventilation system. Pulling, on the other hand, creates a negative pressure inside your air-cooled lighting ventilation system, so any leaks will draw your garden's unfiltered air in.


http://www.thegrowscene.com/posts/2012/12/the-grow-scene-7/push-or-pull-air-cooled-hid-system.aspx
 

jrainman

Active Member
011.jpg004.jpgSo lets take a look at what you have ,but your space (room ) is odd size so lets round off those numbers to make a easy calculation.

Ok your space is about 140 cubic feet , So 140 cfm would be able to handle your size room ( definition of CFM =: cubic feet per minute ), a 6' x 4' x 7' room is 140 cubic feet.

so 140 cubic feet per minute fan can move the air in your 140 cubic feet room 1 x per minute. with correct duct size and make up air (passive air intake)

So now we know your fan is 4 x the size then you need . So if you size the duct and passive air intake correctly in 15 seconds you can exchange 100% of your air.


You have a 449 CFM fan and a filter that can handle only 400 cfm . this is a big No No , but since you are so over sized in equipment you wont notice it ,but your fan will it will be starved for air and this will reduce the life of your fan (run hotter), so I recommend a speed controller for this reason and also the fact your fan is 4 x the size needed to begin with.

Now let get to the duct size : you see a 6'' round duct can only about 150 cfm at best . this is were people go wrong ,just because the outlet on the fan and filter is a certain size does not mean it is the correct size for the duct work, it is done (built that way) for the reason of something called static pressure , So the installer can determin what static pressure is desired for that certain installation. this would be done by something called transitioning (changing duct size )


let me give you some standard examples of duct size and what they can handle:

6'' round duct = 120 cfm low pressure system 150 cfm at medium or high pressure system
8' 'round duct= 200 cfm '' '' 250cfm '' ''
10'' round duct = 500cfm '' '' 550 cfm '' ''
12'' round duct= 900 cfm '' '' 950 cfm '' ''


So your 449 cfm fan to be at optimal performance should be transitioned to 10'' round duct, but again you wont notice is because you are so oversized ,but your fan again will suffer in this respect.so a speed controller is recommended again.

Ok lets get to the make up air (passive air ) So you see above that a 10 round duct can handle 500 cfm your fan is 449 cfm so any opening that equals 100 square inches would be surfice your case,
so your 2 4'' round passive air intake openings equal about 32 square inches , So you need to add another 68 square inches of passive intake. in your case

In a normal installation the passive opening would be multiplied x 2 this insures for optimal filtered air exchange and quite performance as also duct sizing correctly for quite performance.
 

jrainman

Active Member
Snaps said perfectly , and as you know pressure and temperature go hand in hand raise pressure = raise temperature. yes its small amounts ,but when 1 or 2 degree makes all the difference in your passive room on that given day you want to get the lowest ambient temperature available ,and correctly installing the proper size equipment gets you this.
 

lmnop5092

Active Member
set up.jpgnoise box.jpglight and plants duct.jpgexhaust duct.jpgcaving in.jpg
So here's my set up last picture you can see the caving in and the elbows
Would a variac be the best, to cause no hum and protect motor, again mixed reviews on that question too
what do you think??
 

bird mcbride

Well-Known Member
If you are running a cool tube or sealed bonnet it is better to run the light cooling system separate from the grows ventilation and only an exhaust fan and intake vent are required. The venting for the grow should employ two equal fans/blowers and are thermostat controled, where the ossilating and light cooling exhuast fan(s) is/are controled by the light timer.
 

jrainman

Active Member
I really don't know what you have there in some of those pictures boxes with tape I see I think a window ,just really don't understand.

your making me LAMF ,but do want to help.

I don't care what anyone says .first things first ,your room with that size fan does not need that cool tube setup. but with those bends you are losing like 40% of your fans cfm.
I dot know why guy use insulated flex type duct. you don't need it. just uninsulated duct will do and easy to use.

I think you are exhausting your air outside witch is good.

you need to replace those elbows on your intake air with something bigger

I would disconnect the duct to the light ,hang that filter on center of your room height closet to the fan. get flex duct as tight as you can
as a matter of fact I would slide the insulation off the actual duct (easy to do) better to work with also.

try to keep the duct work level as possible , with min of bends and turns.

and yes exhaust outside.
 

lmnop5092

Active Member
The box is to block light/muffle sound, which with the length of the ducting now seems unnecessary, the insulated ducting is also for muffling sound,
and of course you'd ideally want the ducting straight as possible, if i had to space to do that i would but being in an apartment i'm working with what i got
the filter is the closest Phresh filter size

So if i'm reading yours right you're saying hang filter connected with fan up top, screw cooling the light, and duct straight out
Filter>Fan>>>ducting>>>outside
 

lmnop5092

Active Member
ok thank you!

And what are your thoughts about keeping the light connected to the fan or just scrap that and fan above everything with filter?
 

Ou8aCracker2

Well-Known Member
View attachment 3031419View attachment 3031420So lets take a look at what you have ,but your space (room ) is odd size so lets round off those numbers to make a easy calculation.

Ok your space is about 140 cubic feet , So 140 cfm would be able to handle your size room ( definition of CFM =: cubic feet per minute ), a 6' x 4' x 7' room is 140 cubic feet.

so 140 cubic feet per minute fan can move the air in your 140 cubic feet room 1 x per minute. with correct duct size and make up air (passive air intake)

So now we know your fan is 4 x the size then you need . So if you size the duct and passive air intake correctly in 15 seconds you can exchange 100% of your air.


You have a 449 CFM fan and a filter that can handle only 400 cfm . this is a big No No , but since you are so over sized in equipment you wont notice it ,but your fan will it will be starved for air and this will reduce the life of your fan (run hotter), so I recommend a speed controller for this reason and also the fact your fan is 4 x the size needed to begin with.

Now let get to the duct size : you see a 6'' round duct can only about 150 cfm at best . this is were people go wrong ,just because the outlet on the fan and filter is a certain size does not mean it is the correct size for the duct work, it is done (built that way) for the reason of something called static pressure , So the installer can determin what static pressure is desired for that certain installation. this would be done by something called transitioning (changing duct size )


let me give you some standard examples of duct size and what they can handle:

6'' round duct = 120 cfm low pressure system 150 cfm at medium or high pressure system
8' 'round duct= 200 cfm '' '' 250cfm '' ''
10'' round duct = 500cfm '' '' 550 cfm '' ''
12'' round duct= 900 cfm '' '' 950 cfm '' ''


So your 449 cfm fan to be at optimal performance should be transitioned to 10'' round duct, but again you wont notice is because you are so oversized ,but your fan again will suffer in this respect.so a speed controller is recommended again.

Ok lets get to the make up air (passive air ) So you see above that a 10 round duct can handle 500 cfm your fan is 449 cfm so any opening that equals 100 square inches would be surfice your case,
so your 2 4'' round passive air intake openings equal about 32 square inches , So you need to add another 68 square inches of passive intake. in your case

In a normal installation the passive opening would be multiplied x 2 this insures for optimal filtered air exchange and quite performance as also duct sizing correctly for quite performance.
His fan is NOT oversized.If he were using it soley for ventilation,sure,maybe,but when using one fan to both cool a light and ventilate you need a larger than normal fan!

Then there are pressure losses from ducting,benfs in ducting,carbon filters,etc.
 

Ou8aCracker2

Well-Known Member
And oversized insulated ducting does three things...

1) Keeps radiant heat of hot exhuast air that travels through the ducting from (that's right) radiating out,further heating the growspace and room the growspace is in.

2) Allows for better airflow because the airflow is less restricted due to a lower velocity.

3) Dampens the noise of air traveling through it.
 

lmnop5092

Active Member
well its colorado and if you guys aren't familiar we have crazy temperature swings, and my buildings heat is pretty retarded i just need like one more wek and temps should start evening out itll probably be 50-mid to high 60s for like 2 more months
 
Top